You won't automate our roles
If we digitize our souls
- Essenger, Empire of Steel
In which 'Red' attempts to explain the Unity basics in a written article - and in doing so, discovers why most people make videos.
introduction
We've been an active VRChat user since July 2022. During that time, we've uploaded avatars based on several bases available for purchase, and hey, that's enough for an absolute basics guide.
This guide is designed as supplemental to VRChat's Creating Your First Avatar guidance. We will structure things a little differently, but we will refer back to VRC's guidance where possible.
what this guide is
This guide is designed for a moderately technical audience who is interested in VRChat but has not set up their own custom avatar.
It is designed to be end-to-end, and is such monolithic. At least for now. We might end up splitting things out later, for readability.
For people who don't know us but have found this guide through a search, hi, we're plural, and as such, this guide will use both "we" and "I" throughout.
❤️ tends to be the only one building avatars, so they're also the one writing most of this guide.
This guide will focus more on the non-Windows side of things, largely because more manual setup is required.
Also because it's the side we use more when uploading; we build our avatars on a Mac and do initial testing in VRChat's desktop mode on a Steam Deck, even if for now we still use Windows for testing in VR.
what this guide is not
It is not a guide on retexturing, custom animations work, making an avatar truly yours.
This is the very basics.
(We may go into how we do retexturing some other time.)
It is not a guide on 3D model creation using Blender (I am not very good with Blender and any guidance I gave there would most likely not be helpful). This guide assumes that you have a base model ready to go.
It does give a basic overview of Unity's UI, but does not cover things such as navigation in the Scene view; largely because I think the default keyboard bindings are different between platforms.
It does not cover uploading for Oculus Meta Quest or the Android client; it covers uploading to the desktop VRChat client. VRChat have their own instructions on building for Quest providing the avatar you're using meets specifications.
This guide is not perfect. I've tried to go from first principles, but I accept that this far on I don't necessarily remember all the places where I stumbled and had to look up YouTube tutorials or ask for help. Additionally, it's... kind of verbose, to say the least. That'll work for some people, but not others.
other guides we've written
These topics aren't covered by this guide:
glossary
See Appendix A.
setting up
all platforms
You need to be at least New User rank within VRChat to be able to upload avatars. Under normal circumstances, you will probably get this with a few hours of active time - go try on some public avatars with a friend.
prerequisites - windows
If you're on Windows, just download the VRChat Creator Companion app. You'll need it anyway, and it'll do a lot of the fiddly bits for you, including downloading the correct version of Unity and setting up template projects.
prerequisites - not windows
Things get a little harder. The Creator Companion is only directly supported on Windows, meaning everything it can do automatically has to be done manually on other platforms.
You will need:
- Unity Hub - used for downloading and launching different versions of Unity.
- VRChat's current required version of Unity, downloaded via Unity Hub. VRChat lists that information here - as of 2023-11-06, that's 2019.4.31f1 - you should check this on VRChat's site as there is an imminent upgrade to Unity 2022 planned.
- The cross-platform .NET 6.0 SDK. I'm on a Mac, so personally installed this via Homebrew; check MS's page or your package manager on Linux.
- The
vpmCLI tool - install as per here after installing the .NET SDK.
optional
I personally like having all my avatars in source control, for which I use git.
If you're not using source control, you should keep regular backups, especially when it comes to updating shaders or the VRChat SDK.
finding an avatar base
This is somewhat out of scope for this guide, but if you're brand new to VRChat, FurHub is an excellent place to try on public bases, usually with a QR code or link to the creator's site to purchase a version you can customize.
Otherwise, searching Gumroad or FurAffinity for bases can often give good results.
ℹ️
info
Just bare in mind that just because it looks good doesn't always mean it'll be the most easy to work with.
For this guide, I'll be using Eligecos's Dragonite, largely because it's available as a free base under Creative Commons and so you can follow along if you want to.
project setup
new project setup - windows
If you're on Windows, I think you just hit new avatar project in the Creator Companion. I have done this step on Windows approximately once.
new project setup - not windows
- Open Unity Hub.
- Choose to create a new project.
- From the New Project dialogue, make sure the Unity version is set correctly as above, choose a new 3D project, and choose a name and location. Uncheck the "Connect to Unity Cloud" box. (Scrolled off screen in this screenshot).
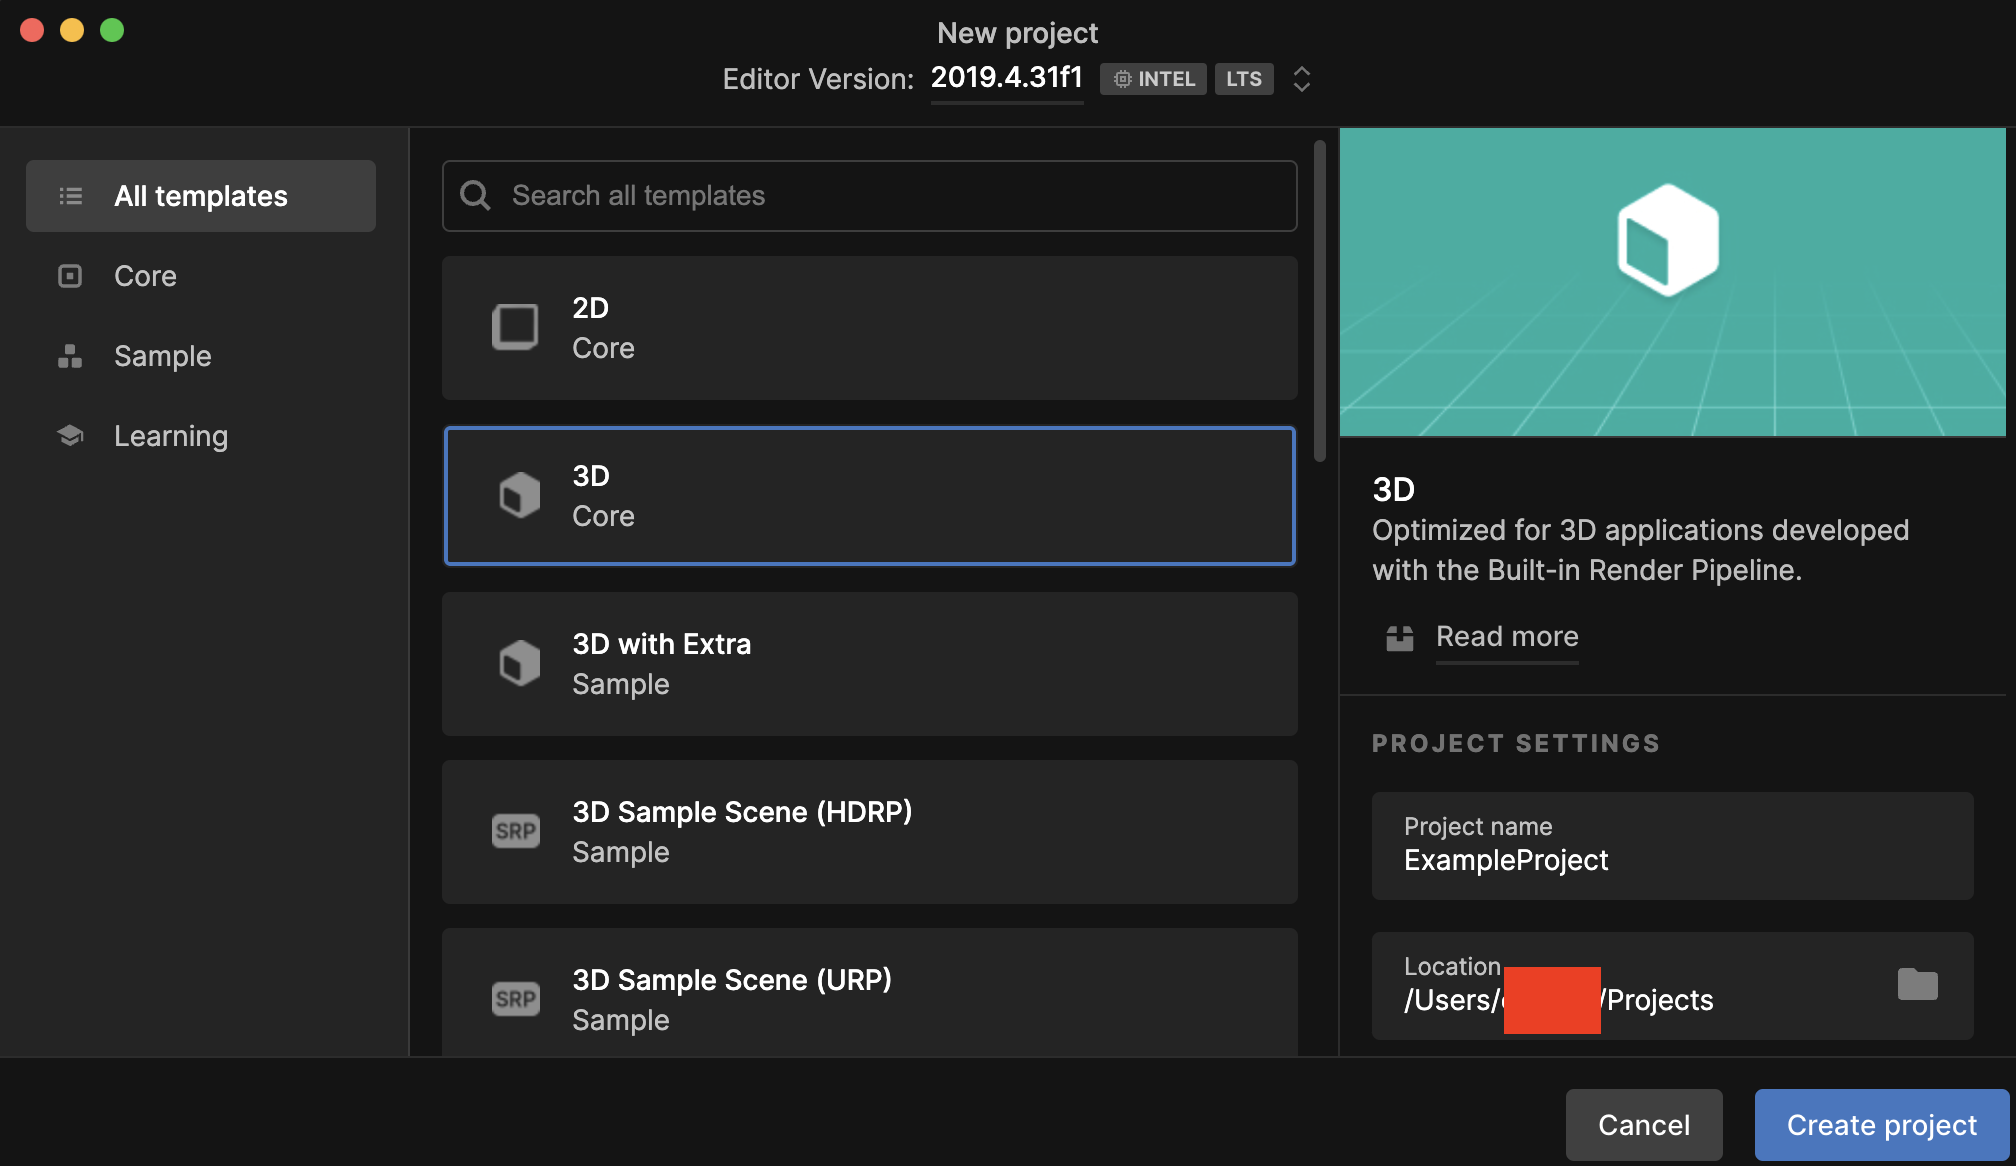
- Click Create project. Wait for it to process
- Save the scene and close Unity.
ℹ️
info
If you're planning on using source control, now is an excellent time to set up your .gitignore (or equivalent) and initialize the repo.
VRChat has some recommendations on the use of source control here, including some default exclusions for Unity.
vpm
Open a terminal window, and cd to the directory your project was created in.
cd ~/Projects/ExampleProjectRun the following command to add the VRChat Avatars SDK to your project.
vpm add package com.vrchat.avatars
To update the packages in future, just follow these instructions again (making a backup or commit first, of course)
For more information on additional packages, see Appendix B.
premade unity projects
Some bases will be distributed as premade Unity projects (including the Dragonite base). Creators aren't technically meant to do this; VRChat specifies that only they're meant to distribute the SDK - and the version of the SDK these come with is likely to be very out of date and not support e.g. multi-factor authentication.
They may also cause a ton of errors depending on platform; on MacOS Sonoma 14.0, the Dragonite project will have a bunch of errors about a component of the Oculus SDK when first opening it. Just hit the cancel button enough times and it'll eventually open.
adding to unity hub
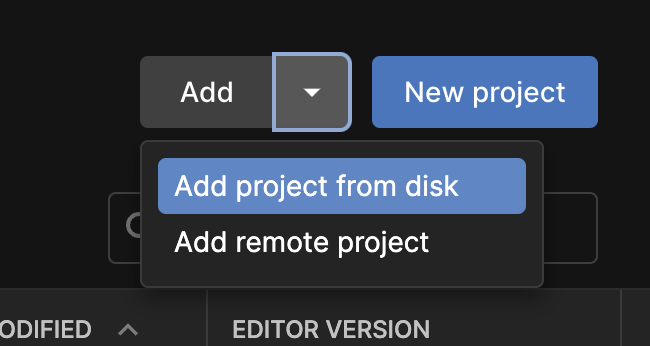
These can be added to Unity Hub using the Add > Add project from disk option.
upgrading a premade project
- On Windows, to upgrade the project's version of the VRChat SDK, I believe there's an upgrade button somewhere in the Creator Companion.
- On not-Windows, follow the instructions in the VPM section, which work for upgrading the VRChat SDK as well as the initial install.
Other components are also pretty likely to be out of date as well. Caution is advised when updating them; for example, updating the version of the Poiyomi shaders used might result in the materials changing to a bright purple when unlocked. Take backups or make a commit before updating anything important for your model. See Appendix C below for some idea on fixing these.
checking the sdk
If it was closed, re-open your project in Unity, and check that the VRChat SDK option is now present in the menu, and that it has more options than just Reload SDK.
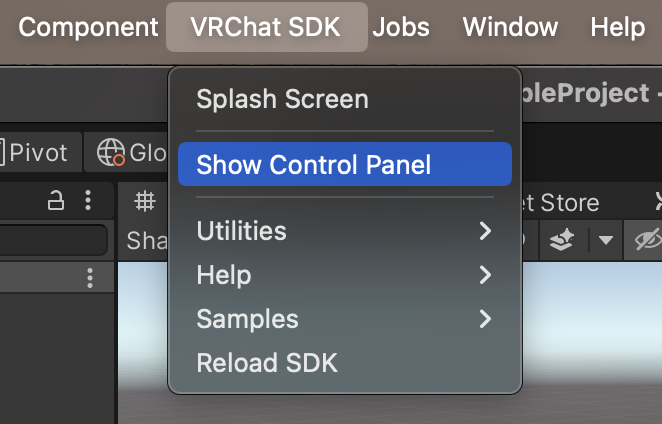
You may wish to Show Control Panel now - otherwise you'll need to do that when it comes to uploading.
ℹ️
info
If it only has the Reload SDK option, and the error window on the bottom left has errors about how it was unable to generate the UI for the VRCSDK, close Unity, go into your project folder > Packages, and delete manifest.json, and load your project back up. It'll recreate this file on load and should then work - for some reason during the initial setup this sometimes has no dependencies set.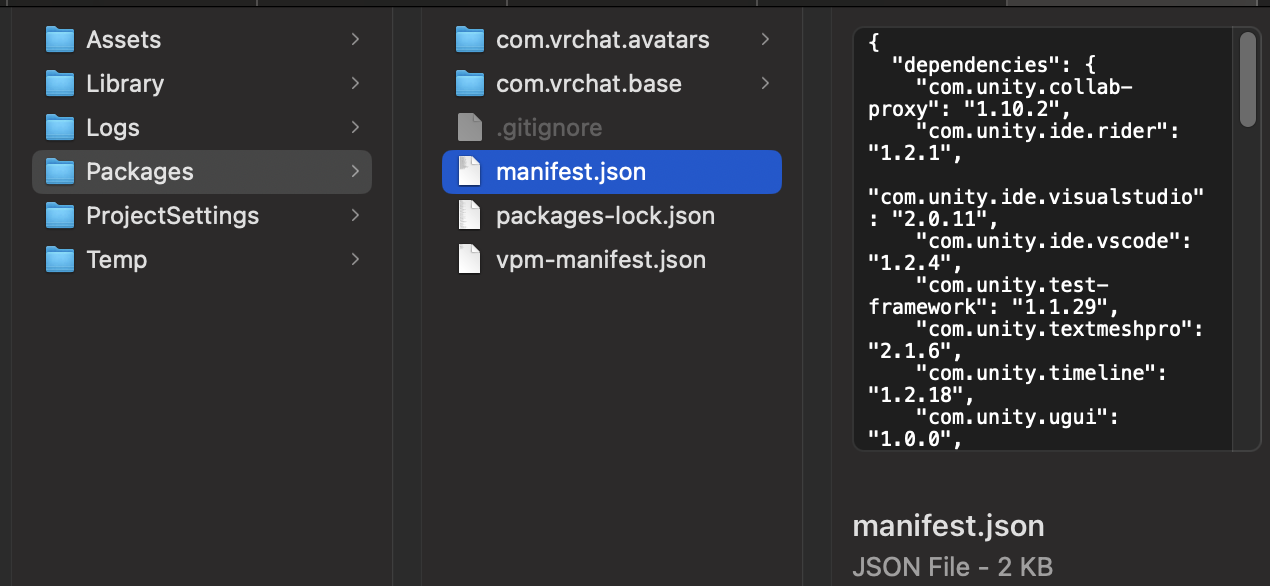
avatar setup
This is the point where things fully diverge as every avatar is going to have different setup instructions. This is the point where you should check the README file, if you haven't already.
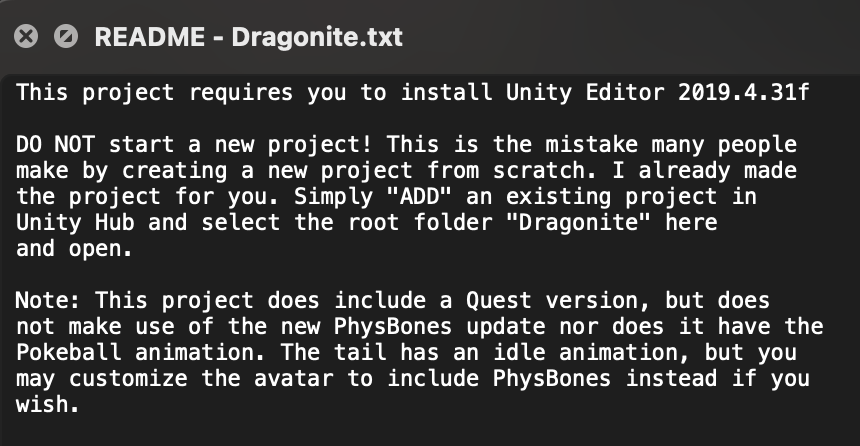
For example, some avatars will come with the Poiyomi shaders already installed, while some will need them to be downloaded separately.
Some may require the use of VRCFury.
So, some general tips.
unity ui
If you've not used Unity before, some crucial UI elements to know about:
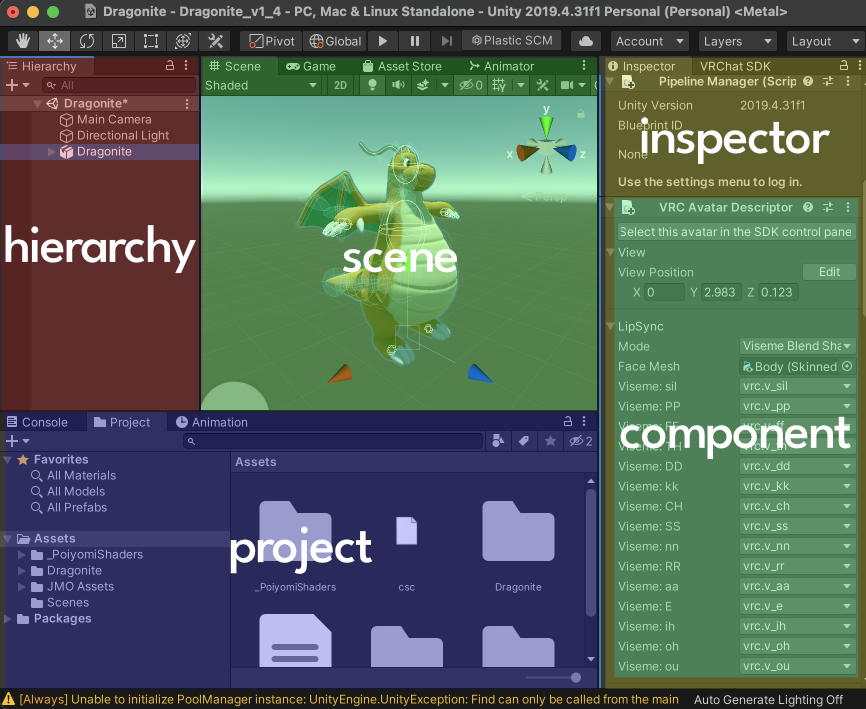
- The Scene view. This can be considered your main canvas. You can drag and drop elements from the Project tab to here.
- The Hierarchy tab. This shows the elements currently in this scene.
- This is where you would go for selecting submeshes of avatars, or specific bones in the model's armature.
- The Project tab - this functions as your file browser for files currently within your Project directory.
- The Inspector tab - this allows you to change the properties or parameters of the currently selected object.
- It also allows for the addition of Components - which are a collection of properties for one specific purpose. Various things in VRChat (such as physbones) require the addition of a component. To add a new component, scroll to the bottom of the Inspector and click the Add Component button, and choose the component you need from the list.
types of downloads
prebuilt projects
See Premade Unity Projects above.
.unitypackage
If you have a .unitypackage, it's usually best to go to Assets > Import Package > Custom Package - particularly on Mac, double clicking or drag and dropping may not work the way you'd like.
.unitypackage files may include the use of different Unity scenes, and may also include shaders and other addons.
If the .unitypackage does not contain a scene, you may need to manually drag the model into the scene from the Projects tab.
fbx
If your model is in FBX format, drag it to the Project tab to import it into your Project, and then drag it from there into your scene view.
If you then click on your model in either the Scene or Hierarchy tab, you should then use the Transform component in the Inspector to position it at 0, 0, 0.
As the FBX contains just the model itself, it likely means that the VRC Avatar Descriptor Component is not present. Follow VRChat's instructions here for setting that up. This may need further tweaks - if for example, the hand positions need tweaking.
fixes
For some common problems, see Appendix C.
afterwards
Now's your opportunity to actually customize things. There are a whole lot of things you can do. You might choose to change the textures to make the base more reflect your fursona, you might change the shader so you look like you're made of goo, you might add props... but this isn't an avatar customization guide.
actually upload the avatar already
OK, OK, OK.
If there isn't a window or tab with the VRChat SDK, in the menu, go to VRChat SDK > Show Control Panel. (See Checking the SDK if needed!)
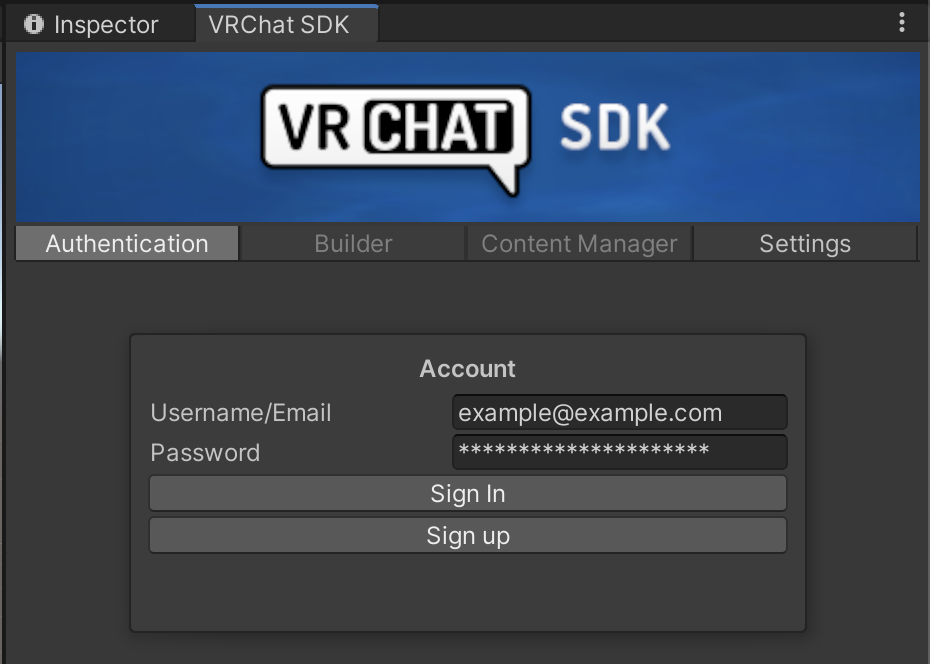
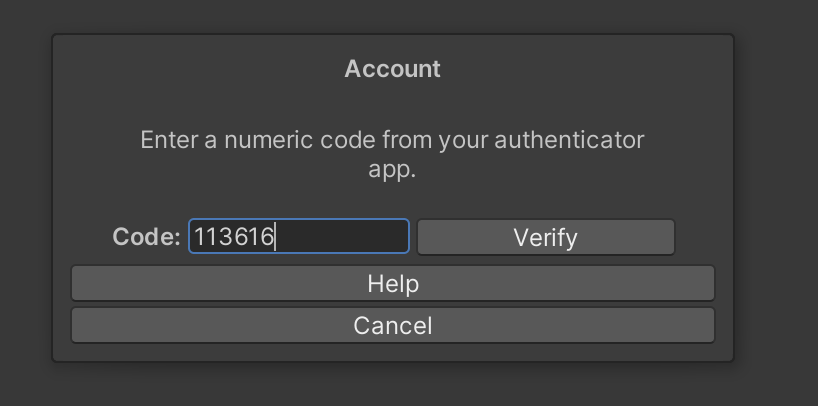
logging in
You will be prompted to sign in to your VRChat account. Enter your username and password. If multi-factor authentication is set up, you'll be prompted to enter your code as well.
building
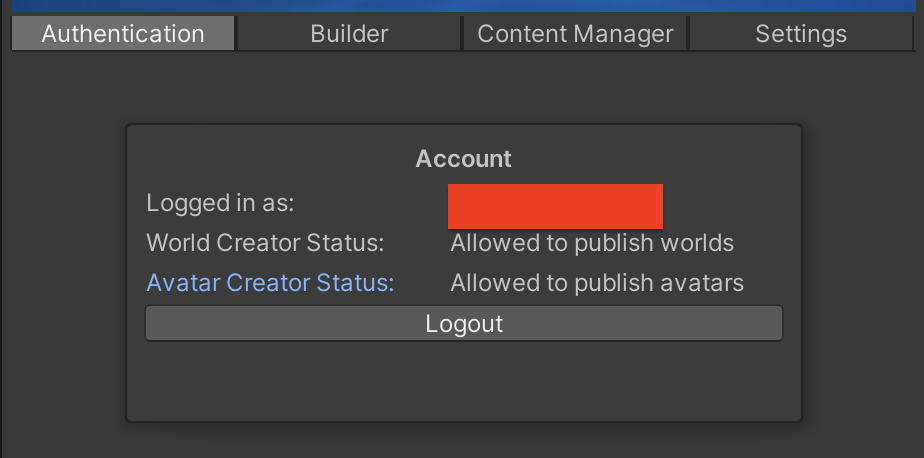
Before you can upload, you'll need to fill in some details about the avatar on the Builder tab of the SDK.
avatar info
- If there are multiple avatars in the scene, you'll need to select the one you want to use.
- Usually I like to disable other avatars in the scene to reduce the risk of accidentally selecting the wrong one. This can be done by selecting the avatar in the Hierarchy, and clicking the checkbox at the top of the Inspector.
- The first time you upload, you'll need to fill in a Name, Description, and add a thumbnail. I like to give credit to the author of the base so other people can go find it if they want to.
- Visibility should usually be set to Private to prevent other people from using the avatar. The only exceptions to this are if the base creator has explicitly allowed it, and you're OK with people using your work as well.

ℹ️
info
If your Builder tab doesn't look like this, you might need to update the SDK.
validations
Scrolling down the Builder tab, there's the Validations section. This relates to VRChat's Performance Ranks system, and will also tell you if there are any errors or warnings. If an automatic fix is available, click the Auto Fix button to try and resolve.
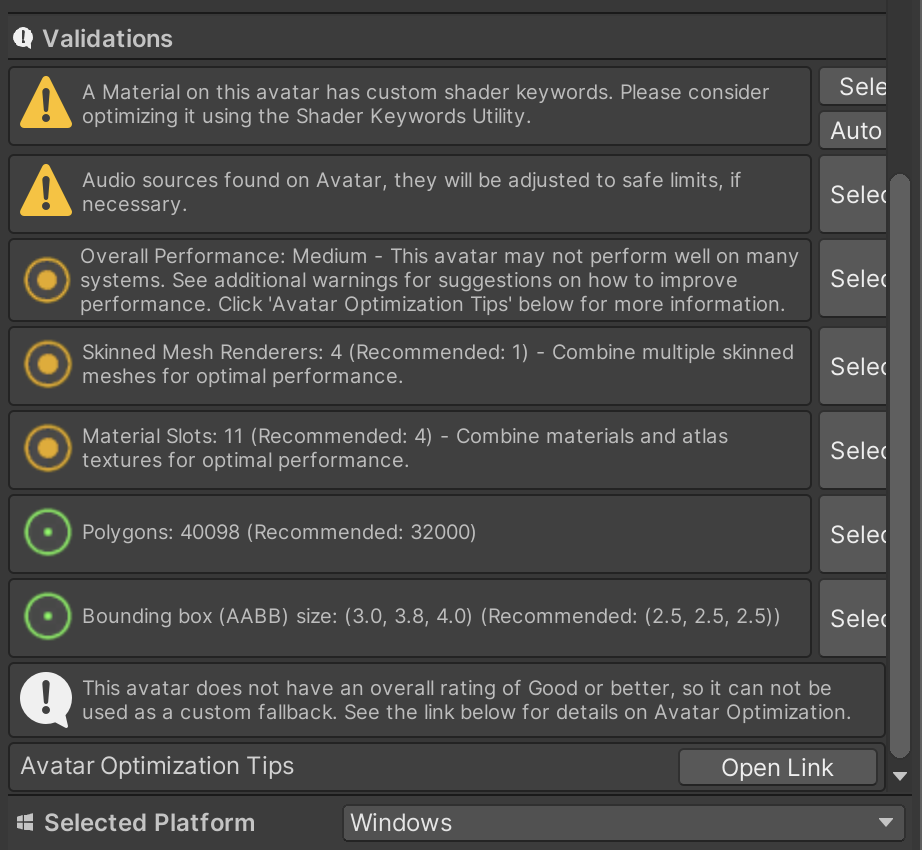
After all validation checks have passed, click the button affirming that you have permission to upload.
build
Leave selected platform as Windows for your first upload. If your base supports a Quest version, here is where you would go to upload that - but again, this is out of scope.
If you're on not-Windows, click Build & Publish, and then if necessary swap to whatever device can load VRChat and check your new avatar works in game.
If you're on Windows, you also have the option to Build & Test. This will create a local only version of your avatar. You can then load VRChat and confirm everything works, before coming back to do the actual upload so everyone else can see it.
final thoughts
Thank you for making it to the end, and hopefully some part of this was useful (and we haven't scared you off)! There's a lot here, but the more you do this, the more things fade into muscle memory.
This guide began because a friend complained about the lack of written guides for doing so.
After writing it, I can kind of understand why; there's a lot that can be a quick little aside in a video that needs expansion in text.
asides and appendices
appendix a - glossary
Some terminology that will be used throughout this guide.
general
Armature : A model's skeleton. Models are made up of a collection of bones - which are transformed or rotated to create movement or animations.
Base : A prebuilt 3D model - downloaded, bought or purchased.
Rig
: Broadly interchangable with armature, but the armature is a property of the model, while how the armature is rigged is a function of the application.
For example, if two models have the same armature, but the bones are named differently, Unity may interpret one as a "Humanoid" rig and the other as a "Generic" rig, even though their structure is identical and the armature can be navigated the same way in the Hierarchy tab.
unity
Component
: A piece of code that can be attached to different objects within the Inspector.
Every avatar must contain at the very least a VRC Avatar Descriptor Component on the root node of the avatar. VRChat will not allow an upload without this.
Inspector : See Unity UI.
Material
: A file with a .mat extension containing information about e.g. a model's textures and shader settings.
Project
: A folder containing all Unity files for a specific application, openable via Unity Hub. It represents a separation boundary; files from one project cannot be used in another without duplicating them.
Generally in our case, a new project per avatar is cleaner.
Scene
: Scenes are a way to separate collections of assets within a Unity project - for example, in a regular Unity developed game, you might split individual levels into scenes. Any scene can use any file from the Project.
There is less need for them when creating VRChat avatars and you may only end up with just the default SampleScene, but some bases might include their own scene and may or may not switch to it.
Shader
: A piece of code that defines properties for how the model should be displayed in-game. This includes textures that might be used for specific purposes.
For example, a shader might allow you to select a texture which controls which parts of the avatar will light up a dark room.
Unity
: A game development engine, the one powering VRChat.
In this context when referring to Unity, it refers to the Unity development environment.
Unity Hub : A launcher application that can manage multiple versions of the Unity development environment.
vrchat
PhysBone(s)
: A VRChat specific component attached to the bone of an armature, providing physics to everything connected to that bone. Allows for the bone (and the child bones connected to it) to be grabbed, squashed, stretched, to have gravity, etc. depending on what parameters are set.
This could be used for hair to act realistically or for a tail to bounce up and down when moving around, as an example.
The VRChat specific implementation of a paid component from the Unity Asset Store called Dynamic Bones - older bases may still refer to needing Dynamic Bones. VRChat should convert Dynamic Bones on upload, due to PhysBones being much more performant within VRChat.
VPM : The VRChat Package Manager, a tool used for managing the installation of packages related to VRChat.
VRChat Creator Companion (VCC) : A Windows only companion app that performs the same functions as VPM along with also automating other tasks relating to the creation of Unity projects.
VRChat SDK : The software allowing for uploads to VRChat, which can be installed via VPM or VCC.
appendix b - additional vpm packages
Additional VPM packages are available from VPM package repositories. VRChat's official package repository is here for listings of other things that can be installed in this way.
You may also choose to add community packages to your project, such as AudioLink for making your avatar audio reactive.
VRChat curates a repo of these community packages here. This repo is also built in to vpm, so if they're in this repo, you can install those the same way.
vpm add package com.llealloo.audiolinkOther packages may need the addition of a repository run by the project's creator.
appendix c - common fixes
fixing the rig
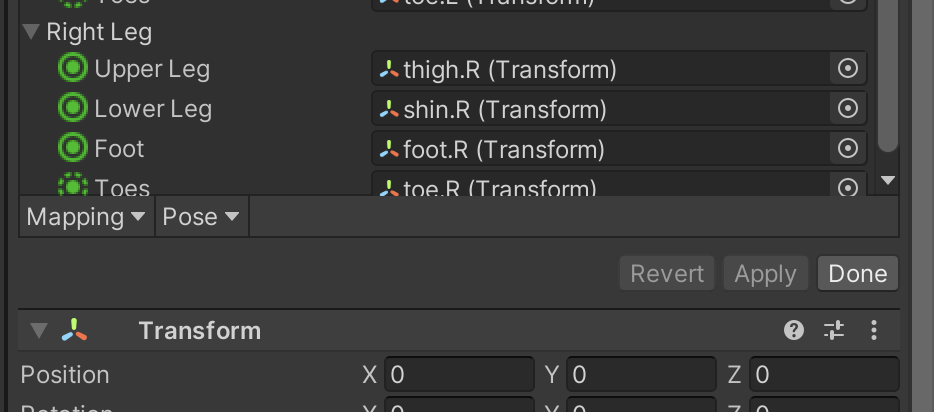
If your avatar is supposed to be rigged as a Humanoid character, it is possible for Unity to fail to recognize certain bone names from Blender (or whatever other 3D modelling application was used).
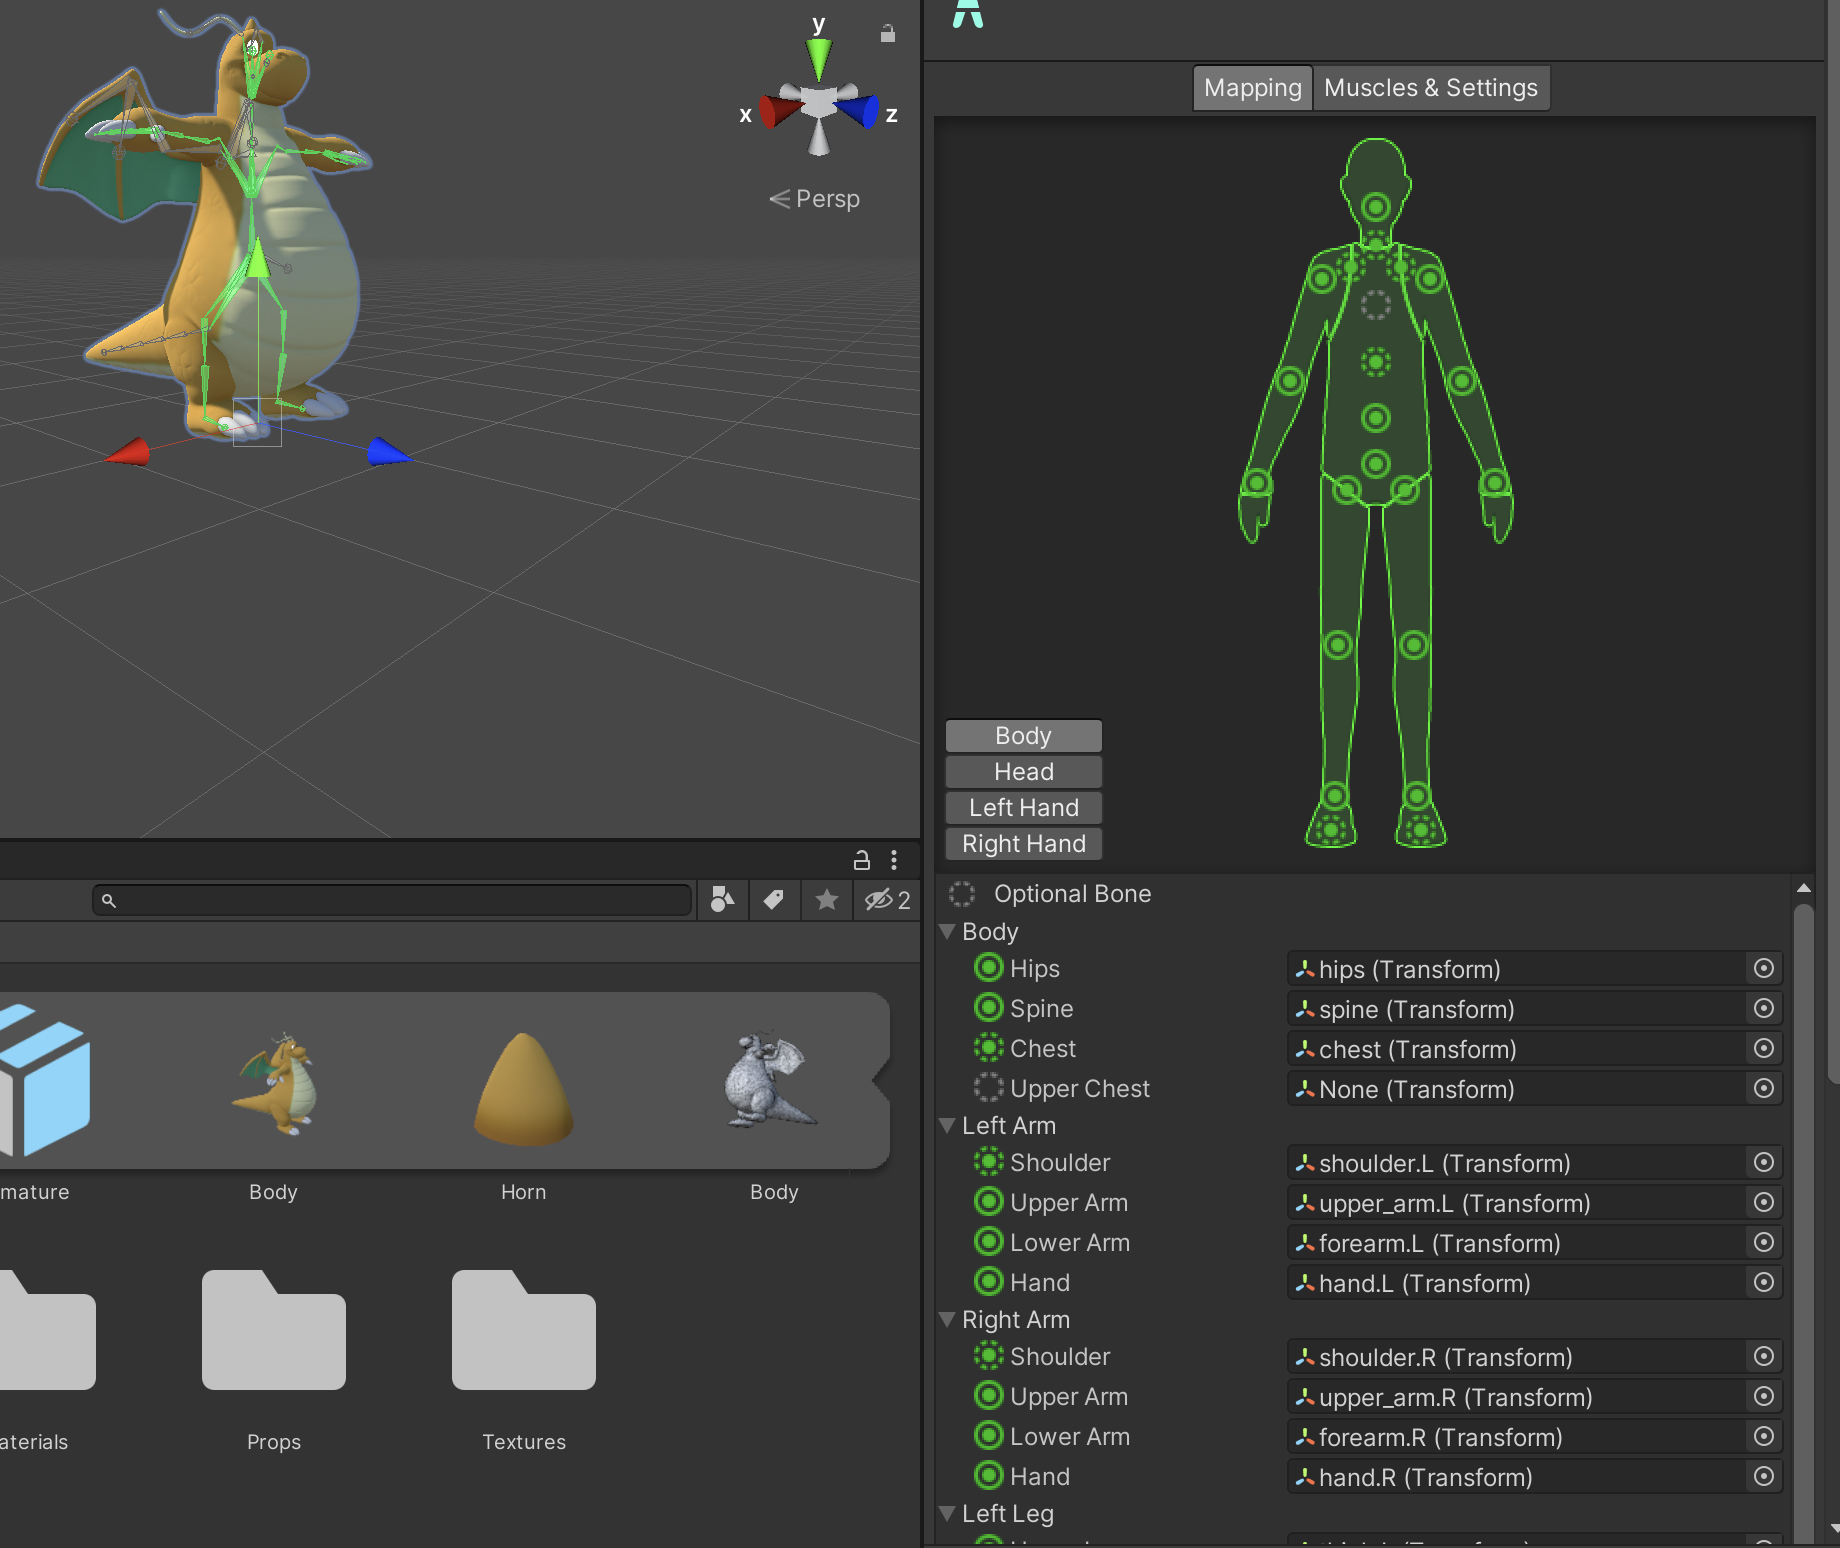
To fix this, click on your model within the Project tab - then on the Rig tab, click on the Configure button next to Humanoid.
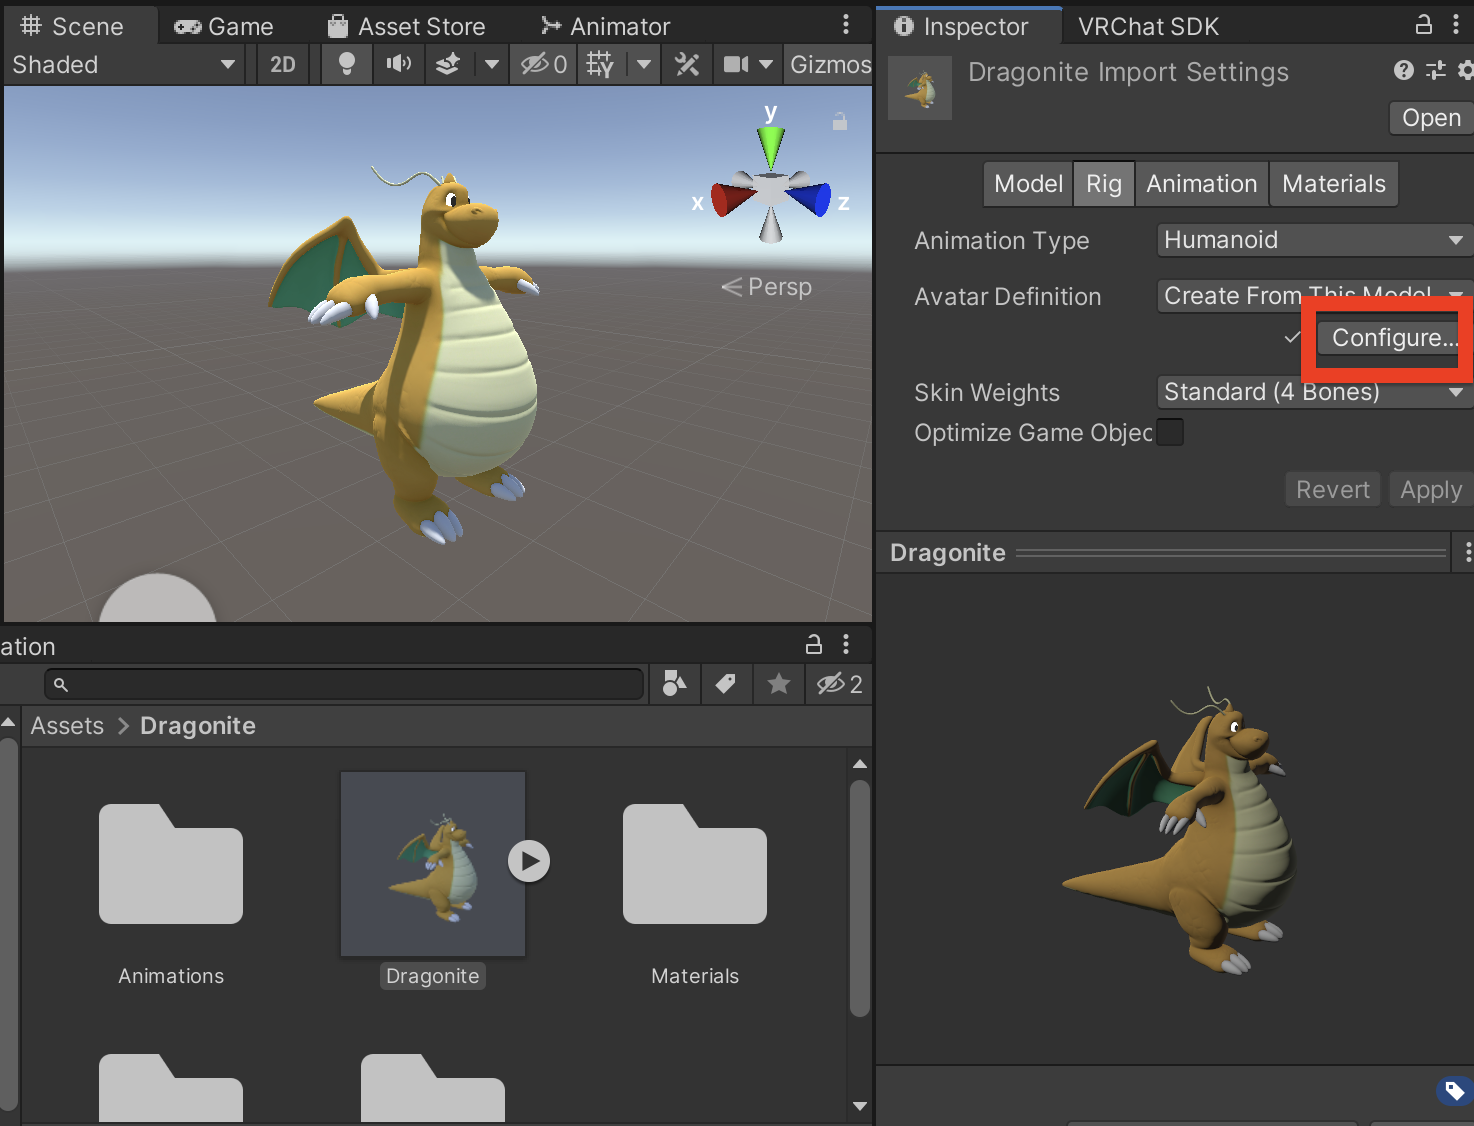
This will take you to a temporary scene with a menu in the Inspector to assign the bones correctly. Once done, scroll down in the Inspector window and select the Done key to return to your main scene.
fixing the materials
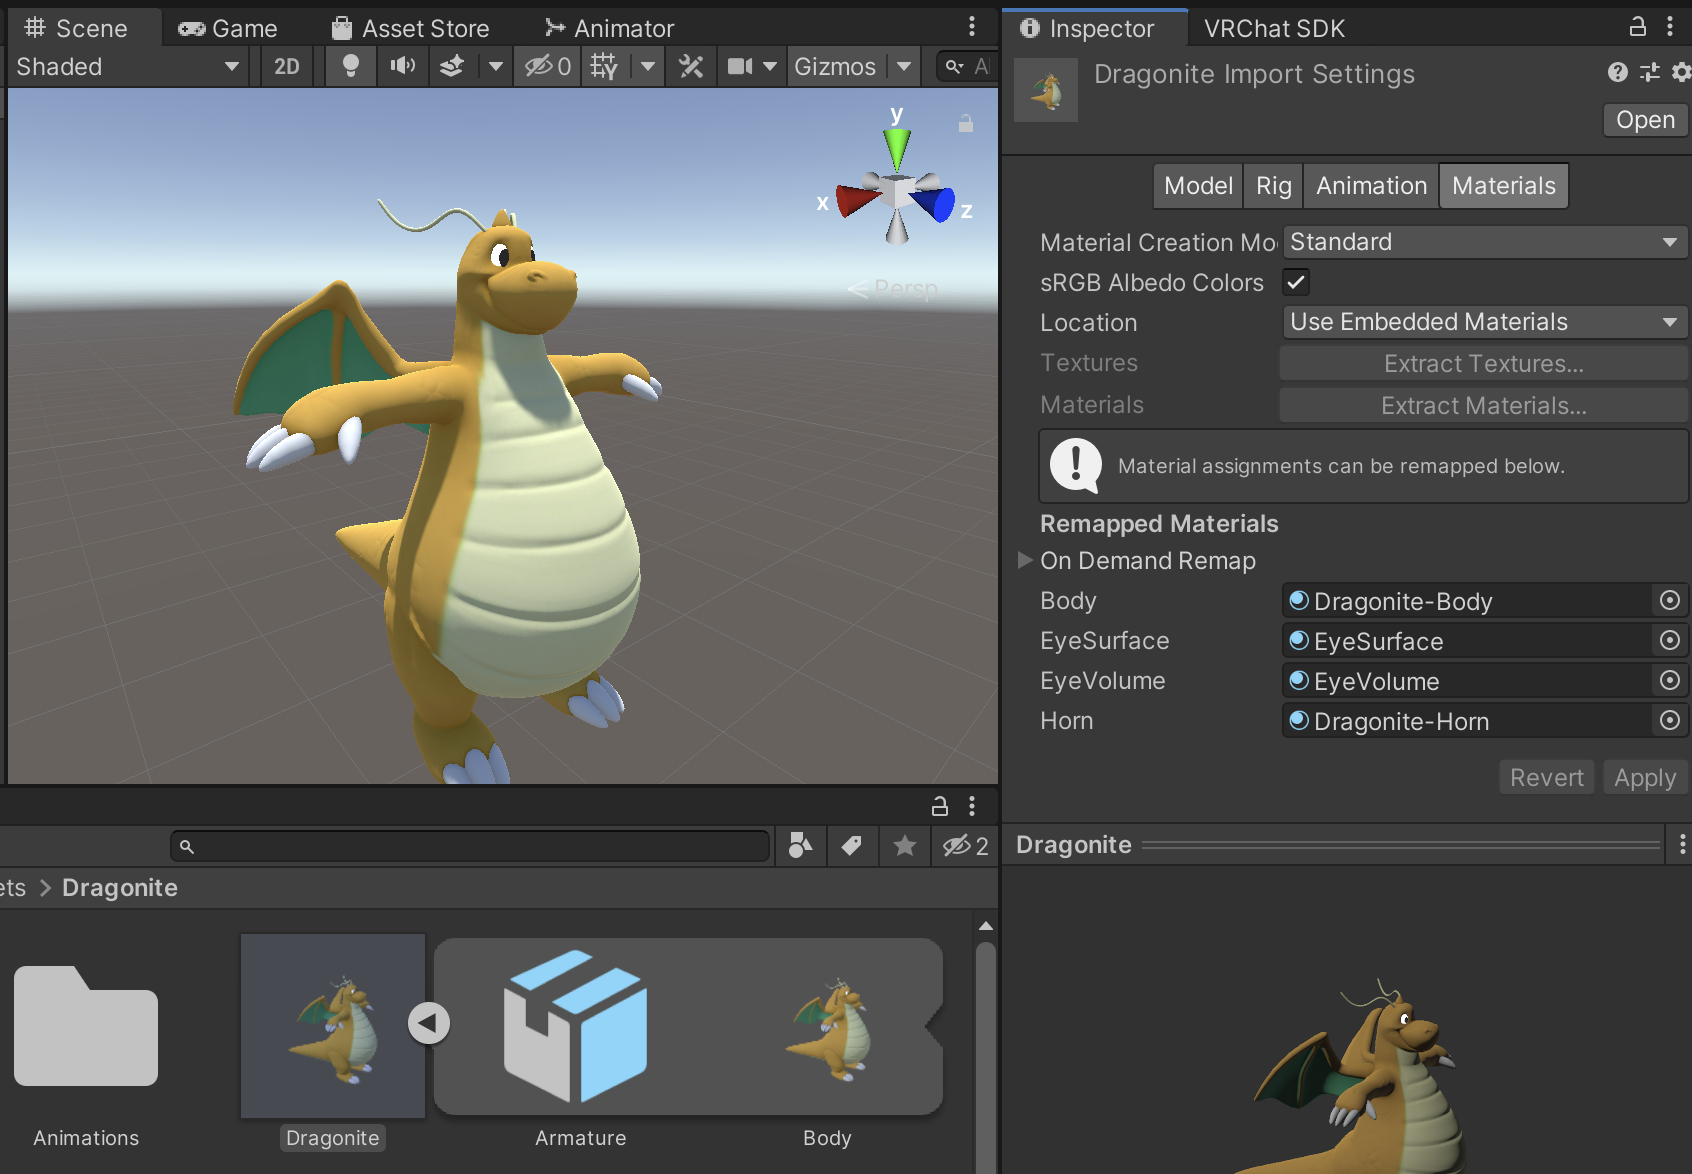
When importing there is a chance that the material will show up as either blank or a vivid purple colour.
blank
The blank represents that Unity hasn't been able to properly assign the materials.
Find your model in the Project tab, Inspector, Materials - and from there you can extract or override the materials. (In the Dragonite's case, the extract option is greyed out as they've already been extracted)
purple
This indicates there's been an error in applying the shader. The main reason I run into it is due to an old version of the Poiyomi shader being supplied and then updating it.
Usually, changing the shader to use a valid shader is enough to fix this, though with Poiyomi it is worth checking that all textures that have been set up have been maintained.
checking and fixing the scale
This is more likely to be a problem with imported FBX models than ones packaged as a .unitypackage - depending on export settings, it is possible for imported models to end up as orders of magnitude incorrect.
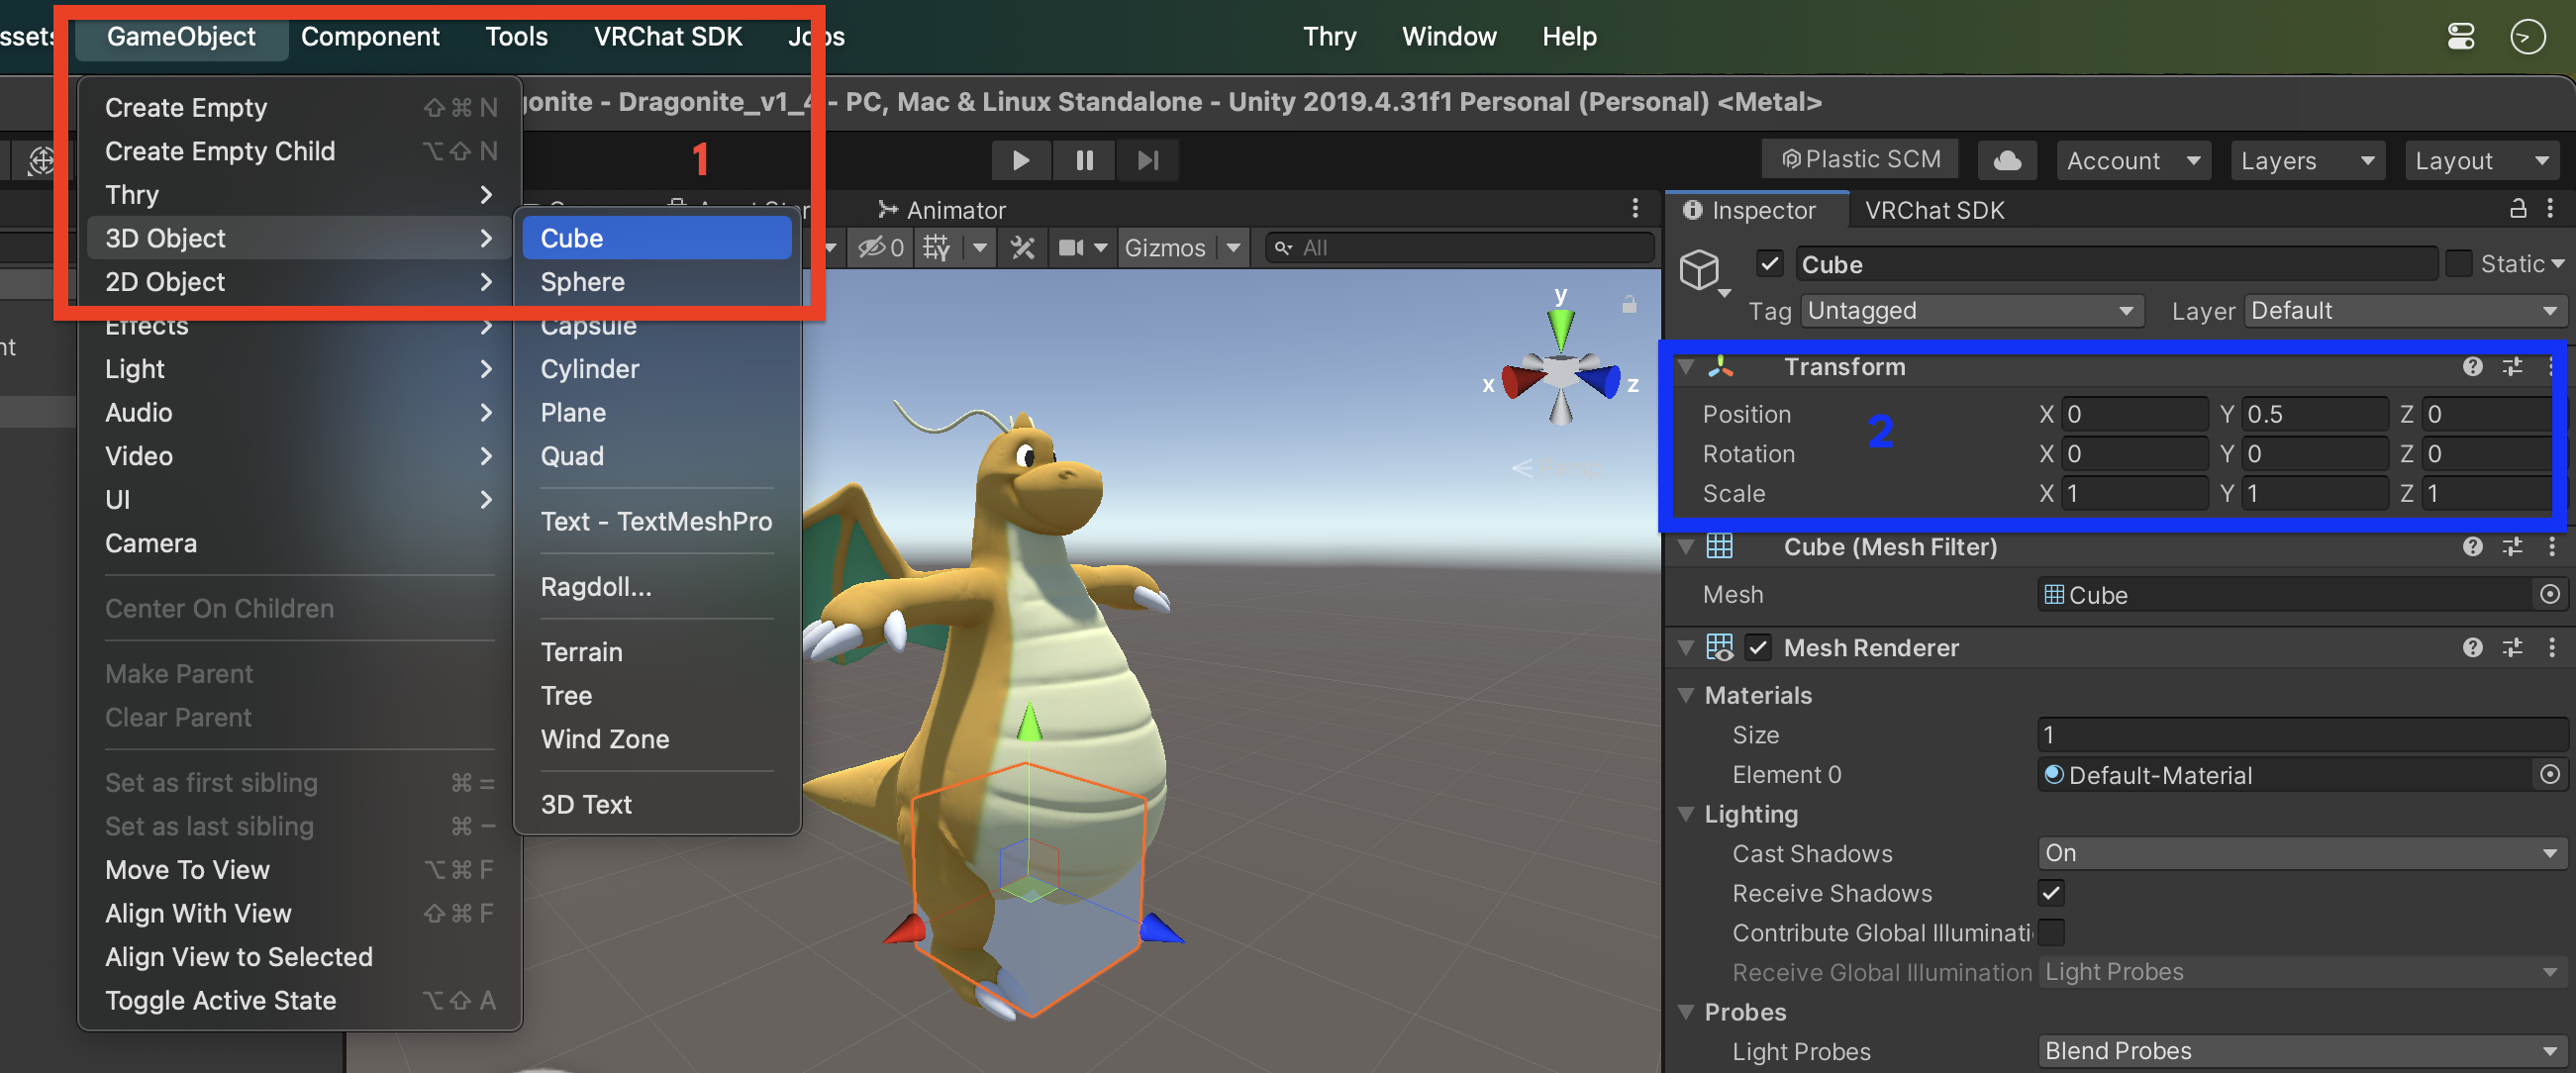
To check your current scale, you can spawn a cube from GameObject > 3D Object > Cube.
This will spawn a cube with the default dimensions of 1 Unity unit in each axis. VRChat will interpret these units as metres.
Use the Transform component of the cube to move it to position 0, 0.5, 0 - the co-ordinates are for the centre of the cube, so this will place the bottom of the cube on the floor. If your model is too big or too small in comparison to the cube, select it and adjust the scale.
⚠️
warning
If you need to rescale your avatar and have already set up the VRC Avatar Descriptor component, check your eye position in the VRC Avatar Descriptor is still correct.
Right click on the Cube in the Hierarchy and delete it when you're finished with it.
other errors
The VRChat SDK is usually pretty good about telling you if there's something else that might cause a problem. In a lot of cases, there will be an autofix option.
changelog
2023-11-06 : first draft.
2023-11-06 - 2023-11-09 : a number of fixes and improvements, plus a lot of site functionality to get things looking the way we'd like.
2023-11-09 : first public version.
2023-11-10
: glossary - expanded armature and rig, added physbones.
also, added changelog.