Ooh, let me in or I'll get phys-i-cal, with you
I just gotta dance right now, it's critical to do
- Studio Killers, Ode to the Bouncer
Because if you're going to dance the night away, you've gotta be you.
⚠️
warning
This page has an animated background.
It can be toggled off with your device or browser's 'reduce motion' setting, if needed.
introduction
Synth Riders is a VR rhythm action game, where you have to hit the coloured balls flying at you. Among the other customization and mod opportunities it presents, it also lets you use models in VRM format to represent yourself in game.
vrm? wasn't that the standard for making 3D websites back in the day?
No, that was VRML.
VRM is a standardized format for humanoid avatars. It's supported by a number of VTuber applications, including VSeeFace and Liv.
It combines model, textures and materials into one file which you can theoretically drop into any VRM supported applications. This comes at the expense of flexibility in other areas; for example, in comparison to a standard VRChat model, you are restricted with your choice of shader.
VRM avatars are also automatically scaled, which may be a problem for some that find species euphoria in just being a Little Creature.
There are two branches of the VRM package available, known as 1.x and 0.x. Synth Riders only uses 0.x, and attempting to load a 1.x package there will cause problems (or at least, did the last time we tried).
about this guide
This guide covers the conversion of a working humanoid VRChat avatar to VRM 0.x format for use in Synth Riders.
It is intended as a companion to the previous post, and as such, Unity basics covered in that post will not be covered again here. (But maybe we should make the glossary section its own post, or something?)
This guide is a partial adaptation of Kaideart's video tutorial on converting avatars for VSeeFace. If you're using it optimally, VSeeFace ideally needs some additional VRM blend shapes for making faces that VRChat and Synth Riders do not.
This guide will not cover the addition of those blend shapes - it will however cover the use of adding springbones (the VRM equivalent to PhysBones/Dynamic Bones), because the ability to shake your tail is important.
Additionally, there are some asides based on Pawperty Damage. These asides are based on the official custom character guide, and are non-comprehensive - you should go read that guide if Pawperty Damage is your end goal. This guide may still give greater grounding for some things.
What you'll need
- Unity Hub - for managing Unity projects and installed versions.
- The latest Unity 2021.3 LTS release, downloadable via Unity Hub. As of 2023-11-29, that's Unity 2021.3.33f1.
- Working VRChat Humanoid model, built with Unity 2019.4.31f1
- The latest UniVRM 0.x package, downloadable from here
For this guide, I'll be using A.T.H.E.N.A., our Mamagen - using Ghostly's Mamagen base (NSFW). Xyr a pretty good fit for Synth Riders!
round 1 - starting off
projecting
I don't recommend building in the project you're actively using for VRChat - particularly with the mismatch in versions.
The easiest way to get started is to copy and paste your project to a new location. This isn't the 100% cleanest approach since it will include a lot of things that Synth Riders doesn't need, but it is simpler to get start with than creating a new project and manually copying things over. It also makes it a lot easier to reference components - e.g. where your PhysBones are for setting up springbones.
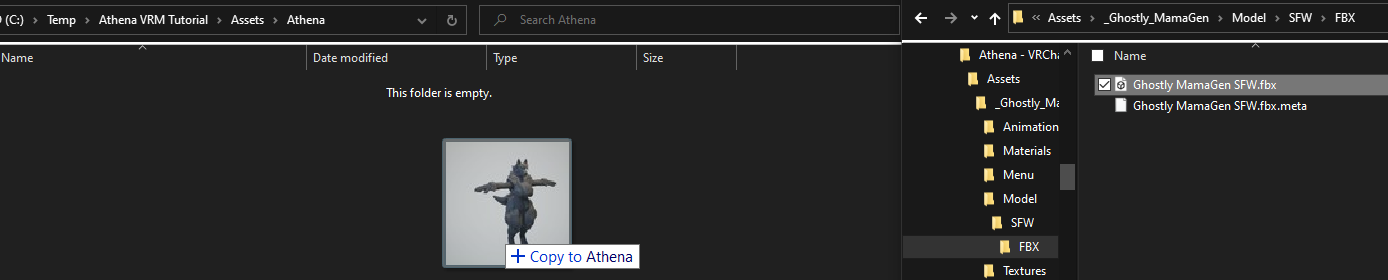
Find your project folder in your file manager (Windows Explorer/Finder/etc.), and copy it to a different location. I like doing this in a location far away from my source project - for example, on Windows, source project files within my directory within Users, this project in C:\Temp.
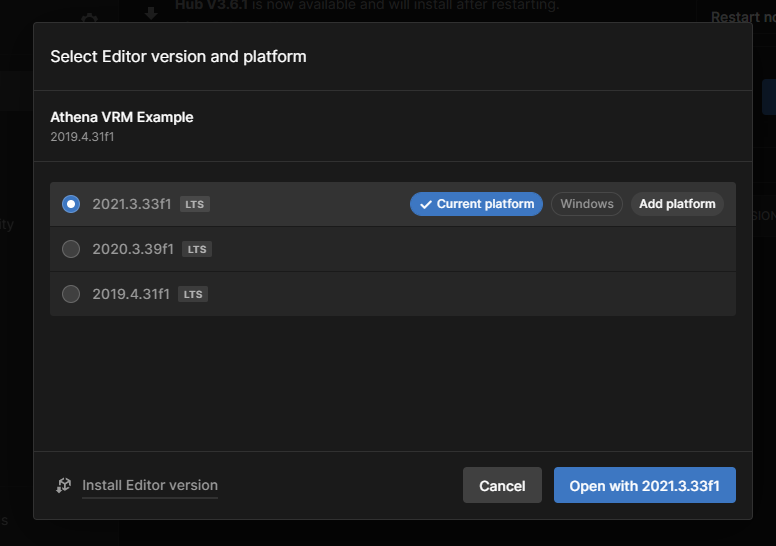
In Unity Hub, go to add project from disk, add the new project, and then click on the Editor Version. In the window that pops up, change to the 2021.3 version, and then click the button at the bottom to open the project.

Hit Continue or Confirm on any dialogue boxes that pop up. You will get some warnings about VRChat scripts, you're OK to hit Convert or Ignore on these as well (after all, we won't be using them).
💡
tip
If you've chosen to create a new project, go to the new project screen, and make sure the Unity 2021.3 version is selected when doing so.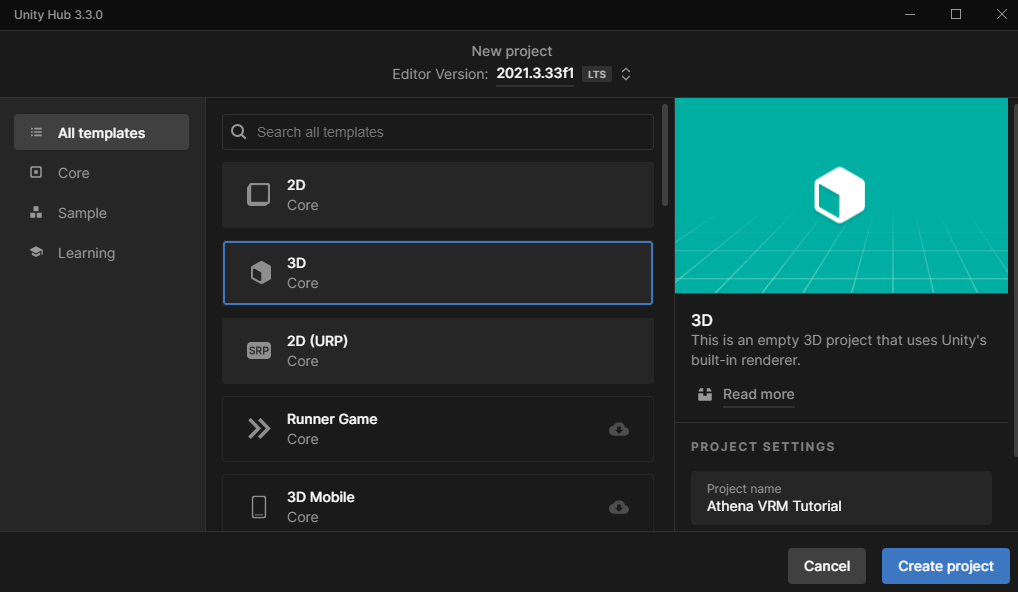
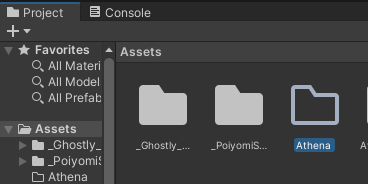
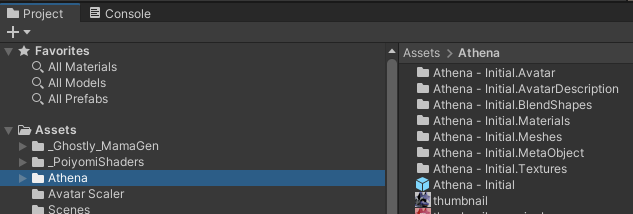
Inside your new project, create a folder for your character (this will be important later). If you already have a Character Name folder, call this one Character Name VRM.
Import the VRM 0.x .unitypackage using Assets > Import Package > Custom Package, and then navigate to where you downloaded the file to. Import all assets.
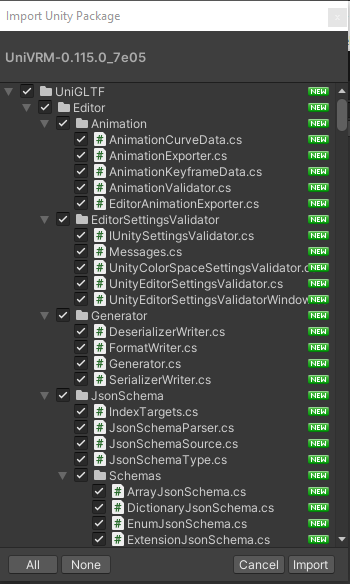
If prompted, hit Accept All and Use Recommended on the dialogues.
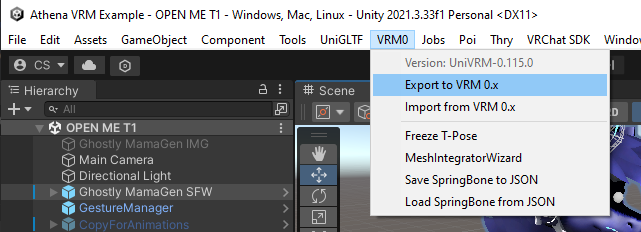
You should now see a VRM0 option in your menu bar. (If this doesn't appear, save the scene and restart Unity).
for new projects only
If you started a new project, copy and paste your model (.FBX file), materials, and textures into the character folder created before.
ℹ️
info
If you only want your default appearance, you only need to copy that set of materials and textures. Creating multiple skins means a new VRM for each one, though you can just drag a new material + export again rather than having to go through the whole VRM export process.
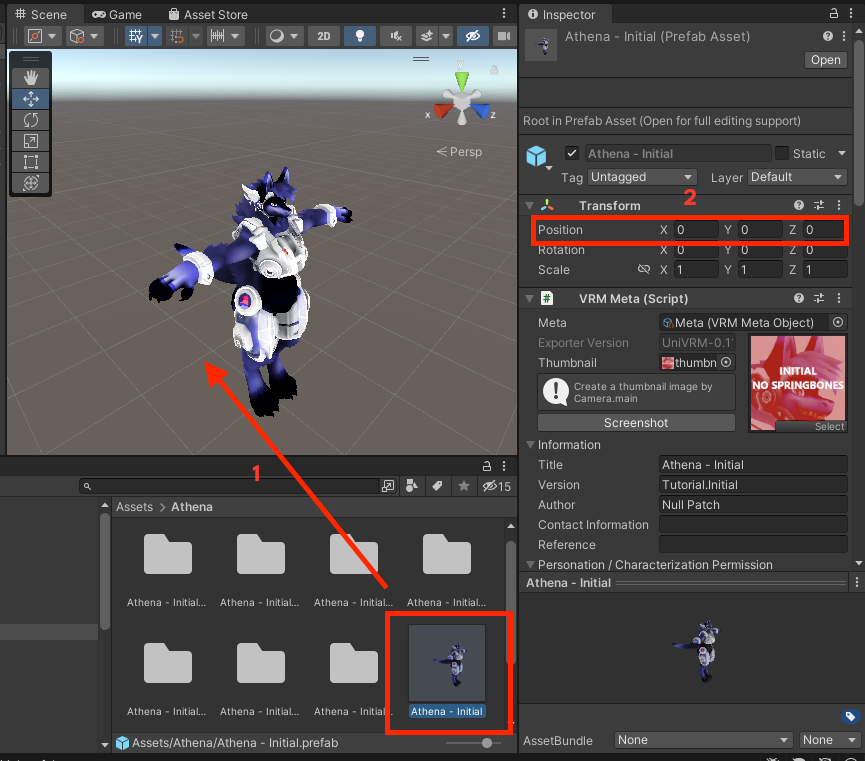
Drag your model from the Project tab into the Scene - then reposition at 0,0,0.
Don't worry too much about issues with the materials for now, we'll fix them up in a few minutes.
model configuration
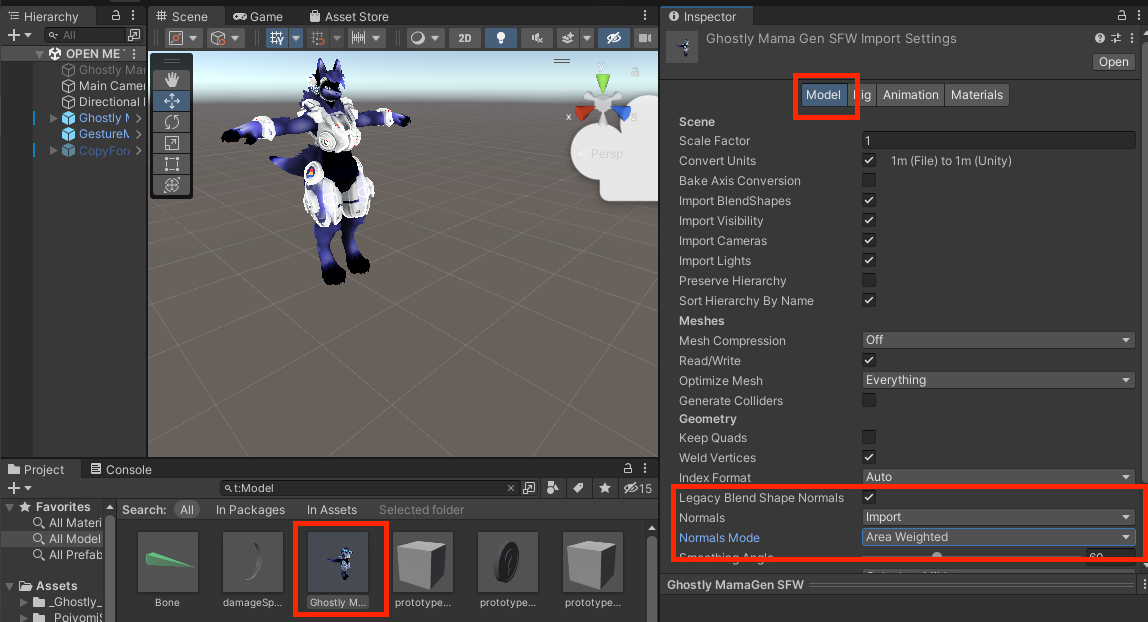
Click on your model file in the Project tab - you should be able to find this using the All Models favourite search if you need to.
models tab
On the Models tab in the Inspector, make sure "Legacy Blend Shape Normals" is selected, and then change Normals mode to Area Weighted.
rig tab
On the Rig tab, if it isn't already set as Humanoid, change it to Humanoid and then go to Configure to assign the bones. (There's more advice on doing that in the previous post)
If any bones aren't where they shouldn't be, remove them.
ℹ️
info
If you are following this guide for vtubing instead of/as well as Synth Riders - if your model has the recommended VRM face blend shapes set up, you may also want to remove the eye bones here to configure eye movement to use blend shapes later.
For Synth Riders, I don't think it's doing anything with facial animation.
living in a material world
We now need to convert the materials used into VRM format. Depending on the number of materials used, this may be doable with the All Materials favourite search.
💡
tip
If you started a new project, you may need to re-export materials - which can be done on the Materials tab of the Inspector with your FBX selected in the Project tab.
Otherwise, open up your model's hierarchy, and click on your mesh. If you scroll down, you should see your materials listed in the Inspector. Click on a material to locate it in the Project tab, and then click on it in the Project tab to open it in the Inspector.
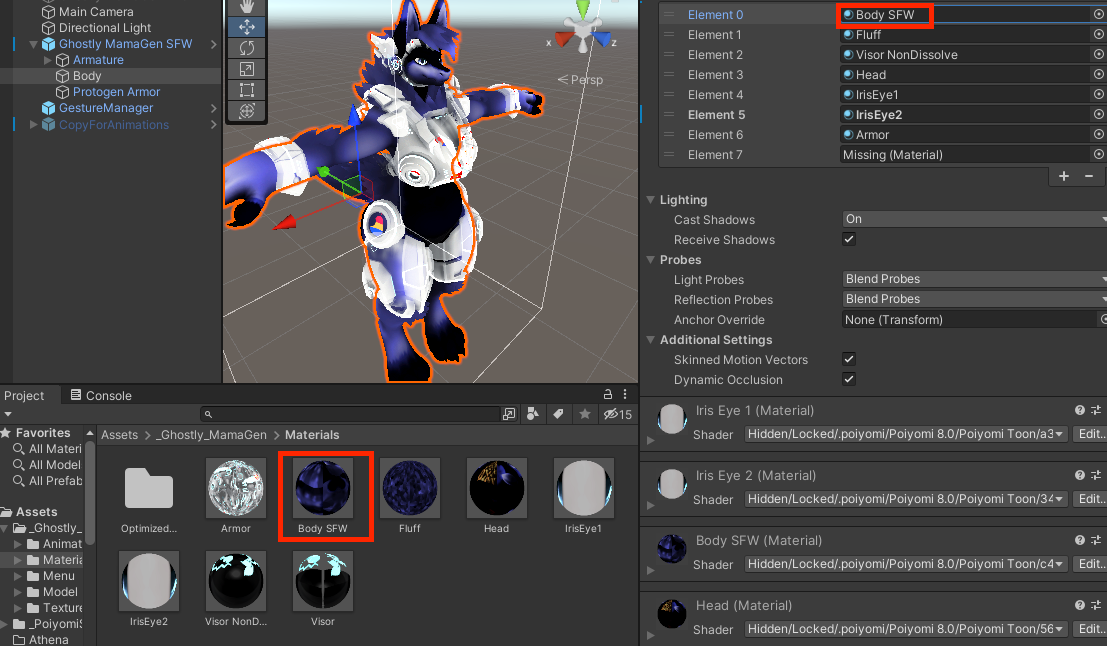
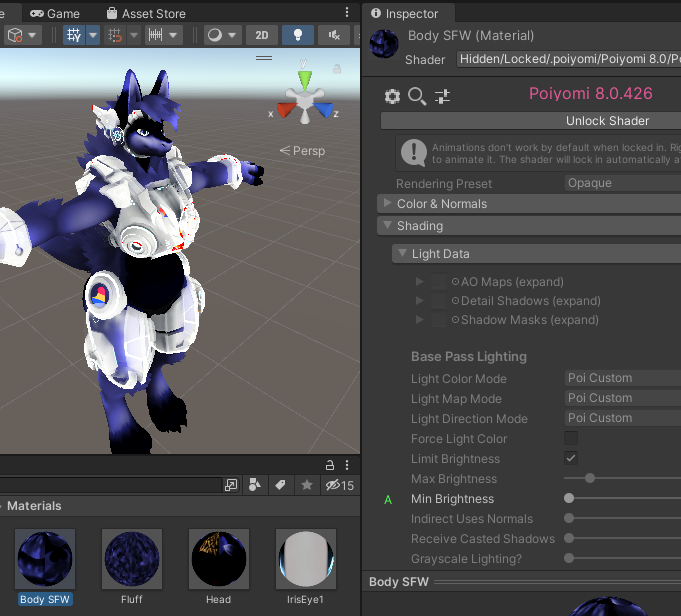
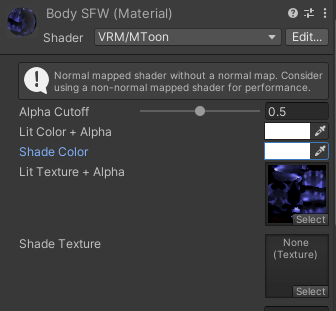
VRMs only support one of a few shaders - the Unity provided Standard and Standard Unlit, and the VRM provided MToon. For the purposes of this tutorial, we'll be using MToon, but you may want to experiment with Unity's other options for a less toony look.
Click the dropdown next to Shader, and change it to VRM/MToon. For the purposes of this tutorial, the default settings should be OK for most things in here - but you may want to check that Shade Colour is correct as it tends to default to a pink tint for us. Additionally, if it hasn't picked up the Lit Texture + Alpha, make sure to re-select that.
For translucent elements, you may need to adjust the Render Queue setting at the bottom.
Repeat for all materials, and all meshes you want to be included.
first export
Click on your model in the scene or Hierarchy to select it - then go to VRM0 > Export to VRM 0.x.
On the window that pops up, it'll require some information to be able to export the avatar - fill in the Name, Version, and Author on the Meta tab, as well as any other license or performance information. Click on the Make T-Pose button to force it into a T-Pose.
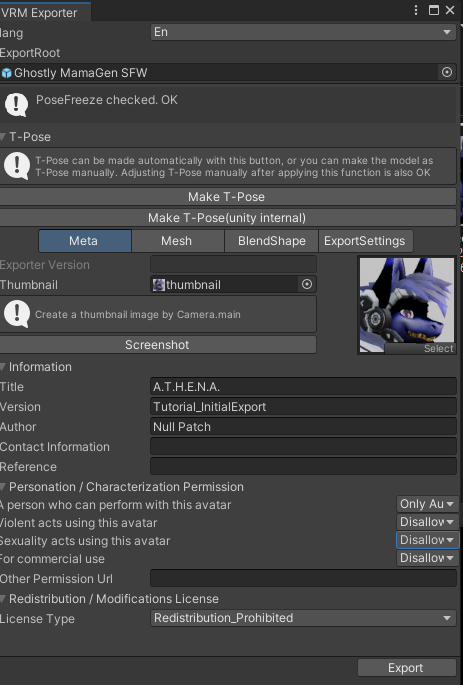
When done filling in info, click on the Export button. Save it to a location outside of your project's directory. Unity will do a bunch of processing and then save it.
...
And so, you have a VRM file. You can technically stop here if you want to, skip straight to getting it in game.
But right now, there's a few things missing. Some of those are primarily relevant to vtubing, but as I mentioned near the top, springbones are pretty important if you want to shake your tail.
| Without springbones | With springbones |
|---|---|
Our full body tracking was playing up a bit while recording these, whoops! Still, look at the difference in how the tail moves.
round 2 - re-run
re-import
Go to VRM0 > Import. It will prompt you for the VRM path that you saved the file to, but then it'll prompt you for another file location. This is the point where we'll need that character folder from earlier; the VRM importer will create extra subdirectories to store stuff in.
⚠️
warning
If you saved the VRM file to a location within your project, it may fail to import. Clean up the temporary folders it created from within Unity (so it deletes the .meta files as well), and try again, elsewhere.
Click on the VRChat model in your Hierarchy, and then click the ☑ button at the top of the Inspector to disable it from the Scene.

Look for the Prefab file in the character folder, and drag it into the scene. Then use the Inspector to reposition at 0, 0, 0.
some optional things
See appendix A for some things that will not have an impact within Synth Riders but might be useful for if you think you may want to use it elsewhere.
re-look
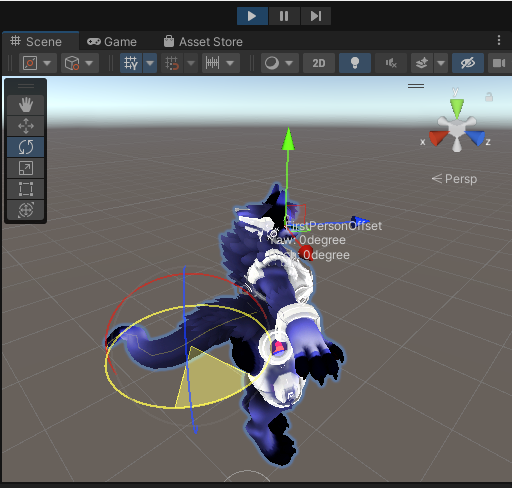
Click on your model in the hierarchy again.
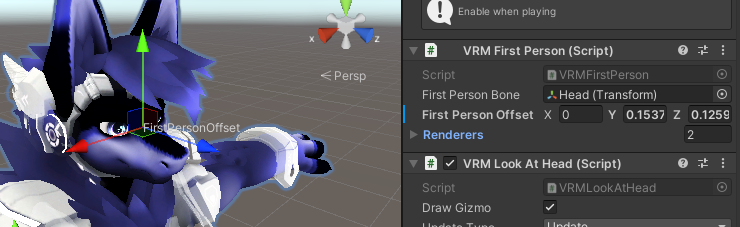
Notice that there's a gizmo with the words "FirstPersonOffset" written on it. This is similar to VRChat's "View Position" - it controls where your viewpoint will be in VR.
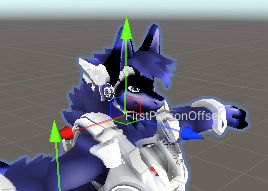
Ideally, you want to position it between your characters eyes. Use the arrows on the gizmo to adjust - can also make numerical adjustments in the VRM First Person component.
re-coil (springbones)
And now we get to the point of adding back a bit more bounce.
💡
tip
If following this guide for Pawperty Damage, their custom character guide has specific instructions/restrictions on springbones due to it needing to convert them to a different format.
information discovery
In the Hierarchy, click on the arrow next to the VRM prefab to expand it out, and then expand out the armature. From there, look for bones that should be able to animate with indirect movement - good examples of these include ears and tail; depending on your model, butt and belly might also be good places.
💡
tip
If your VRChat model had PhysBones, you can expand the hierarchy of that and view which bones have PhysBones there.
adding the springbones
There are two ways to set springbones up depending on if you might want to tweak them per bone.
The Secondary method is specified as preferable by the Pawperty Damage custom character guide; I am not sure of performance impacts or incompatibilities.
method 1 - individual springbones
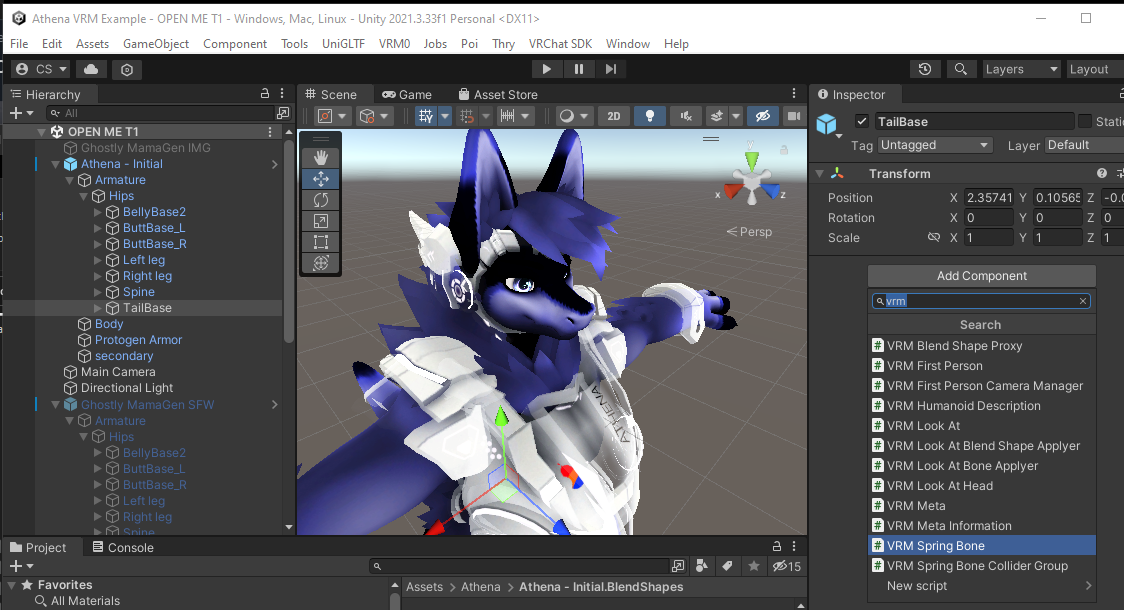
Once you've found a target bone, click on it in the hierarchy, then Add Component > VRM Spring Bone.
In here, expand Root Bones, and then click on the + button to add a new root. Then drag the bone from the Hierarchy to the box next to "Element 0".
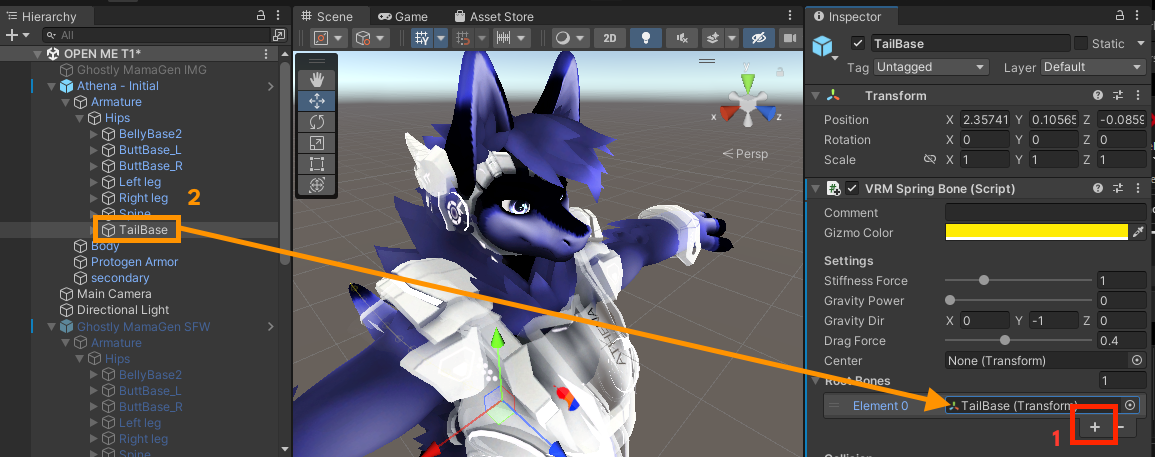
⚠️
warning
You can also click the target next to the Element 0 box to select a bone from the scene. The problem with doing this is that if your VRChat model is still present, the bones will be named the same thing, and so it'll be difficult to tell which is the correct one. Dragging and dropping removes the ambiguity.
method 2 - everything on secondary
Click on the Secondary component within the VRM prefab in your hierarchy. You'll see the same VRM Spring Bone component as above (or add it if it's missing).
Follow the other instructions above, but instead of clicking the add button once for one root bone, click it for however many springbones you want to add in total - and then drag and drop each of them in to their own element slot.
This means that they'll only have one set of settings for all bones, so be careful with things such as gravity.
testing the springbones
To test the springbone works, click on the ▶ button at the top of the Unity window to enter Play Mode. In this mode, you can make temporary changes that won't be saved.
💡
tip
You may recieve an error at this point that compiler errors must be fixed before entering Play Mode. If this happens, check in the Console for what this compiler error is; it's most likely something to do with the VRChat SDK given that it wasn't meant to run on 2021.3.
If this happens, note down the remaining bones that need springbones, and then on the top menu, go to Window > Package Manager. In there, remove everything relating to VRChat. You may need to remove other files depending on the VRChat SDK as well (e.g. Poiyomi).
While in Play Mode, click on the Scene tab to get back to your editor view, then select your model and use the gizmos or Inspector to drag it around and check that the bone you animated is working. Once you've done, click on the Play button again to exit Play Mode.
You may wish to adjust the springbone settings as desired; we're just going for the defaults for this tutorial as a test. Repeat this process for every springbone you wish to add.
re-export
Go back to VRM0 on the top menu > Export to VRM0.x again. This time, there's no more information to fill in, unless you want to bump the version number.
get in the game
file island
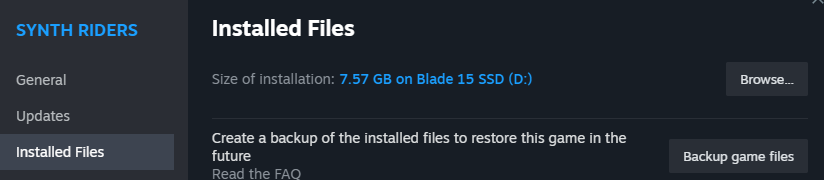
The location to put your VRM files will depend on the game's installation directory, which in turn will depend on your Steam library location.
The easiest way to find this is - in Steam's desktop mode - to right click on the game in Library view > Properties > Installed Files > Browse.... This will take you right to your installation directory.
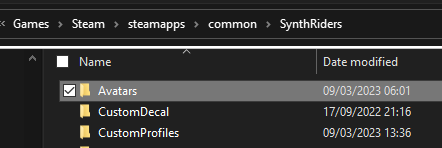
Copy your VRM file to the Avatars subdirectory.
💡
tip
While you're in here, if you want to customize your platform image, place a 512x512 JPEG called CustomDecal.jpg in the SynthRiders_Data/CustomDecal folder.
the distant future of 198X
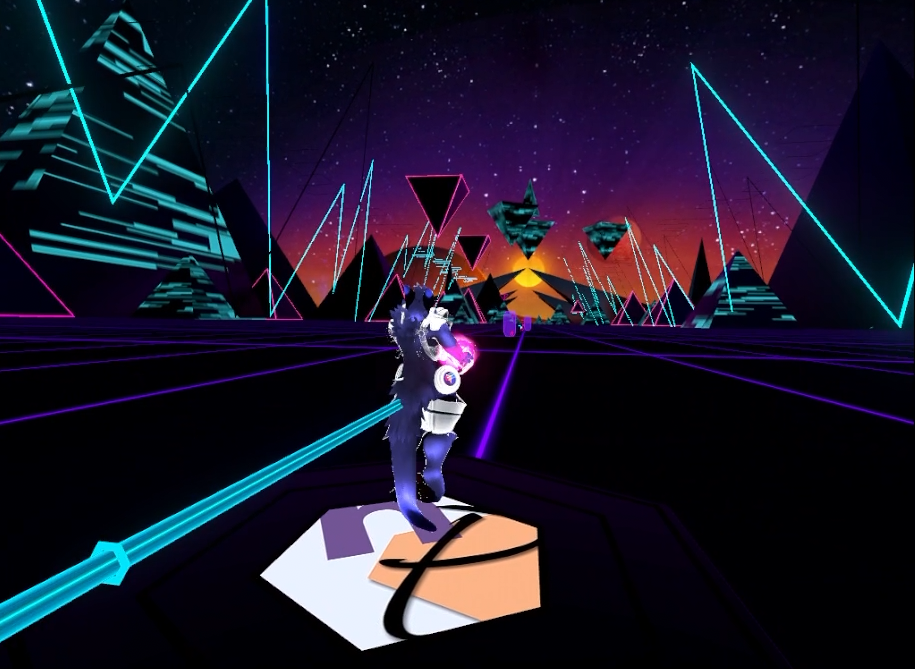
Put on your VR headset and do whatever you need to do to launch Synth Riders.
On the Synth Riders main menu, press the Settings button to open the Settings menu.
On the Visuals menu, change Avatars to On, then look to your left to see the Avatar wall. Configure your tracking mode, then find your avatar in the list, click to select it, and then as the warning suggests, look straight forward and pull both triggers to calibrate.
Congratulations, you've done it! Remember that your avatar will only be visible in third person, so you'll probably want to configure your stream camera settings and OBS - as well as potentially going back into Unity to make some more tweaks. But you're all ready to ride the rails!
Next time, maybe Resonite or something, I don't know.
asides and appendices
appendix a - things good for other VRM applications that don't matter for synth riders
This section contains a few optional steps that will have no impact in Synth Riders, but will have an impact in applications like VSeeFace or Pawperty Damage.
blend shape proxy
The blend shape proxy is used to configure avatar facial expressions. Synth Riders does not to our knowledge use these, but VTubing applications in particular will make extensive use of them.
Click on the VRM prefab in your Hierarchy to select it. In the Inspector, scroll down until you see "VRM Blend Shape Proxy". Click on the box next to Blend Shape Avatar to take you to the BlendShapes folder in the Project tab.
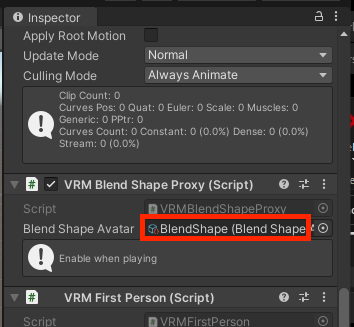
Then click on the BlendShape asset to display the editor.
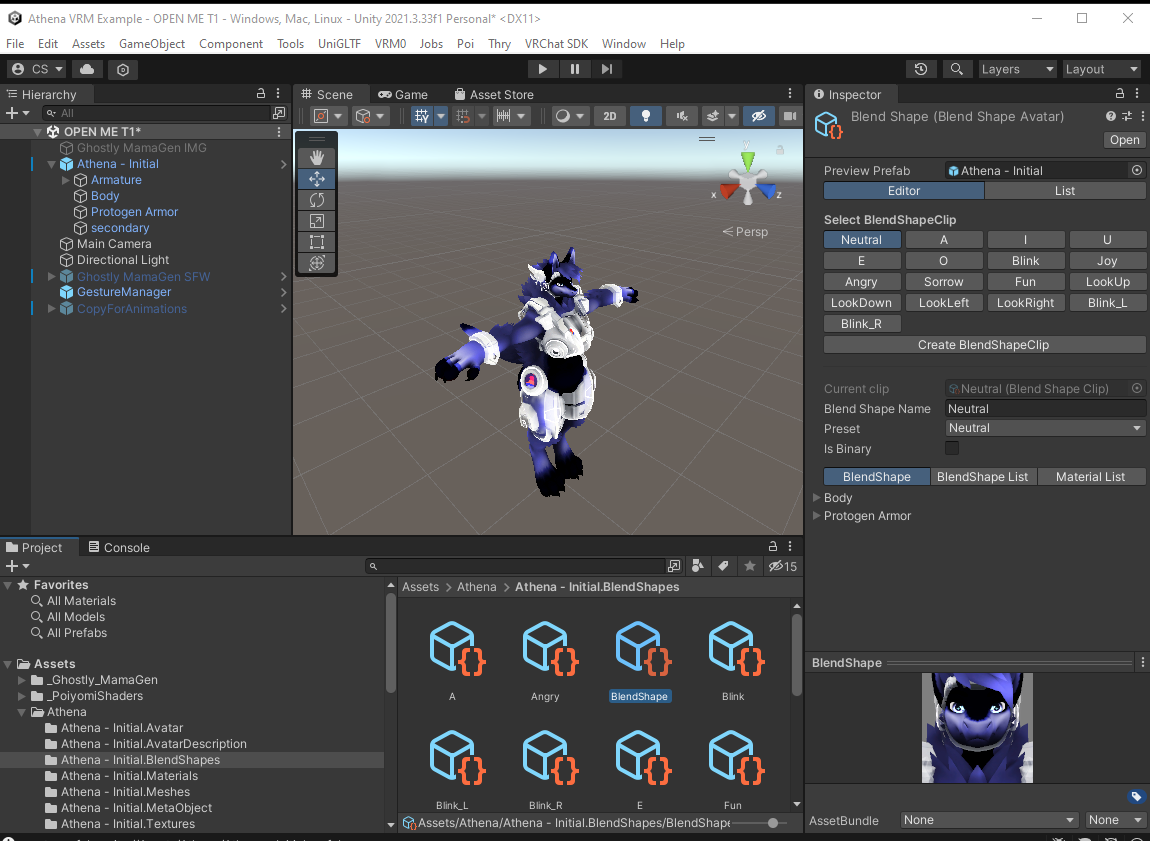
In here, click on each blend shape, then expand the relevant mesh and then drag the relevant blend shape slider, if you have one. Use the preview to make sure it looks right.
(If you don't have a relevant blend shape on your avatar for the VRM blend shape, just skip that one)
💡
tip
If porting for Pawperty Damage, you will at least want to configure 'A' as it's used for the bite animation as well. You should also check their guide for additional blend shapes that are only present within Pawperty Damage but not other VRM applications.
eye movement
There are two primary ways to control eye movement with VRM format avatars, "Look At Bone" - which controls the eye movement using eye bones, and "Look at Blend Shape", which uses the Look Up/Down/Left/Right blend shapes from the blend shape proxy step.
VRM will default to the bone, but the blend shapes are simpler to work with if present; they should work well with the default settings.
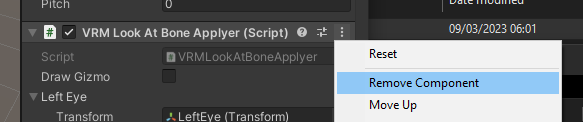
To change the mode from bone to blend shape, click on your model in the hierarchy again. This time, scroll down to "VRM Look At Bone Applyer". Remove this component, and add "VRM Look at Blend Shape Applyer" instead.
If using the bone, you may need to tweak settings. As I don't use this, the Pawperty Damage guide has more detail for configuring this than me. (Section 4.5.1 as of 2023-12-09).