Spooky scary skeletons forge frights from frame to frame
Almost the most annoying part, UVs put them to shame
- Spooky Scary Skeletons - ANIMATORS BEWARE, SavannahXYZ
So, once again, we got nerdsniped!
A friend asked a question so we're going to attempt to answer it quickly.
Re-reading this while editing just before posting... an attempt was made, at least.
We have answered this question on Cohost before, but we felt it was worth expanding on - largely because our old answer on Cohost was limited by Cohost's format, but also because Cohost is going as soon as Archive Team finishes their work.
The question is "how do I add an animation to my VRChat avatar". Like a lot of things with Unity and VRChat, there's several different answers to this.
Assumptions
This guide assumes that you have a working avatar, and that it's either in source control or you've made backups before starting this. It also assumes at least a little familiarity with Unity - basically that you've read through here.
Disclaimers
We are not experts and chances are we're going to use the wrong words for things here and there.
First principles
We need a little bit of background before we can get started, because it might help prevent some problems later.
Animations
An animation in Unity is just a way to change the values associated with one or more properties on a model. For example, for a character walking, the properties being changed would be the rotation of various bones - but it could just as easily be changing the colour applied to a material to make something on your avatar blue, or enabling a flashy particle system, or turning up the volume on a sound effect.
They can be instant, or display different properties over a timeline. This can be used to create other effects - like altering a parameter based on the volume of your voice.
Animation Clips
Animations are saved as Animation Clips on disk, with the extension .anim.
If you attempt to save an animation clip and don't already have an Animator Controller, Unity will either offer to create one or just do so automatically.
Animator Controllers
Animator Controllers determine the logic of how animations work, including how they connect together - e.g. from my Idle animation, if the TailWag parameter is set to TRUE, play the TailWag animation - and then after 30 seconds, set the TailWag parameter to FALSE, and reset to Idle.
Animator Controllers are layered state machines - which is a fancy way of saying that they can handle multiple things at the same time. When my TailWag animation is playing on the Tail layer, I could have FingerGun playing on the Hands layer, and Unity would seamlessly blend these animations together.
Similarly, if I have an animation that shows a prop, that can be completely independent from an animation that shows a different prop.
Animator Controllers can get wild with how much you're able to do with them.
Playable Layers
VRChat has 5 special Animator Controllers, known as Playable Layers. Every avatar uses these, whether through a custom one being specified, or by using VRChat's default layer.
The linked article goes into more detail, but to summarize:
- Base - used for among other things, locomotion animations while moving around.
- Additive - animations that are added on to the playing animation. (We've never used this one)
- Gesture - this is used for anything that would affect only part of the model's armature (like the
TailWagabove). - Action - this is used for animations that fully replace anything that otherwise would be playing. For example, a couple of our avatars use a different AFK animation than VRChat's default lotus position, and this is where we would go to replace that.
- FX - everything else.
In general, most Humanoid avatars will only potentially need custom Gesture and FX layers - plus Action if wanting to override AFK.
Animator Parameters and Expression (VRChat) Parameters
Depending on choices made later, this section might be optional, but it is also a common point of confusion. Feel free to skip for now and come back if you need to.
Animator Controllers have animator parameters which control the flow of animation.
VRChat also has parameters - known as Expression Parameters. These are stored in a paramters file.
When you select an option in an avatar's radial menu, if the associated expression parameter matches the name and type of an animator parameter, it changes that animator parameter, which in turn does whatever that parameter does in logic.
These do not have to be equal:
- A custom expression parameters file might contain the expressions for multiple animator controllers. Each controller only needs the parameters relevant to it - so the
TailWaganimator parameter might only be present in the Gesture layer, butShowFireworksmight only be present in the FX layer. - VRChat includes a number of built-in expression parameters where the equivalent animator parameter can be added to any Playable Layer, but that should not be added to your expression parameters file. This is for example how some avatars will make different faces when making different gestures using your controllers - the Animator Controller is responding to different states of the
GestureLeftandGestureRightparameters. - Animator Controllers can have parameters that only exist within them. The main thing with these kind of animator parameters without an associated expression parameter is that they are not synced across the network; there is no guarantee that your friend will see the same thing. However, you can add a Parameter Driver, which can modify any expression parameter, which will be synced.
Parameter types
Parameters should all be one of the following:
bool- true or false/on or off.int- a non-decimal number between 0 and 255.float- a decimal number between -1.0 and 1.0
Types should always match between the two.
Part 1 - Creating your first animation
Hey, um, just to check, you have taken a backup, right?
Or put everything in source control.
In the Hierarchy, select your avatar, and then right click > Duplicate. Right click on the duplicate and name it something obvious (we always use CopyForAnimations, but that's just us). You may also want to move it to the side, or hide the original by unchecking the box in Inspector view.
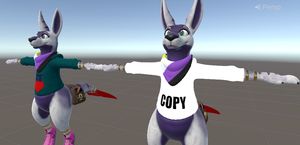
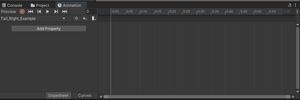
Click on the duplicate in the Hierarchy, and then click on the Animation tab. This is where you'll go to create new animations. On first copying an avatar, you will most likely see this:
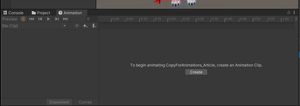
Click to do so, and then you'll be prompted with your OS's file save dialogue to choose the location of your new animation clip. The location needs to be somewhere under your project's Assets folder.

Our recommendation for filename is for something short, but descriptive. These names will be used throughout Unity's UI, and you don't want to have to be telling your "adsdfdsfsd" from your "fsasdsdasdasd" from your "fhqwhgads" later.
We tend to use Thing_Action (e.g. Tail_Right, Wings_Unfurl) - which groups all the animations for that thing together when sorting alphabetically.
The view will then change to show the timeline, with the dropdown acting as a way to jump between all animations in the default Animator Controller and create new clips.
⚠️
warning
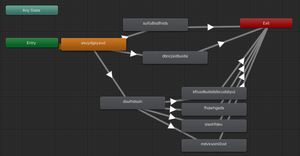
If you see something like this to start with, then your original avatar has a default animator controller and that has been copied over. This can cause some odd behaviours in VRChat, see Appendix A.
What happens next depends on what you're trying to do.
For most changes
Hit the record (🔴) button and then make the change you want to make. This will automatically add the relevant properties and the value(s) you've changed them to.
For complex materials
Shaders such as Poiyomi allow for configuring a lot of different settings on materials, which may or may not work with hitting record.
These instructions will differ depending on the shader in use, and for something other than Poiyomi, you should consult the documentation provided by the shader author if applicable.
On the material you want to animate, right click on the property you want to animate, and select "Animated (when locked)". Right click again, Copy Animated Property Name - and paste it somewhere.
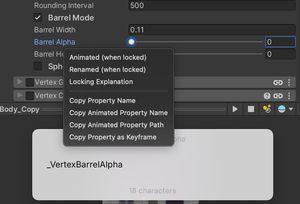
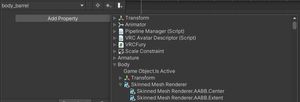
On the Animation Clip, rather than clicking Record, click "Add Property" - and then expand out the hierarchy to find the GameObject the material will be applied to and its skinned mesh renderer - then find the Property Name you just pasted. Click on the + button on the right to add it to the animation, and then you can adjust the values as needed.
Be careful with these - if you have multiple materials that set the same property and they have different defaults, it's possible to get some very different looks accidentally or for a value to not be properly reset.
Animating between states
If you add a property as above, you might notice that it automatically creates a keyframe (represented by a ♦) at 0:00 and 1:00 on the animation timeline.

These allow for setting the value of the properties at these times, and then Unity will automatically tween between these states.
If one wasn't created automatically, or if you want to use multiple, right click on the grey area at the top of the timeline in line with the top most diamond, and select Add Key.

💡
tip
Which specific point is up to you - the exact timings can be adjusted later, but the shorter the time here, the more choppy the resulting animation might be. I like to use 60 frames (corresponding to 1 second) generally.
Drag the playhead scrubber at the top to the new keyframe, and adjust the value.
We should also note that we're not animators by trade and you should probably consult other resources for how to make your animation look good.
Part 2 - Adding the animation to your avatar
There are multiple ways to do this, and we would strongly recommend the easy method.
The Easy Method - VRCFury
VRCFury is an add-on for non-destructively making changes to an avatar during the build process with minimal complexity. [1] It has a lot of features, but there's only one we're interested in - the Toggle component. This adds a button to your avatar's radial menu, and automatically resets state when that button is turned off. If you have multiple animations that target one thing or outfits that should never go together, they can be made mutually exclusive so they don't conflict.
Installing VRCFury
If you're on Windows, VRCFury provide a one click installer to add to the VRChat Creator Companion.
Unfortunately, the VRChat Creator Companion still doesn't exist on other platforms, and we're writing this on a Mac, so say hello to our old friend vpm.
Close Unity, open up your terminal of choice, and change directory to your project's root directory (the folder with Assets and Packages subfolders).
cd ~/Projects/exampleAdd the VRCFury repo:
vpm add repo https://vcc.vrcfury.comDownload the package from the VRCFury repo:
vpm add package com.vrcfury.vrcfuryAnd that's done! For any future avatars you need to work on, you can skip the add repo step. Once it's installed, it'll auto update if it needs to.
Adding VRCFury to your avatar
In the Hierarchy, click onto the copy's avatar root (the node with the VRCAvatarDescriptor component), scroll all the way down to the bottom, and click "Add Component". Type in VRCFury.

Click on the + button to add a new VRCFury sub-component, and select Toggle.

Enter in a menu path for your toggle (where it'll go in your radial menu), and then hit the Add Action button.
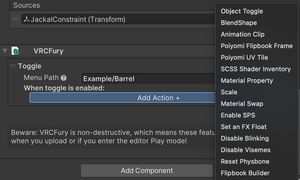
Select Animation Clip, and either click the ⊙ button to locate an Animation Clip, or simply drag it in from the Project tab. You may need to play around with the Options for what you'd want - e.g. if it's meant to be a slider on the menu rather than a simple button.
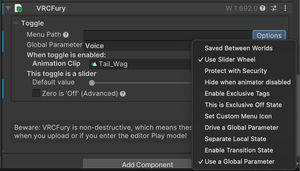
Note how we could have done some of the things earlier in here instead - VRCFury makes material swaps and material property changes available through Toggle components as well. The main reason to do things manually is for a greater degree of control for things that need it.
You may wish to test the copy at this point using something like Gesture Manager, to confirm the new option is present on the menu.
(For Mac/Linux users, the command you're looking for is vpm add package vrchat.blackstartx.gesture-manager)
Once you're happy with it on the copy, hit the ... icon in the VRCFury header and select Copy Component.

On your original avatar, hit the ... icon on any other component, and select Paste Component as New.
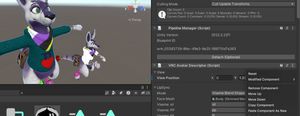
Test again, and if you're happy, congratulations!
⚠️
warning
One potential issue - if using a Toggle that asks you to select a renderer (e.g. Material Property), you may need to go and update that after you copy the component - it might still be pointing to the version on the copy.
The Hard Method - manual
The main reason to use the hard method is specifically that you want more control over the process.
...and you know what, this post is long enough and this is going to take a whole lot more words. we'll write a follow up post with this.
Appendices
Appendix A - The Default Animator Controller
When you create an animation clip on a model, Unity automatically creates an Animator Controller to store the animation clips in. It will also create logic linking the start of this controller to the first animation created. When new animations are created through the Create New Clip option, they will be added to this default controller, but there will be no logic linking them to anything else.
This comes with a couple of caveats that might be important to know about:
- The only animations available in the Animation tab's dropdown menu are the ones on the default controller. If you've created a second animation by duplicating the original file (highlight in Project tab, press
Cmd+Don Mac - presumablyCtrl+Don other platforms), these will not be added to the default controller and may not be present in the dropdown. Subsequently, they may sometimes be greyed out when you try and edit them. - If the original avatar has the default animator controller present when uploaded to VRChat, it might play that first animation in a situation where it isn't meant to.
To remove the default animator controller before uploading, locate the Animator component on the root node of your avatar, click the ⊙ to select a new target, then select None.
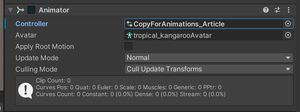
Footnotes
Alternatives are available, but VRCFury is the one we're used to. ↩︎
