I got up so tight, I couldn't unwind, I saw so much, I broke my mind
I just dropped in to see what condition my condition was in
- Kenny Rogers, Just Dropped In
A thorough examination of why a lot of tutorials about these end up as videos.
This is a follow up to the previous post - if you need it, refer back to that one; we'll try not to cover the same ground again.
In particular, the last post mentioned Animator and Expression Parameters, but didn't have much use for them there - but they are much more important in this one.
Disclaimer
Once again, we are not experts, we're just sharing some of the ways that we've done things. Some of these might not be the most performant, but we've tried to pick up what we can here and there.
Also, for this article in particular, we're attempting to deliver this as 'immediately effective' as possible. Let us know what you think?
Why do things manually?
Before we launch into the what to do, it's a good idea to figure out why you might want to.
In the time before we knew about VRCFury, we did things manually because we didn't know there were other options that would make it easier. There is a whole lot on older avatars that we could completely clean up and replace with something conceptually much simpler.
The choice here is simply one of control. VRCFury's Toggle offers simplicity, but if you have an idea in mind that is more complicated, then it's probably going to be easier setting it up manually. Here are a couple of things that we've done where manually editing an Animator Controller was probably the easier approach. [1]
- When spawning into a world, play a random tail animation unless changed in the menu. If someone boops my nose, randomly play one of those animations at a super fast speed until the point they stop booping.
- Some time after going airborne, start flapping wings.
- Make an emission reactive to our voice.
For Toggle to work, everything has to be set up before hand. The Animation Clip has to be the right length, and you can't chain it together as easily.
With that said, it isn't completely an either/or thing - VRCFury also has the ability to add on an entire animation controller (as well as expression menus), so you can keep a lot of what you'd like to do separate from your avatar's Playable Layers. This is particularly important for frequently updated bases - if you've made a lot of customizations and the avatar author has also changed something on the same animator controller in an update, you'll lose what you've done and have to redo it - but if their stuff is in BaseFX.controller, and your stuff is in MyCharacter.controller, then there's no conflict.
But I get it, installing stuff is sometimes a pain, so we'll go through the process without it first.
Part 2 - Part 1 - Adding a basic toggle
So, we have an Animation Clip (or a series of them) that needs to be applied to one of VRChat's Playable Layers - which are just a type of Unity Animator Controllers with special things done to them by VRChat.
Which layer to use will depend on the exact type of animation you've created - Action for full body actions like the default backflip or the lotus position when AFK, Gesture for affecting physical things about small parts of your avatar like what animations the hands play when placed in different positions on the controller or for making a tail wag, FX for everything else.
For this example, I'm going to create a toggle that changes my avatar's outfit when I select an option in the menu. This falls into the "everything else" category, so we will be working with an FX layer for this example.
Find What You Have
Before you can start modifying, you need to understand what you have. A lot of avatars and bases will come with animations already made and applied in various forms. Some might have custom menus already set up, or contact triggers that cause something to happen when touched.
Playable Layers, custom menus, and expression parameters are normally located on the avatar's root, within the VRC Avatar Descriptor component.
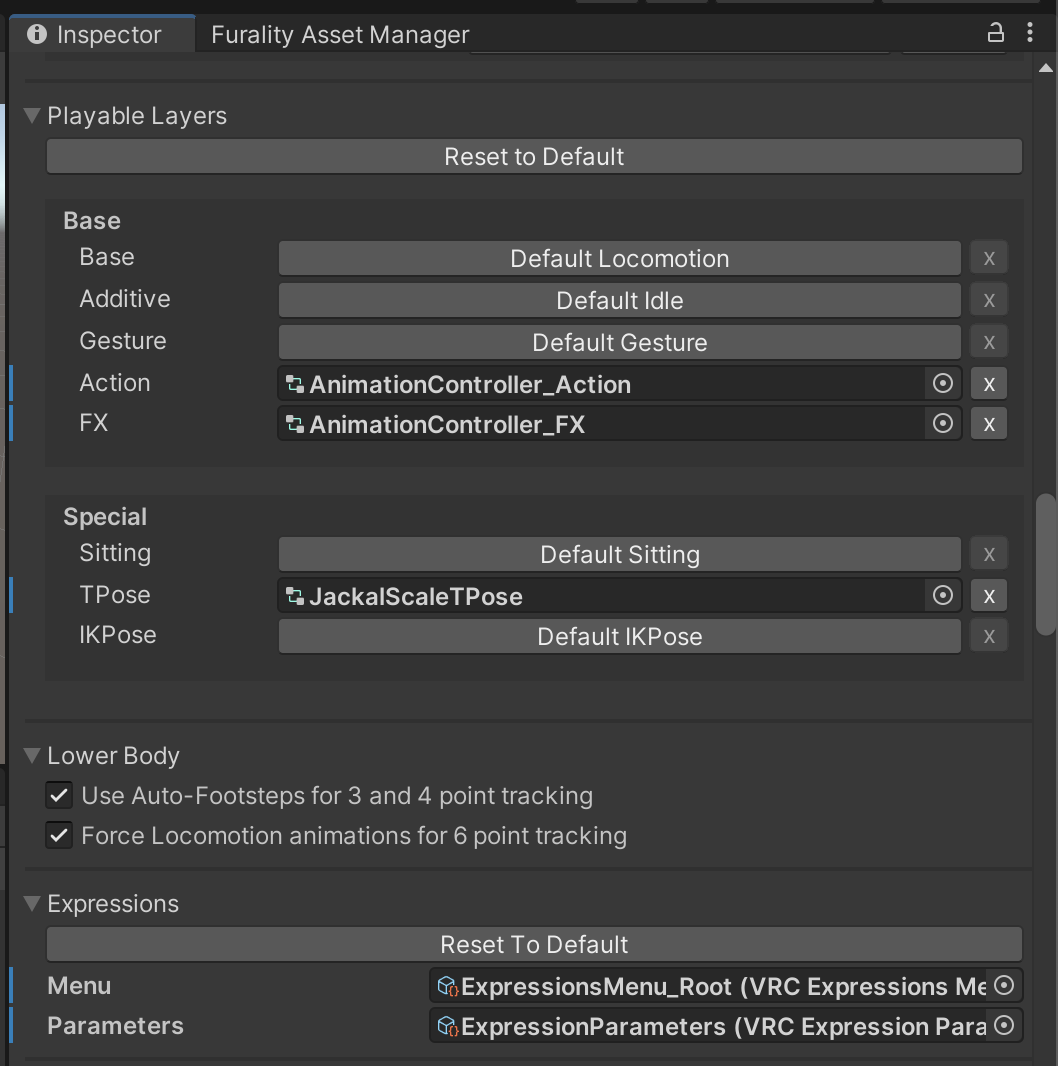
For items not set as default, you can click on the item here (not the ⊙) to immediately locate the relevant file in the Project tab - then click on it in the Project tab to open its details in the inspector and/or the Animator tab.
💡
tip
If you don't have files listed here, but your avatar definitely does have custom animations or menus already - check elsewhere in the avatar root to see if these have been set up already using a system like Modular Avatar or VRCFury.
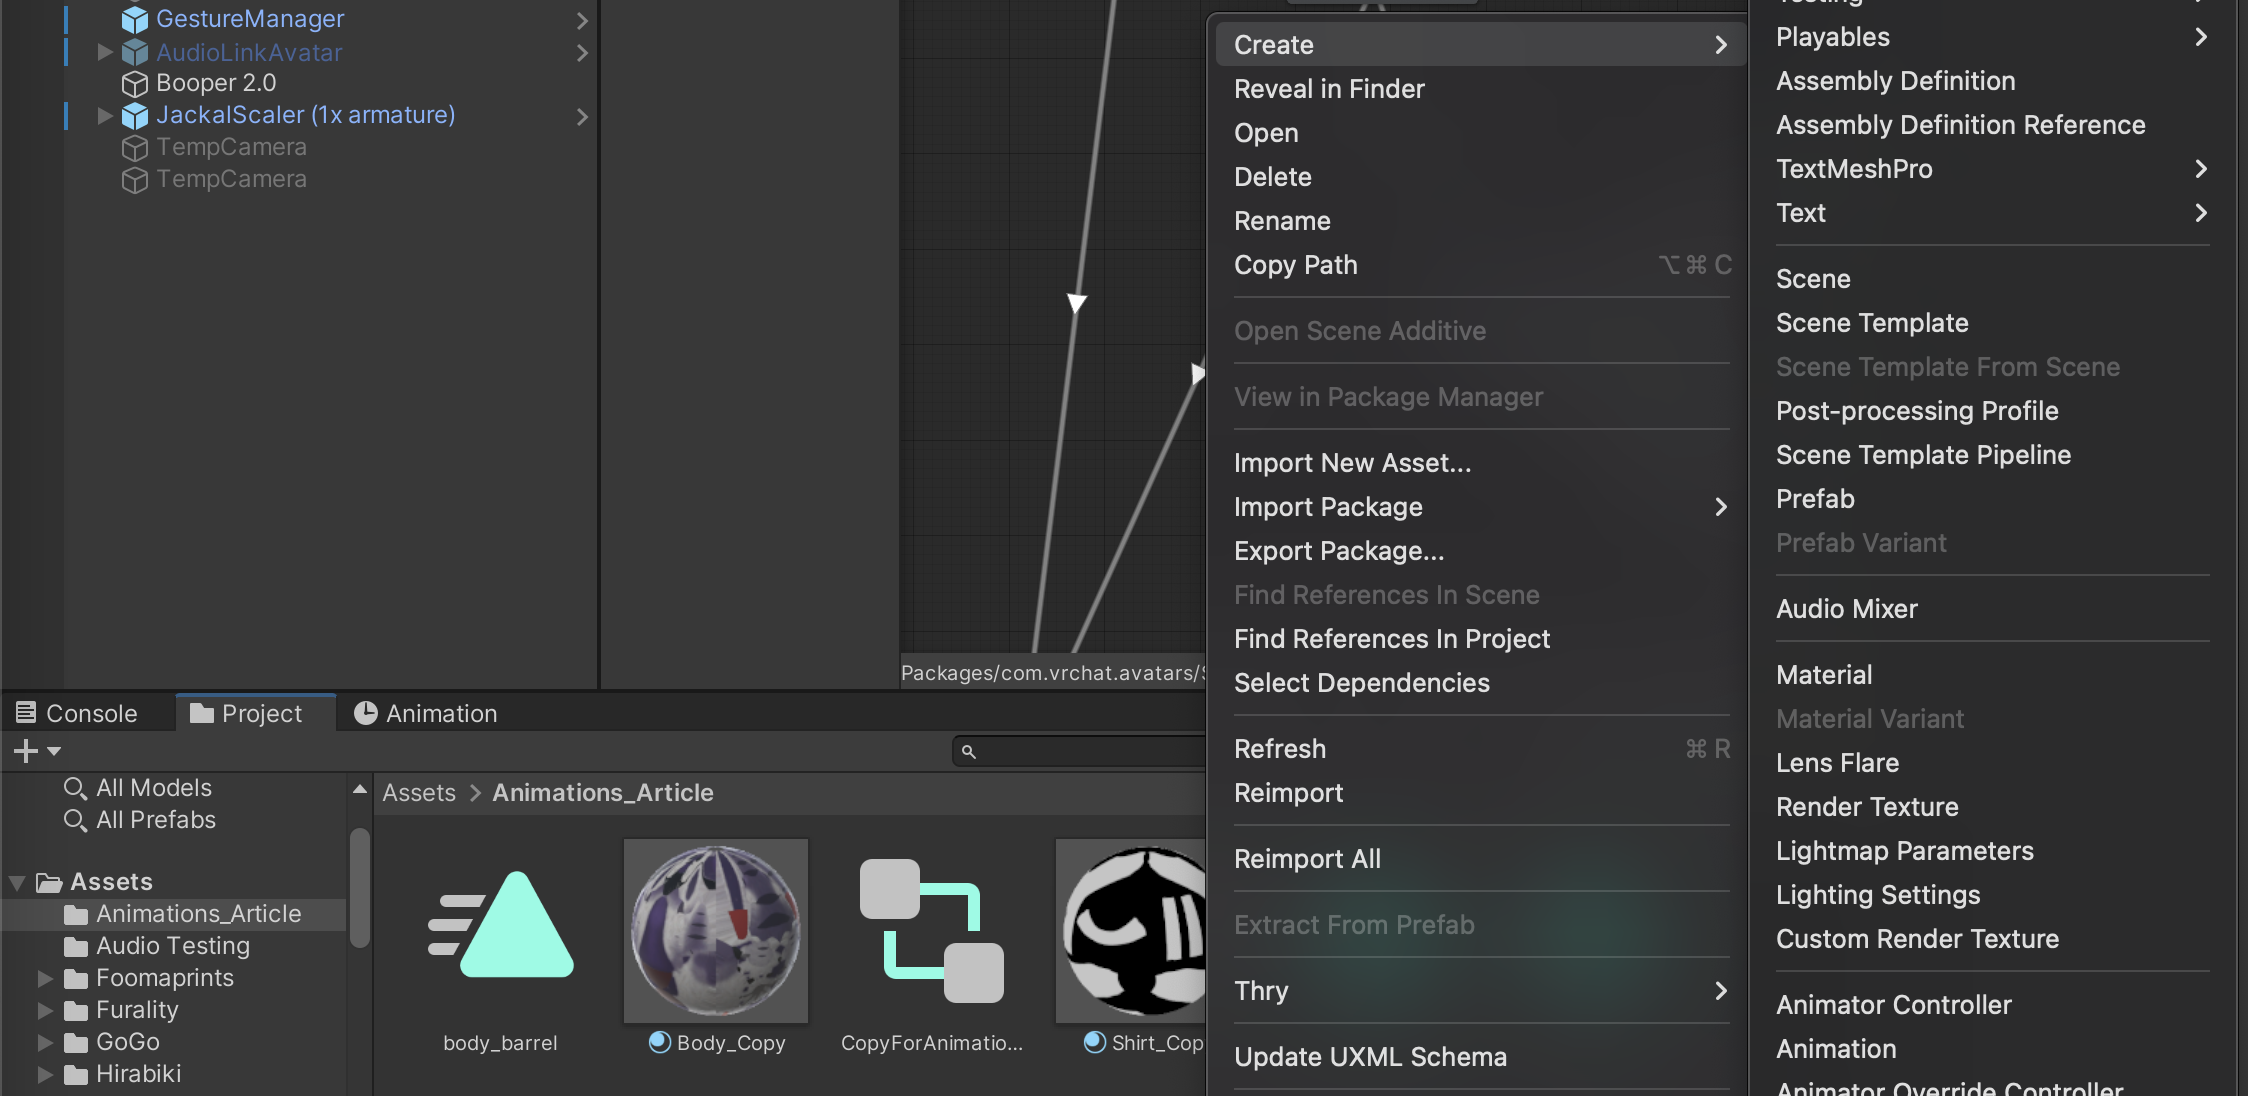
If only the Default is currently present, then to create an Animator Controller, in the Project tab, find a suitable location in your project, right click, Create > Animator Controller.
Give it a name - we've found it helps if the name includes the type of layer it is - e.g. MyCharacter_FX. Then return to your avatar root. Click on the default button for your layer to replace it with a file selector, and then use the ⊙ icon to locate the Animator Controller you want to fill that slot with. (Pressing the X will return to default for the Playable Layers).
The Animator Tab and Layers
Whether you're using an existing Animator Controller or a new one, click on it in the Project tab, and then click on the Animator tab at the top. You'll be presented with this blank canvas.
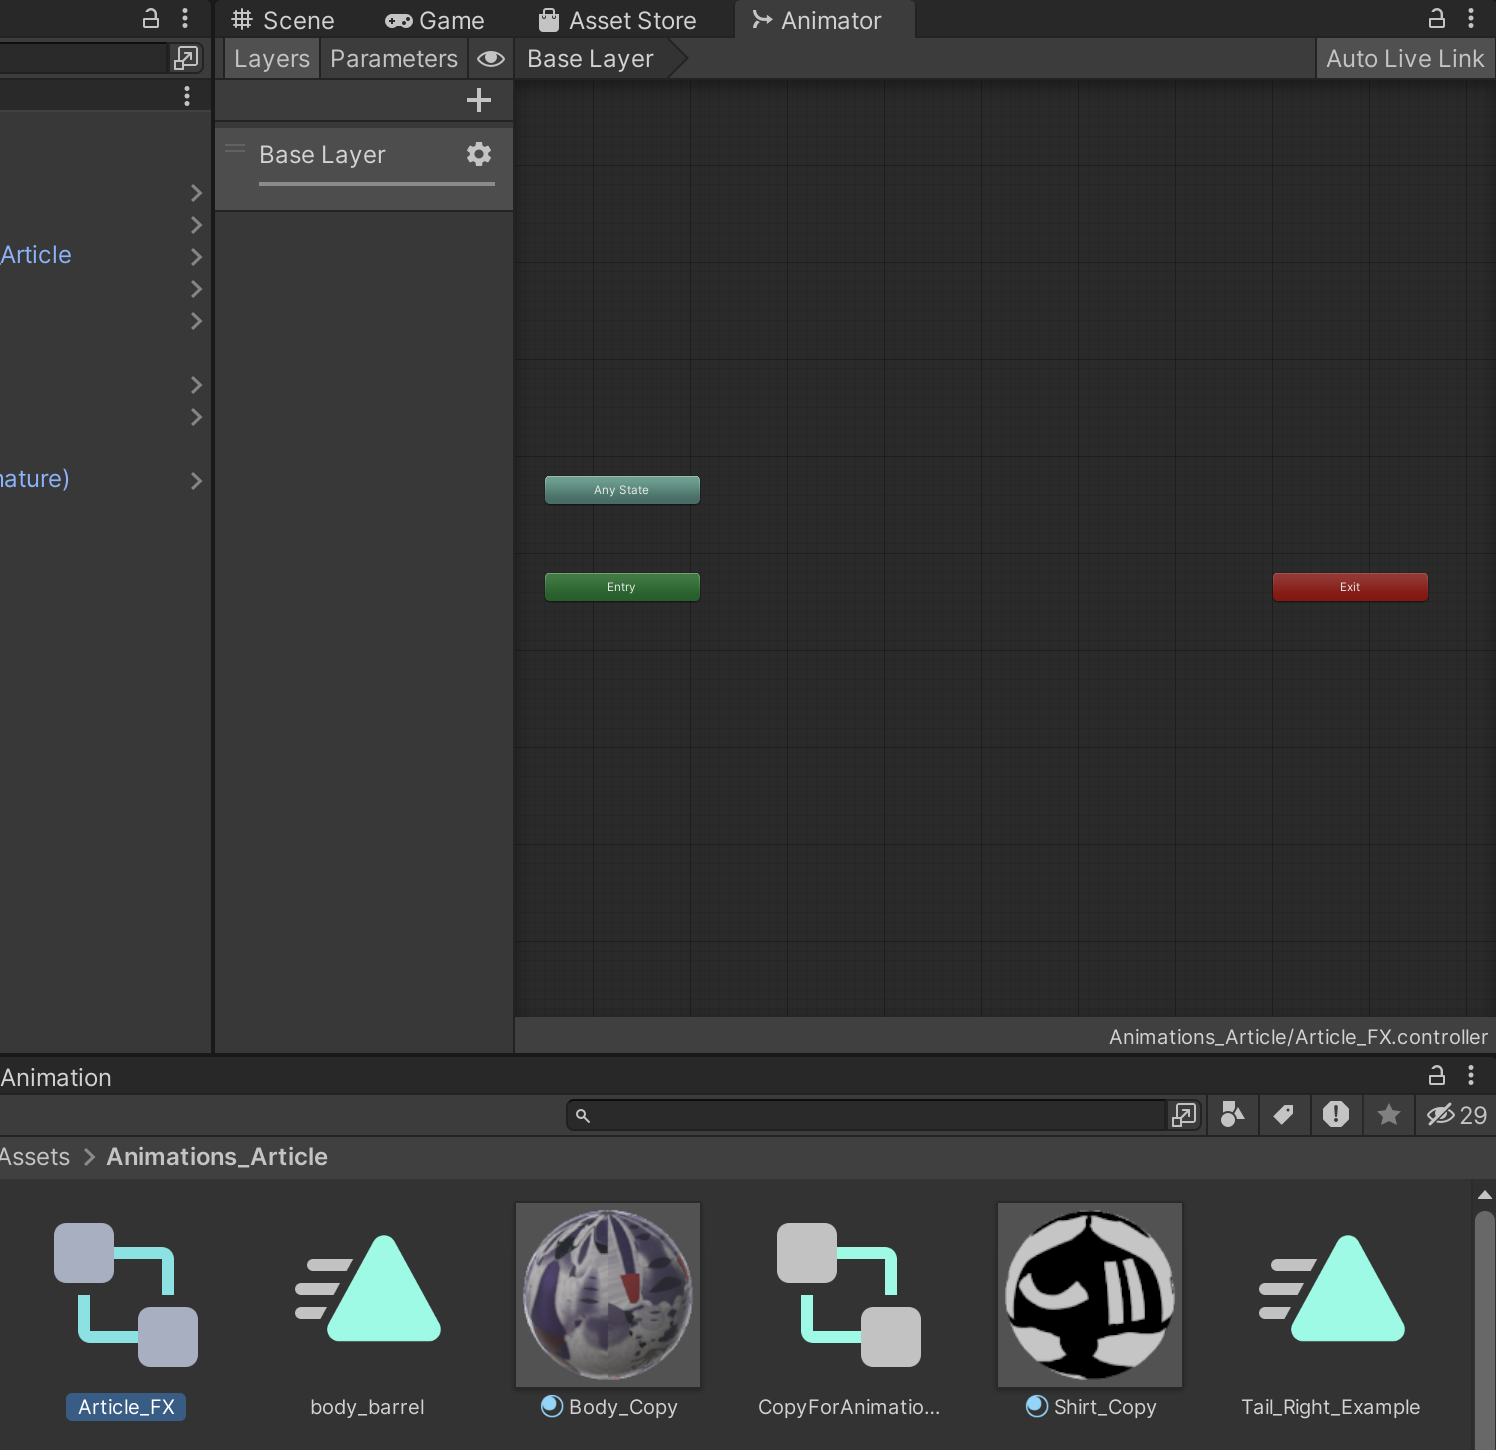
VRChat specifically recommends against editing the Base Layer, so click on the + icon at the top to create a new layer.
When do you create a new layer? Much like animation clips, it's a good idea to have each layer dealing with as small a thing as it can where possible... though it is possible to go overboard. I believe VRChat may start having performance problems if there are more than 100 layers on an avatar - though there's probably going to be more performance problems elsewhere if you've done that.
Immediately after creating (and naming) your new layer, click on the ⚙️ next to it and change the weight from 0 to 1. If you don't do this, nothing within the layer will have any impact.
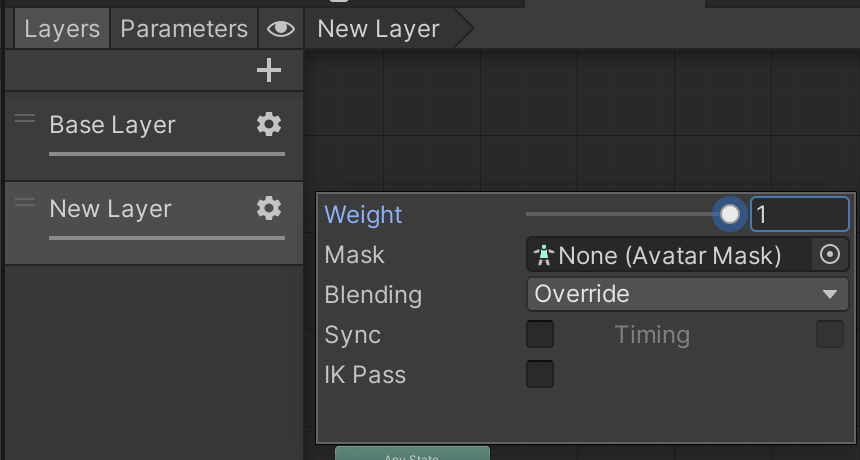
‼️
important
If you're working with animations manually like this, this needs to be done every time you create a new layer - you do not want to spend an hour troubleshooting why something is having no impact to find out it was this.
And now we have a blank canvas, ready to begin our work.
Some basic navigation tips:
- Use the mouse wheel, two finger swipe, or scroll bar on your touchpad to zoom in or out.
Option+Click(on Mac)/Alt+Click(Windows/Linux) to move around the canvas.
If you're on a Mac with a touchpad, do not use the standard touchpad pinch zoom in gesture - instead of zooming in and out like normal, it will instead make the Animator tab full screen. Keep pinching to zoom out and it should return to normal. This has caught me out more times than I'd like to admit.
States
Each node in an animator controller is called a state. Each state defines things like
- What animation, if any, should play
- What speed the animation should play at - or if instead of playing normally, it should be driven by something else.
- What will cause this state to transition to the next one in the chain, if any
- Additional state behaviours. VRChat provides a few of these like disabling tracking for one aspect of the model while an animation is active. (Remember to switch it back on again afterwards!)
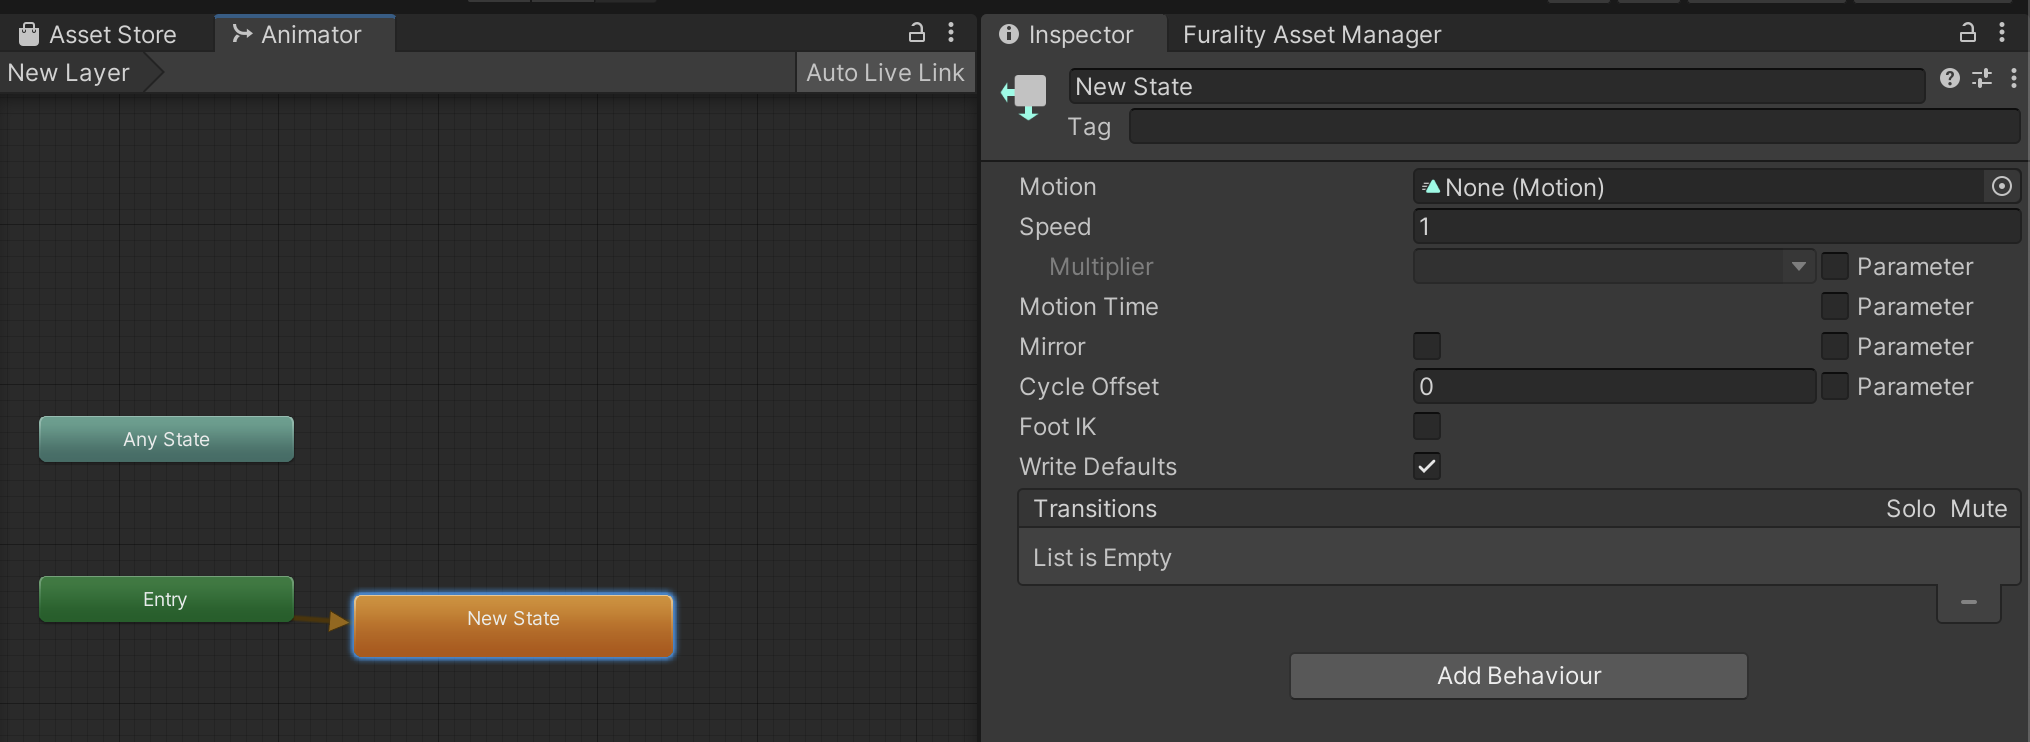
Every layer starts in the Entry state which you cannot modify (beyond dragging around where it's located), and (optionally) ends in the Exit state. Entry can only go to one state.
You can create a state by dragging in an Animation Clip from the Project tab, or by right clicking and selecting Create State > Empty.
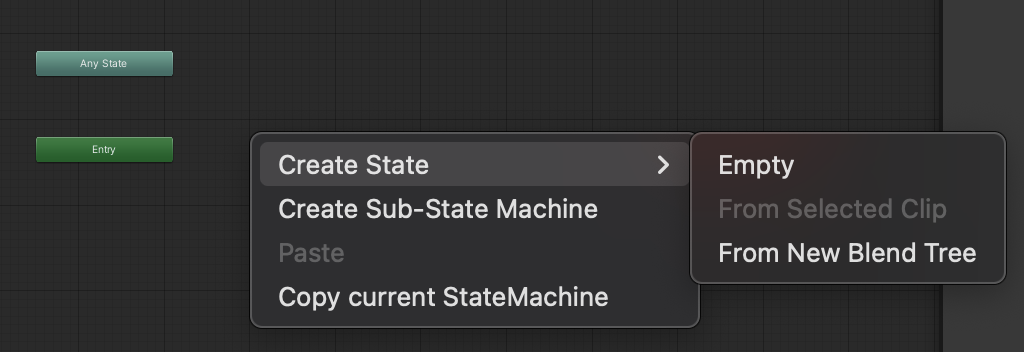
The first state created on a layer is special - it is automatically linked to Entry, and subsequently will be run every single time your avatar is reloaded (for example, when you change worlds). For this reason, I tend to start with an Empty state with no animation attached as that first state - it prevents any sudden flashes of the avatar being in the wrong state while loading in.
Transitions
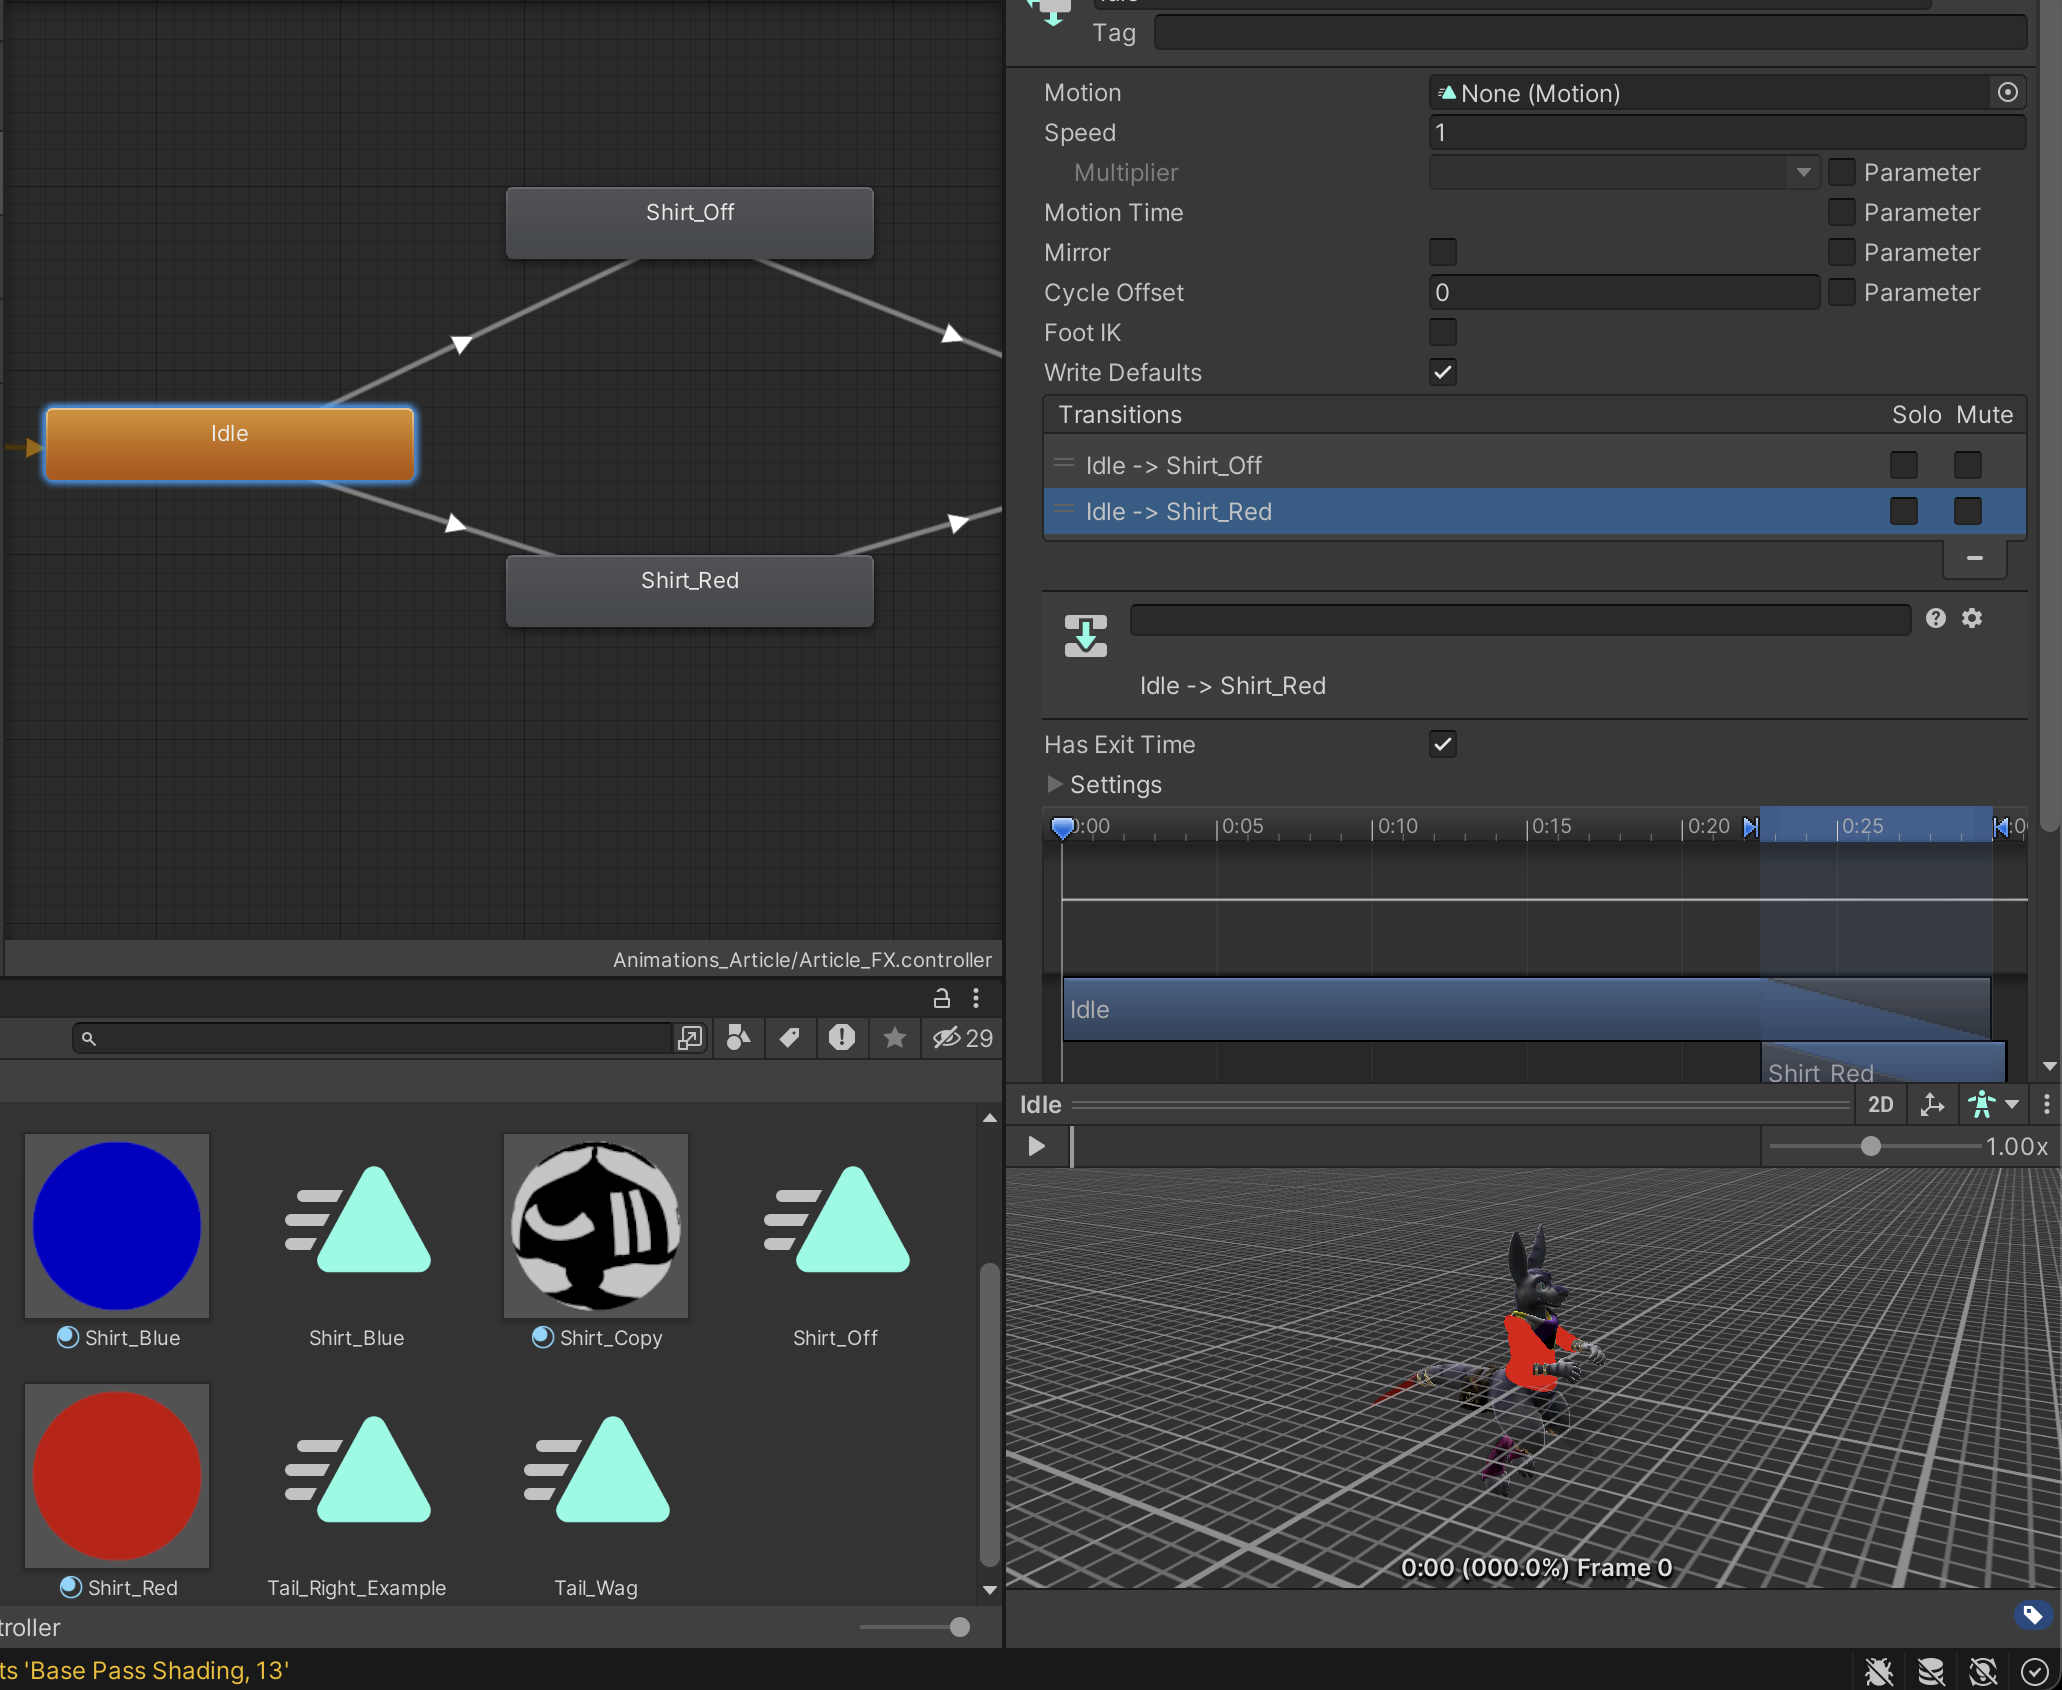
If you right click on the state, there's an option to have it transition to another state. For that, we'll need another state - drag in an animation clip from the Project tab, then right click the empty state (which I've renamed to Idle), and select Make Transition - then click on the destination state to connect the two.
If the inspector doesn't do so by default, click on the source state and then the transition to view the details.
💡
tip
If there's only one transition from a source state (represented by a single arrow), you can also click on the arrow to bring up the transition details. If there are multiple transitions from a single source (represented by triple arrows), then you'll still need to select the individual transitions.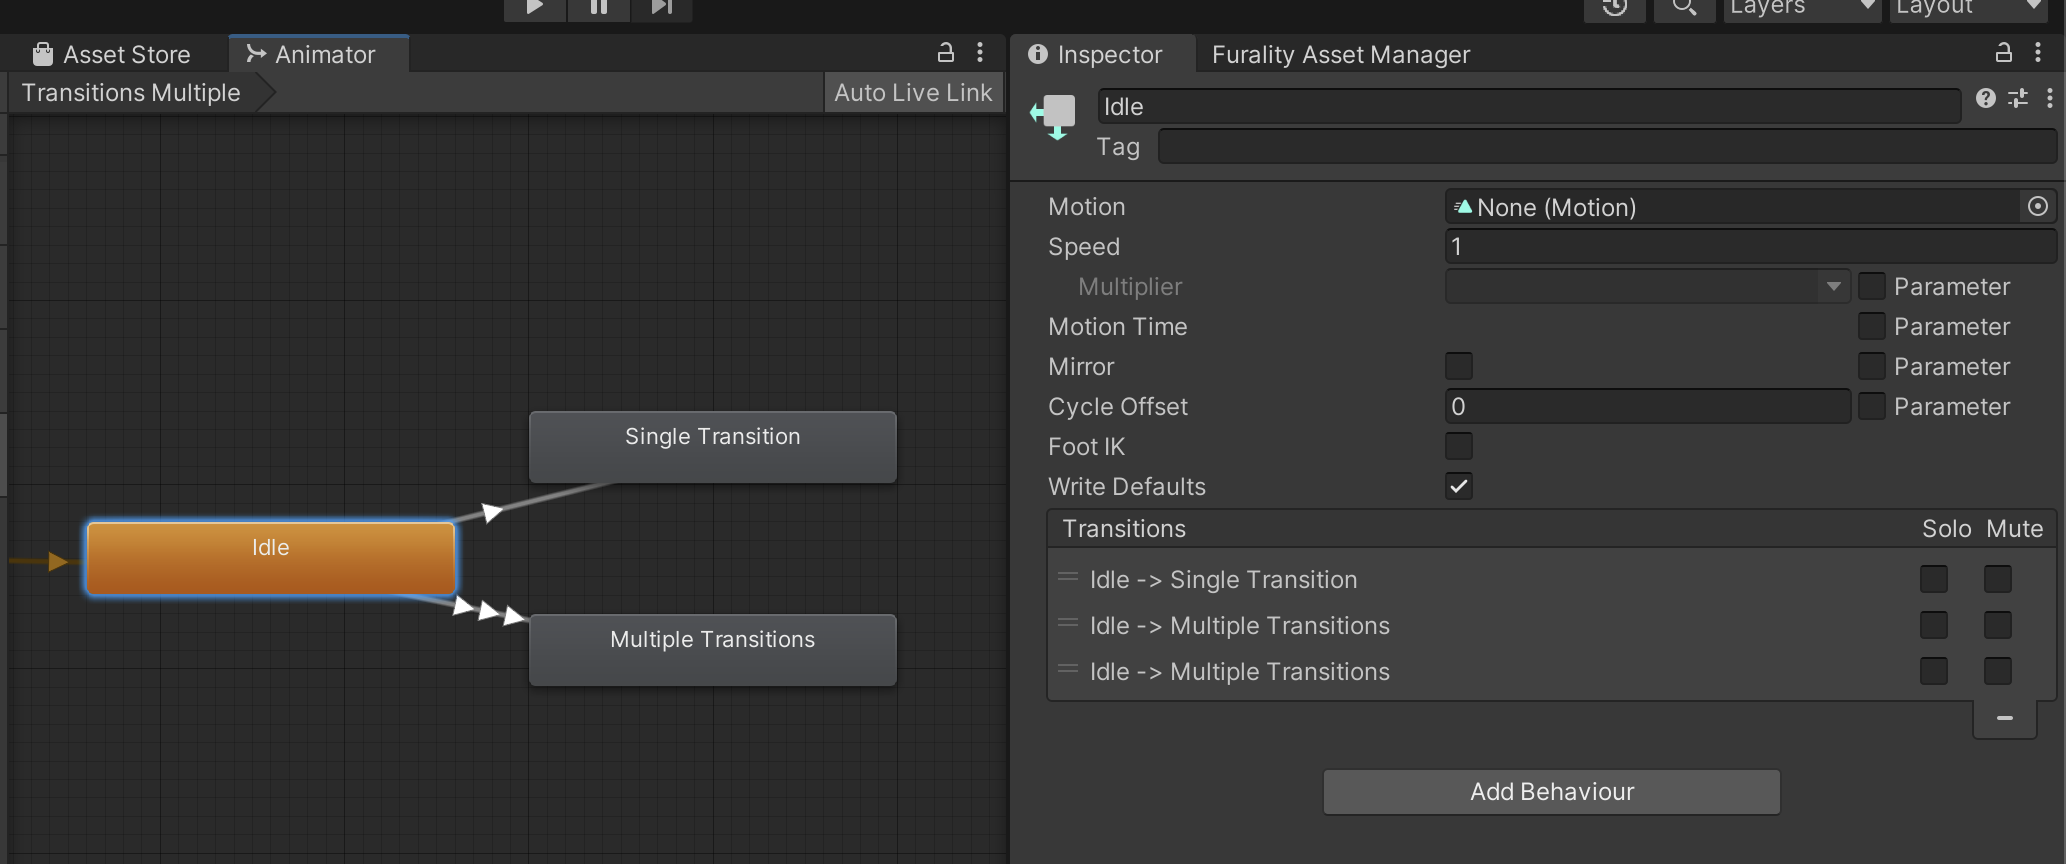
Transitions can be based on time (which is Unity's default) and/or based on conditions. In this case, after 0.75 seconds in the idle state, there will then be 0.25 seconds where the two states are blended together until the animation is fully in the new state.
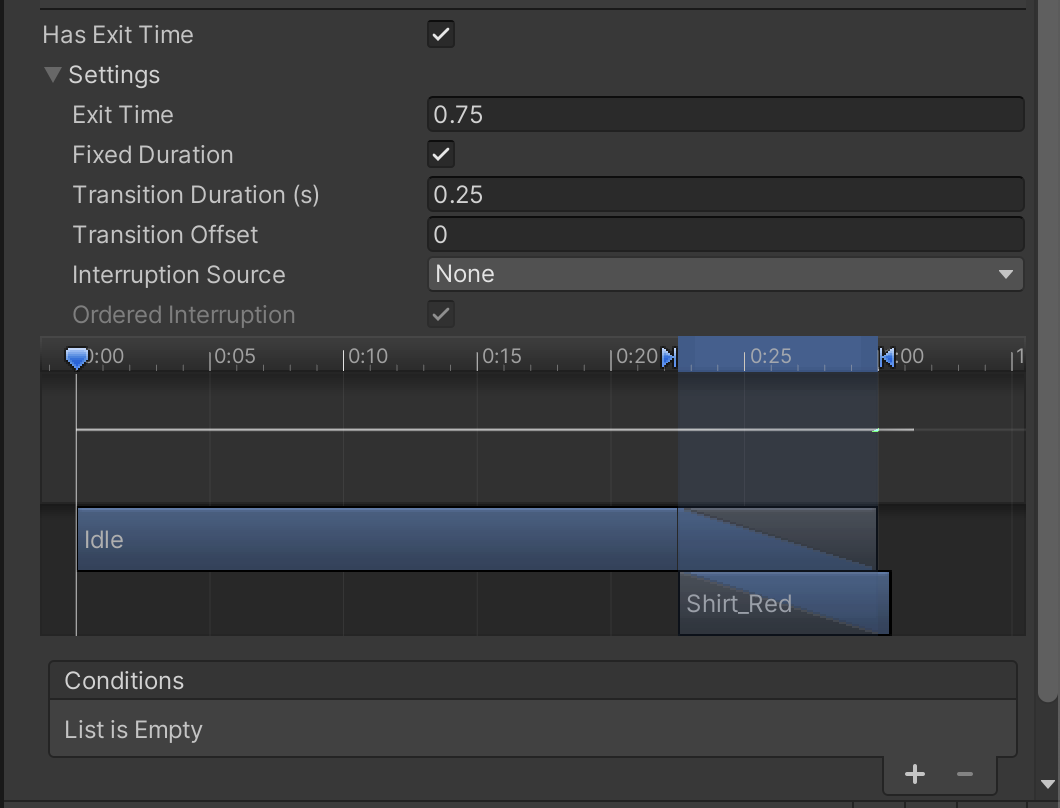
There are times when this will be what you want to do - it makes sense for some transition time to be needed during bone animations. But we want to change a material, and trying to blend those can cause problems - so at least for this example, turning transition time off makes sense.
After turning off the Exit Time as well, we can now see Unity is throwing a warning. Time to fix that.

Animator Parameters and Conditions
Animator Parameters are Unity's way of adding logic for moving between states in an Animator Controller. They are specific to that particular Animator Controller (but you can have a parameter with the same name in multiple controllers, if it should have multiple effects).
Animator Parameters are created in the Parameters tab of the Animator tab, also using the + icon.
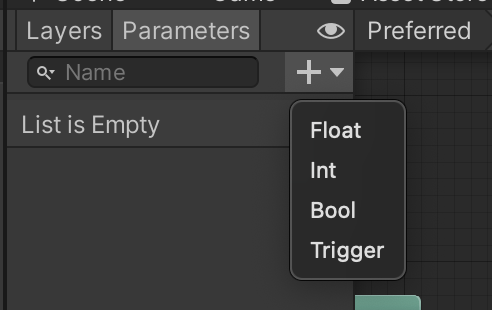
There are 4 different kinds of parameters in Unity. Boolean values (bool), integers (int), floats (float), and triggers (trigger) - bools are a simple yes or no, ints represent whole numbers, and floats represent a decimal number between -1.0 and 1.0. Triggers are not (to our knowledge) used by VRChat, we don't know anything about them beyond what's implied by the name, and they will not be mentioned again here.
Bools are good for simple toggles and yes/no questions.
- "Is someone booping my snout?"
- "Do I want to have my sunglasses on?"
Ints are good for more complicated distinct states.
- "Do I want to wear my red shirt, my blue shirt, my green shirt, my purple shirt, or no shirt at all?"
- "Which tail wag animation should be playing?"
Floats are good for being able to precisely dial something in.
- "What exact hue should I be?"
- "How intense do I want my AudioLink to be?"
- "How fast do I want to dance?"
In this case, I want to toggle if my avatar's shirt is shown or not. I could create a bool for a simple animation that enables or disables the shirt's GameObject - or if I had multiple different shirts, I could have an int and have a different shirt on each number with 0 being off.
For the purposes of this article, I'll use an int.
After selecting int in the + menu, give it a relevant name - in this case, I'll use ShirtState.

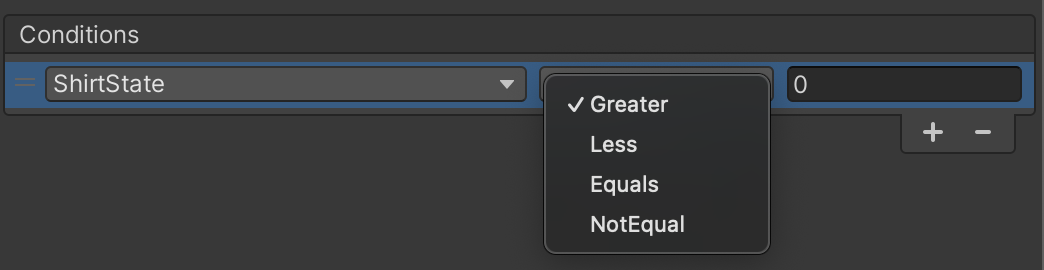
Click on the Layers tab, and then the layer we created with the animation clip already added. Select the transition, scroll down to the bottom, and click the + under Conditions - then fill in the details. In our case, I've decided that this animation will be given the value of 1, so Equals makes sense as the dropdown.
There are a couple of slight problems here:
- There is no way of taking the shirt off once it's on.
- This isn't actually hooked up so that it could work in VRChat.
Let's look at the first one first.
Layer layouts
Creating another transition just follows the same process as the first one - right click, Make Transition, click a destination, change the time, add a condition. So we can create a transition back from our Shirt_Red state to a state that turns the shirt off.
💡
tip
To use an existing transition as a starter, right click on the transition in the inspector view, and select "Copy Transition Parameters". Right click on the new transition and click Paste Both to save it - and then just change the condition.
The issue is where that destination state should be. Here are some different ways of laying out layers that we've seen in other avatars.
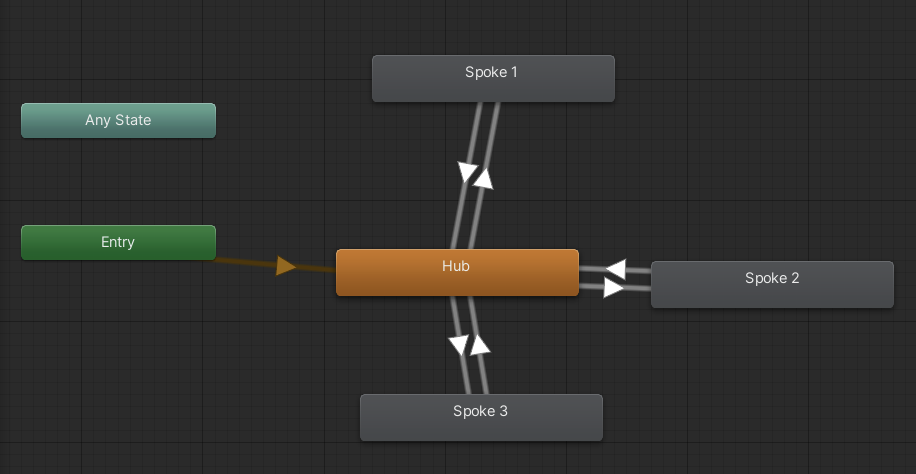
Our preferred layout is this; it keeps things very simple; only ever one transition to and one transition from. It's not always possible, but it guarantees a reset. The transition from Idle always has the condition of "equals (number)", the transition to Exit always has the condition of "not equals (number)".
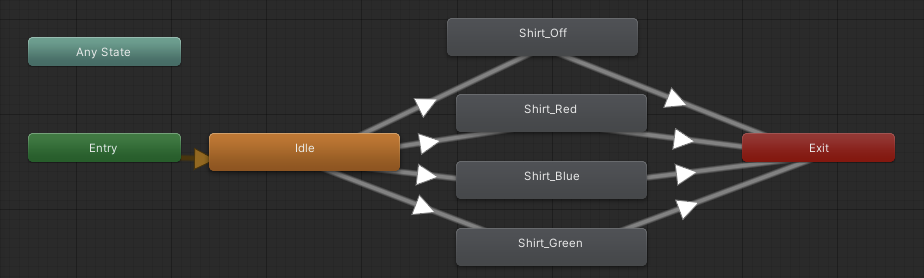
Much like Entry, the Exit parameter is special and will cause it to start a new instance of the loop. In this example, if I change from Red to Blue, it will go to exit, start the loop over, go to Entry, go to Idle (which is blank), and then from there go to Blue.
This sort of layout does mean that transition times need to be carefully checked, as there can be a significant delay between changing an option in the menu if they're not, but it's conceptually simplest for us in most cases. (Though for a bool, the two states going back and forth with each other is fine)
The main thing to do is avoid any situation where your animator hits a dead end (like the "Thy Dungeonman" example does), which VRChat's documentation says not to do.
We still need to make this actually work inside VRChat.
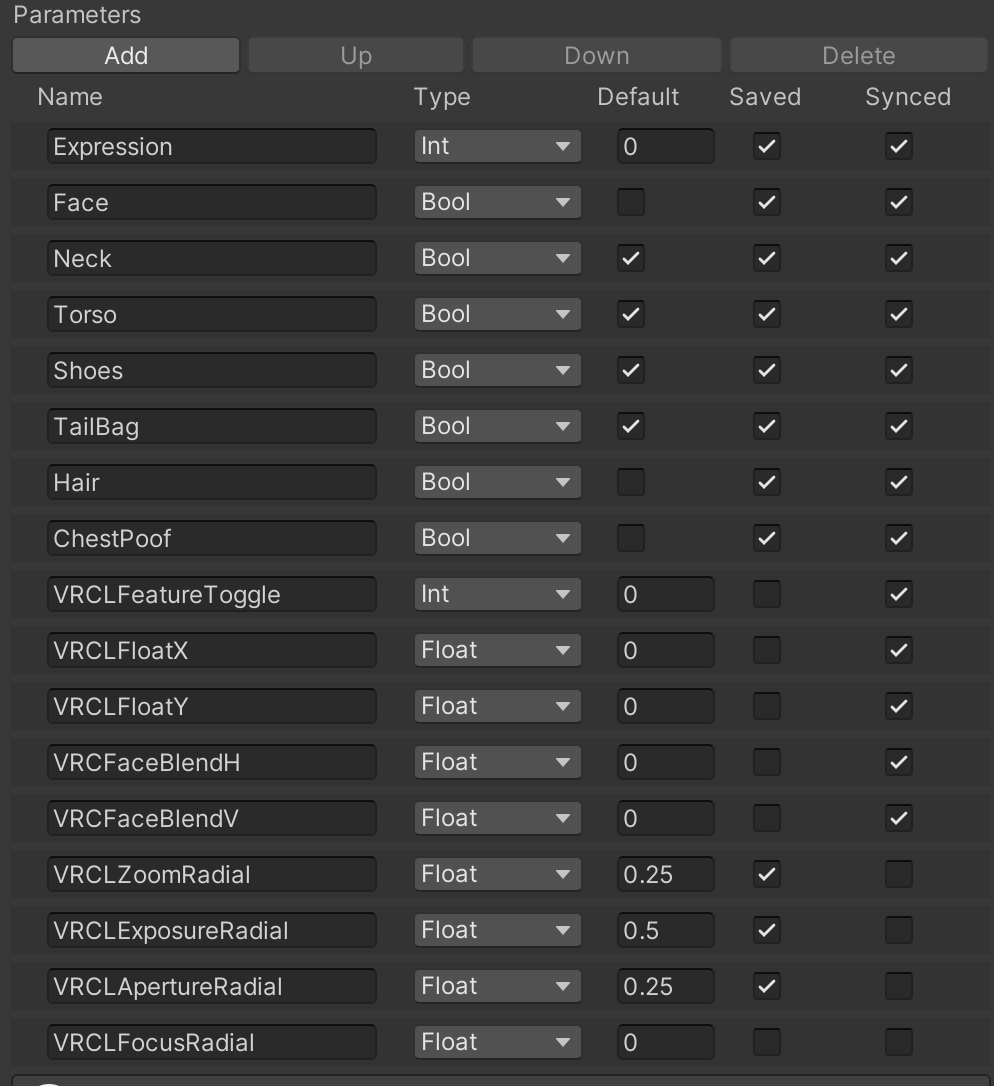
Expression Parameters
Expression Parameters are how variables are handled within VRChat. They are distinct from, but related to Animator Parameters:
- Expression Parameters are synchronized across the network. Animator Parameters are not; they are up to the local client to interpret.
- If an Expression Parameter has the same name (including capitalization) and type as an Animator Parameter, it passes its value through to the Animator Parameter. (If it has the same name but a different type, results may be unexpected)
- Because VRChat synchronizes Expression Parameters very quickly with other players in the same instance, there is a limit on how much data can be stored by them - you can have between 32 and 256 Expression Parameters depending on the types of data stored (ints and floats use more 8 times the amount of data that bools do). Animator Parameters do not have this limit.
Follow the instructions above in [[#Find What You Have]] to check if you already have an Expression Parameters file. (If you have a menu that has more than the default animations, you probably do)
If not (or you just don't like what's there already), find a suitable location in your Project tab, right click an empty space, Create > VRChat > Avatars > Expression Parameters. Then assign to the Parameters slot as was done for the Animator controllers.
Whether new or existing, click on the Expression Parameters to open them in the Inspector - then click on the Add button on top to add a new parameter, and fill in type and the default value. For this example, we know we need an int named ShirtState.
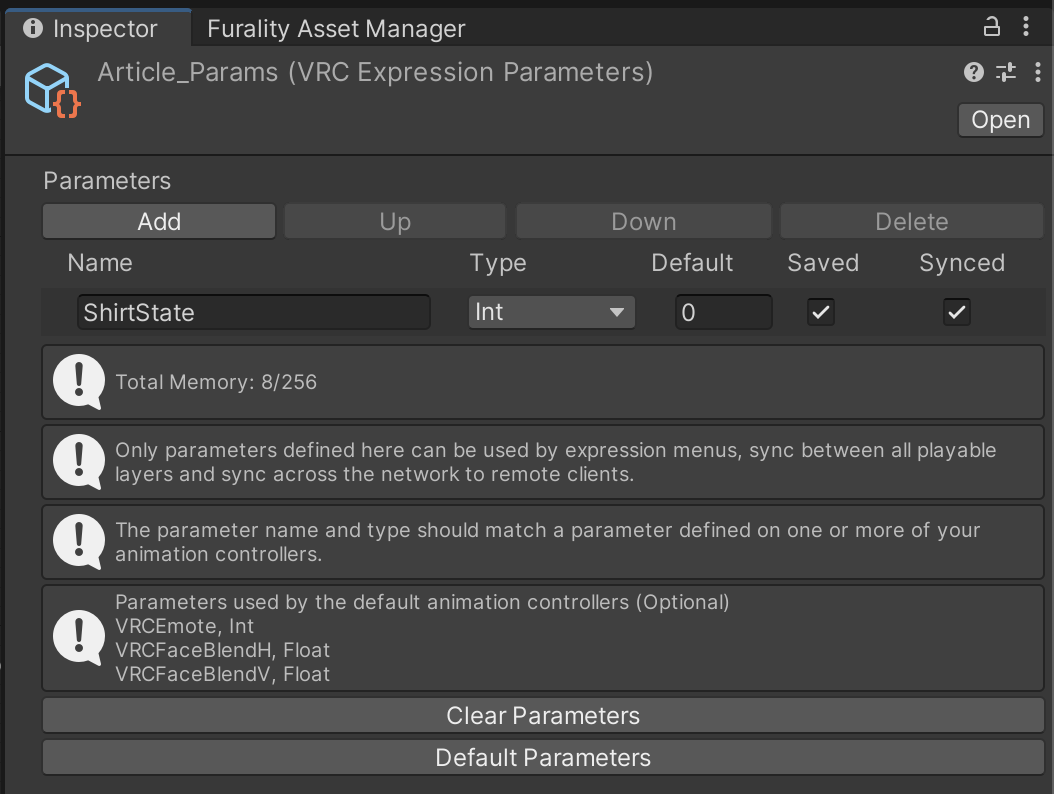
If the Saved box is checked, then any changes will be saved when your avatar is reloaded (e.g. travelling to a different world or instance). If it is unchecked, then it'll be reset to the Default value. (The Default value is also used if the avatar is fully reset).
The Synced box controls if the parameter isn't synced with other players - the main use for this being off is for having something local that you still want to control from the radial menu.
Speaking of the radial menu, we probably need some way to control our new parameter.
Expression Menus
Expression Menus are what's displayed in game on the radial menu or in the expressions section of the avatar flyout. They are the primary way of changing the values of Expression Parameters.
Again, find your existing one, or find a suitable location in the Projects tab, right click > Create > VRChat > Avatars > Expression Menu - and then set it in the slot of your VRCAvatarDescriptor. Then click on it on the Project tab to open in the inspector.
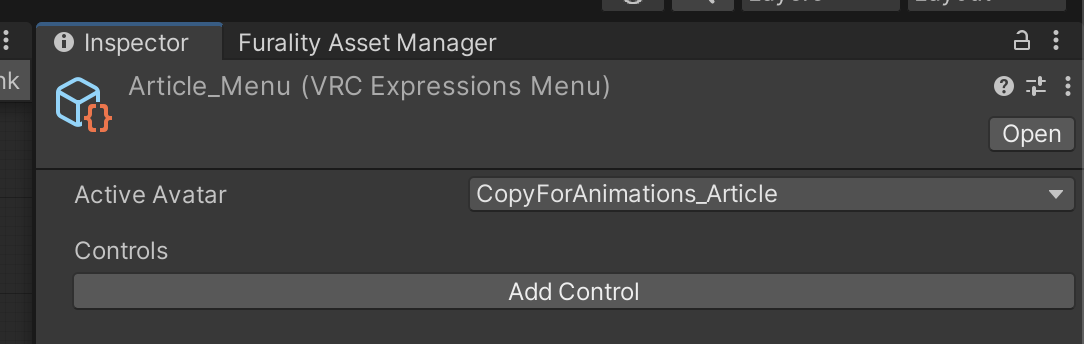
If you have multiple avatars in the same scene, make sure to select the one that has the parameters file applied - you'll only be able to select the parameters that are in that file.
⚠️
warning
If you're working with a system like VRCFury or Modular Avatar that allows the use of multiple Expression Parameters files, only the parameters defined in the avatar's main expression parameters file will be available to select here. Swap the main expression file for the secondary, make your changes to the menu, and swap back when you're done.
Click Add Control to get started adding your first control.
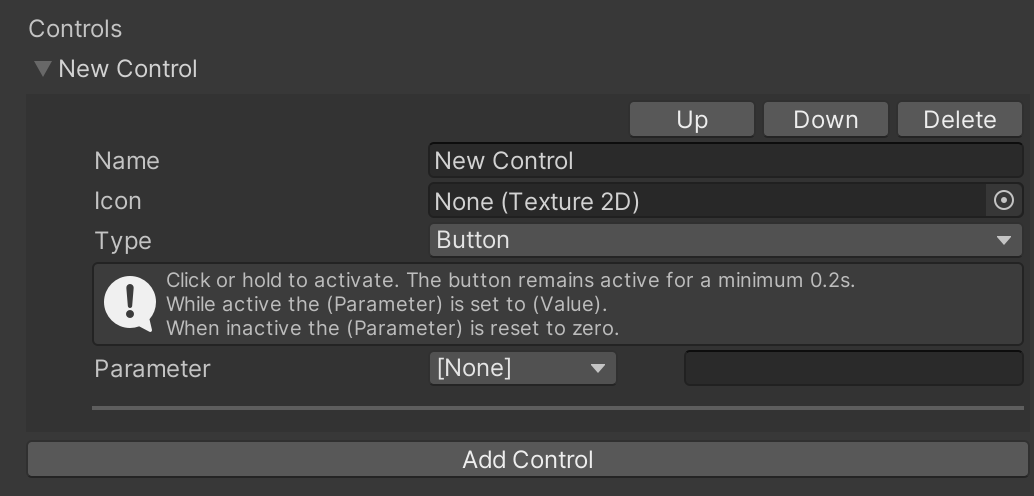
Name can be anything you like; it's how it will appear within VRChat.
Icon can be any type of texture that Unity supports.
When I do custom icons, I like pulling from Mutant Standard's emoji selection. Make sure to use the small ones though; these are still textures and will still contribute to file size when uploaded.
Parameter lets you select from the parameters in the selected avatar's main parameters file.

The Type dropdown controls how the menu item behaves within VRChat.
Expression types - Buttons and toggles
Buttons and toggles are basically the same in how they function - when turned on, they will set a bool to on (or true, or 1, or yes - however you think of it), or an int or float to a configured value.
When turned off, they will set the value to off for a bool, or 0 for an int or float.
The difference is in how they're activated. A button is only switched on when the corresponding menu option is held down. A toggle remains on with a single press - and the only things that will turn it off are either hitting the menu option again, or something that affects the same parameter.
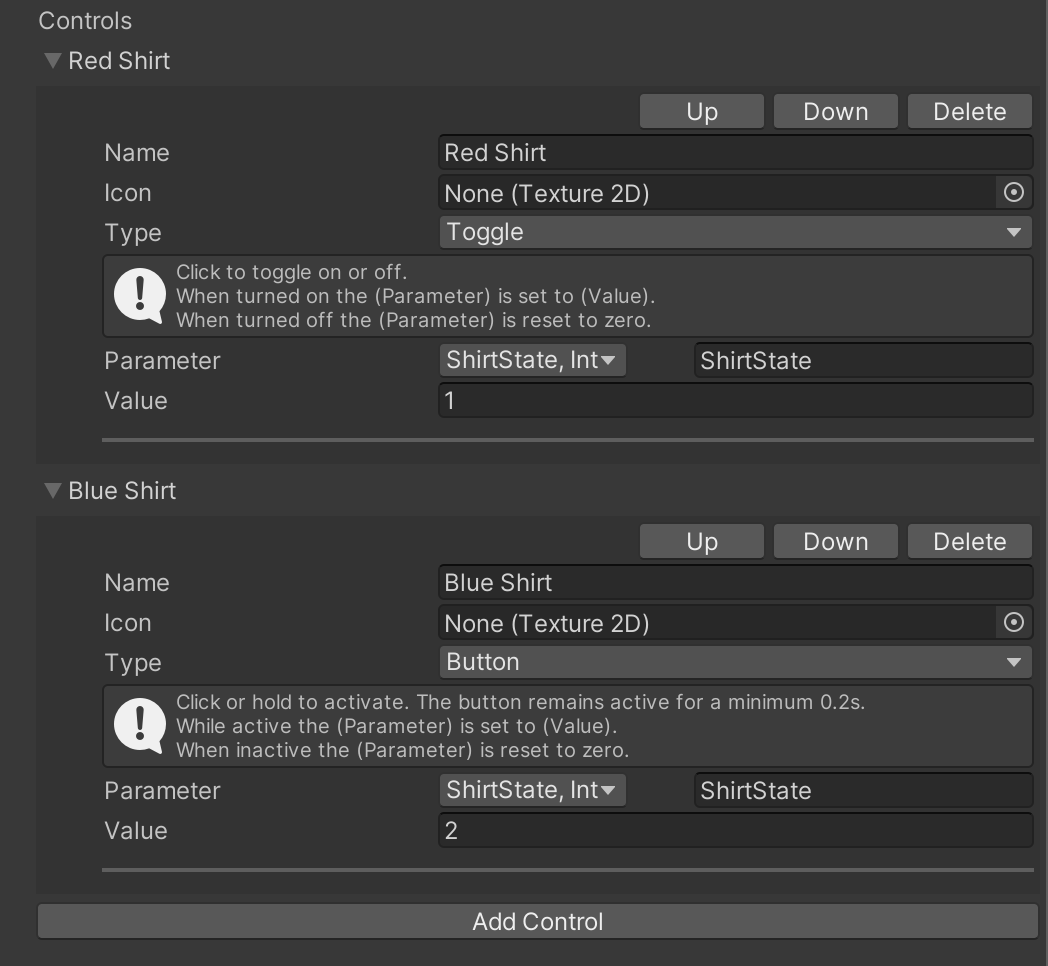
Generally, you probably want to be using toggles. Buttons do have specific uses - for example, GoGoLoco uses buttons to precisely adjust the height of your avatar - but generally, there's less need to set those kind of things up.
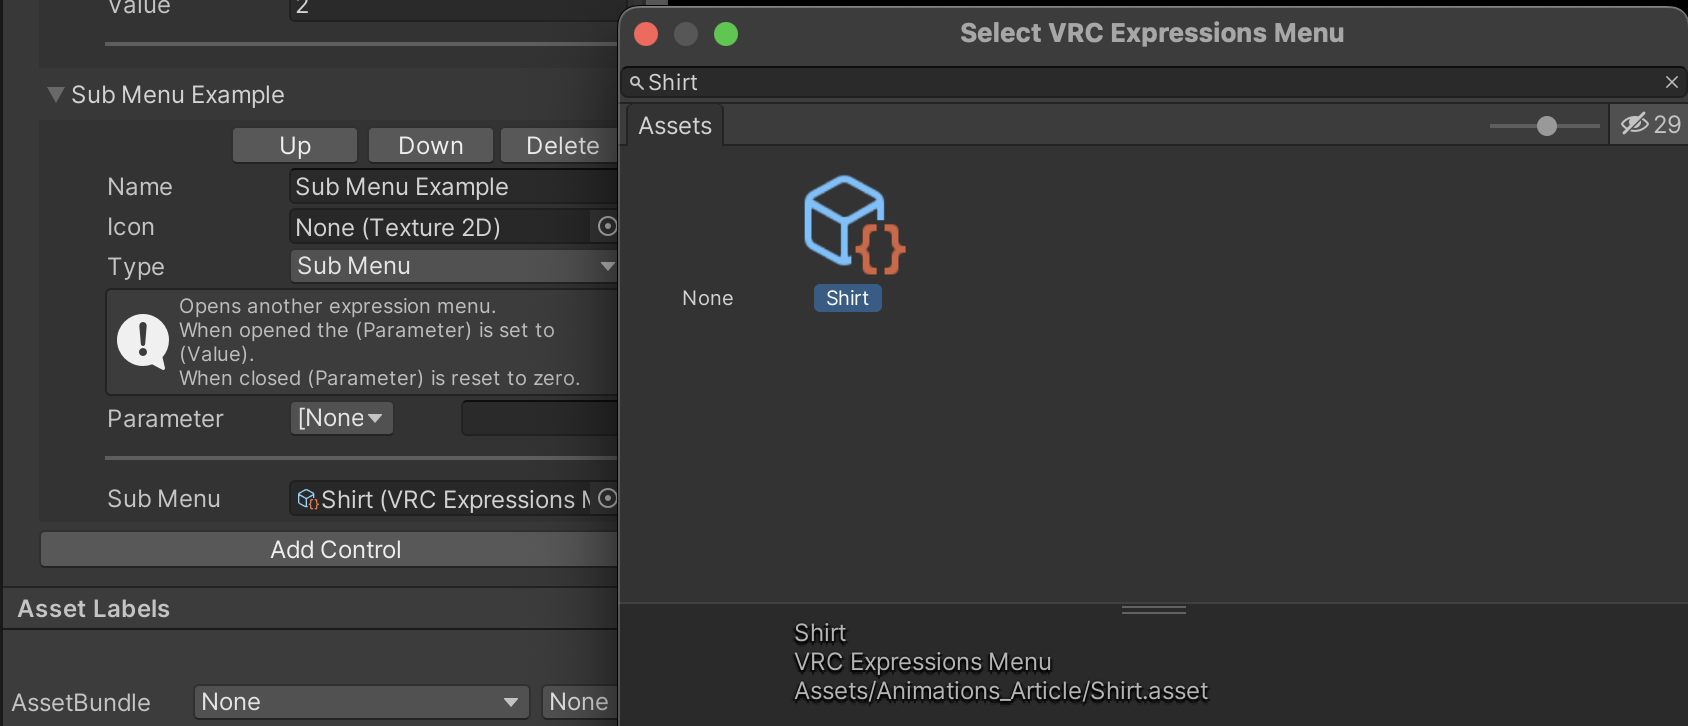
Expression types - Sub Menus
This is a little messy to just have in the root of the menu (you might want to turn other things on or off) - so we can use a Sub Menu to isolate the shirt options.
For these, you do not need to specify a parameter, though it is an option - e.g. you could set the ShirtState int to an option which changes your shirt to say "I am playing with my menu instead of listening to you".
All you really need to do is select another menu. This can be a menu you've created, or it can be the VRChat default emotes menu if you like doing a backflip.
Create a new menu file named Shirt, fill in the controls in that file - and then on the original menu, create a Sub Menu control, and click on the ⊙ icon next to Sub Menu to select it.
Part 2 - Part 1 Over
And now you're ready to upload and test.
That was a lot to go through to add a couple of buttons. As I said before, the main reason to do this over using a system like VRCFury is if you need a lot of control.
If all you need is a basic toggle, you can stop here.
But you might have noticed other options in the types menu that you're curious about, or want to do things based on your voice.
If so, take a break, and read on. The next parts should hopefully go faster - though there will be significantly less images.
Part 2 - Part 2 - Sliders and Yelling
Let's look at some options on another avatar - the Pixel Yinglet by Avi has a lot of customization options even in the public version.
The buttons and toggles seen so far wouldn't work too well for these.
How would we make these kind of sliders? Or control it with our voice?
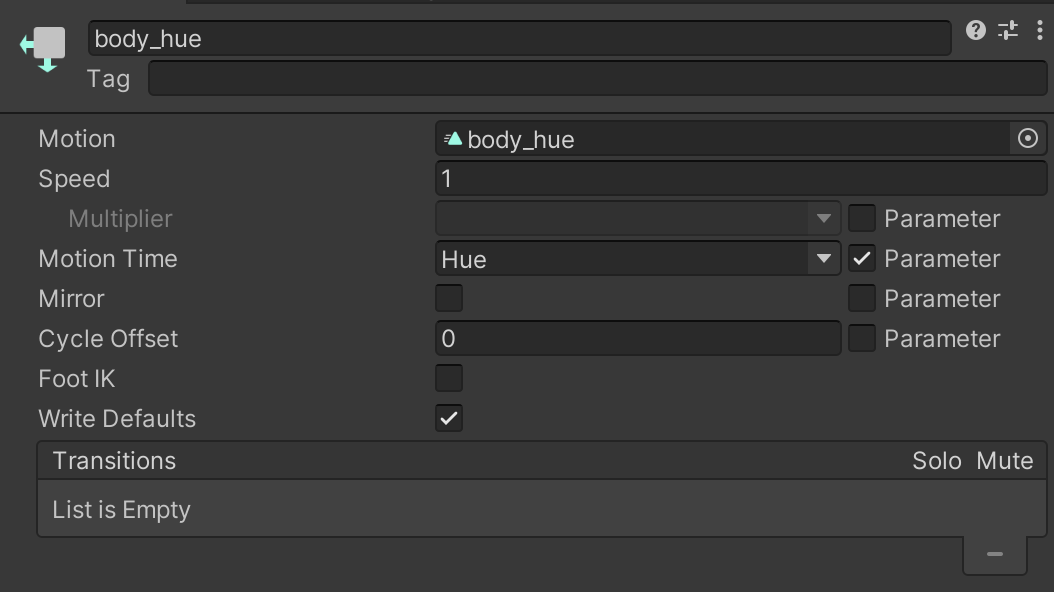
Motion Time
You might have noticed the Motion Time option when setting up an animation in the Animator Controller.
This allows for taking a float Animator Parameter (remember, any decimal value between -1 and 1), and progressing the animation based on the value - when the float is 0, the animation shows at whatever's configured as frame 0 - when the float is 1, the animation would be at the end of the timeline.
In this case, I've created a float Animator Parameter named Hue. I've created an animation using Poiyomi's Hue Adjust, as discussed in the previous article.
I can then add that Hue Animator Parameter to the Motion Time.
We need a way to control Hue in game. Buttons and toggles can't really give a smooth slider the way the Pixel Yinglet has it set up. You could technically create a toggle for 0.01, 0.02, 0.03, etc. - but this wouldn't be particularly practical, especially with a limit of 8 controls per menu.
Radial Puppets
In the Type drop down menu in the Expression Menu, you might have seen the Radial Puppet type.
Radial Puppets are a way to smoothly control the value of a single float.
Similar to Sub Menus, the Parameter field isn't the main one we want here - instead, we want to set the Parameter Rotation. This corresponds with the rotation within VRChat.
But that's not the only way to control an animation like this.
VRChat's Built In Parameters
VRChat contains a number of built in Expression Parameters. You do not need to add them in your Expression Parameters file, they do not count for the limit of 256 bits of user data, and they are only for VRChat to change and modify, not you.
However, by creating an Animator Parameter with the same name and type, you can still read them. In this case, if you create a float with the name Voice, and then swap the Motion Time to Voice, then it will work based on volume rather than the Radial Puppet.
Part 2 - Part 3 - The Boop
Have you ever been in an instance and someone's asked you to boop their snout? For some avatars, maybe they blush, maybe their eyes turn to hearts, maybe they stick out their tongue, maybe their tail glows. You choose the animation that plays - we're just interested in looking at the background behind why it works.
Contact Receivers
VRChat has a whole system of Contacts Senders and Receivers. You attach a Receiver component to the part of the armature you want to receive input (in this case, the head), and specify what senders should interact with it - and crucially, a parameter to be activated when it does.
The Tropical Kangaroo used as an example earlier already has this set up, so for this example, I've just made it visible.

We're not going more into details about these here, but they are good for this example.
If the animation you want to control with the boop isn't controlled any other way, then just create it as you would a normal layer.
But what if you did something that was already used by other things, and wanted to resume those other things once the boop stopped?
The Any State
You might have noticed on the Animator Controller examples above the node called "Any State".
The Any State is a powerful way to interrupt any animation on that layer when its condition is true.
Any animation, including the one it's trying to branch to.
What this means is that with a simple condition (like NoseBoop = true), the controller will continuously loop from the Any State to the resulting state, every frame where that continues to be true, which will likely tank performance for anyone around you.
We can fix this by using additional conditions - Unity will only allow for switching to a new state if all conditions are true.
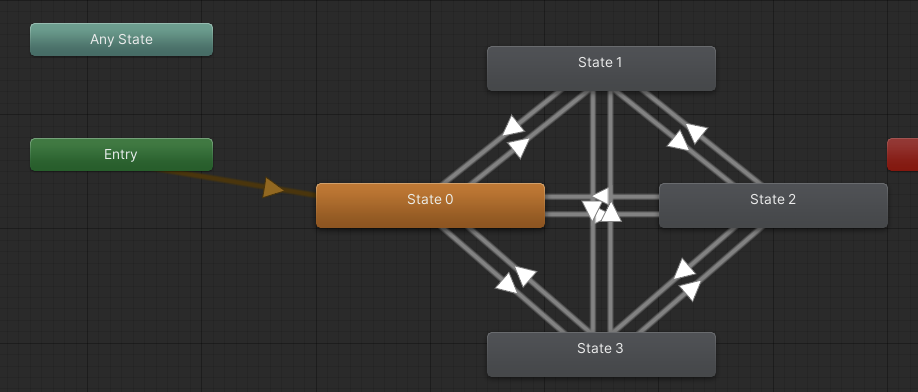
Here's an example from my older avatar - with a tail that flashed in different ways based on various conditions, including being booped.
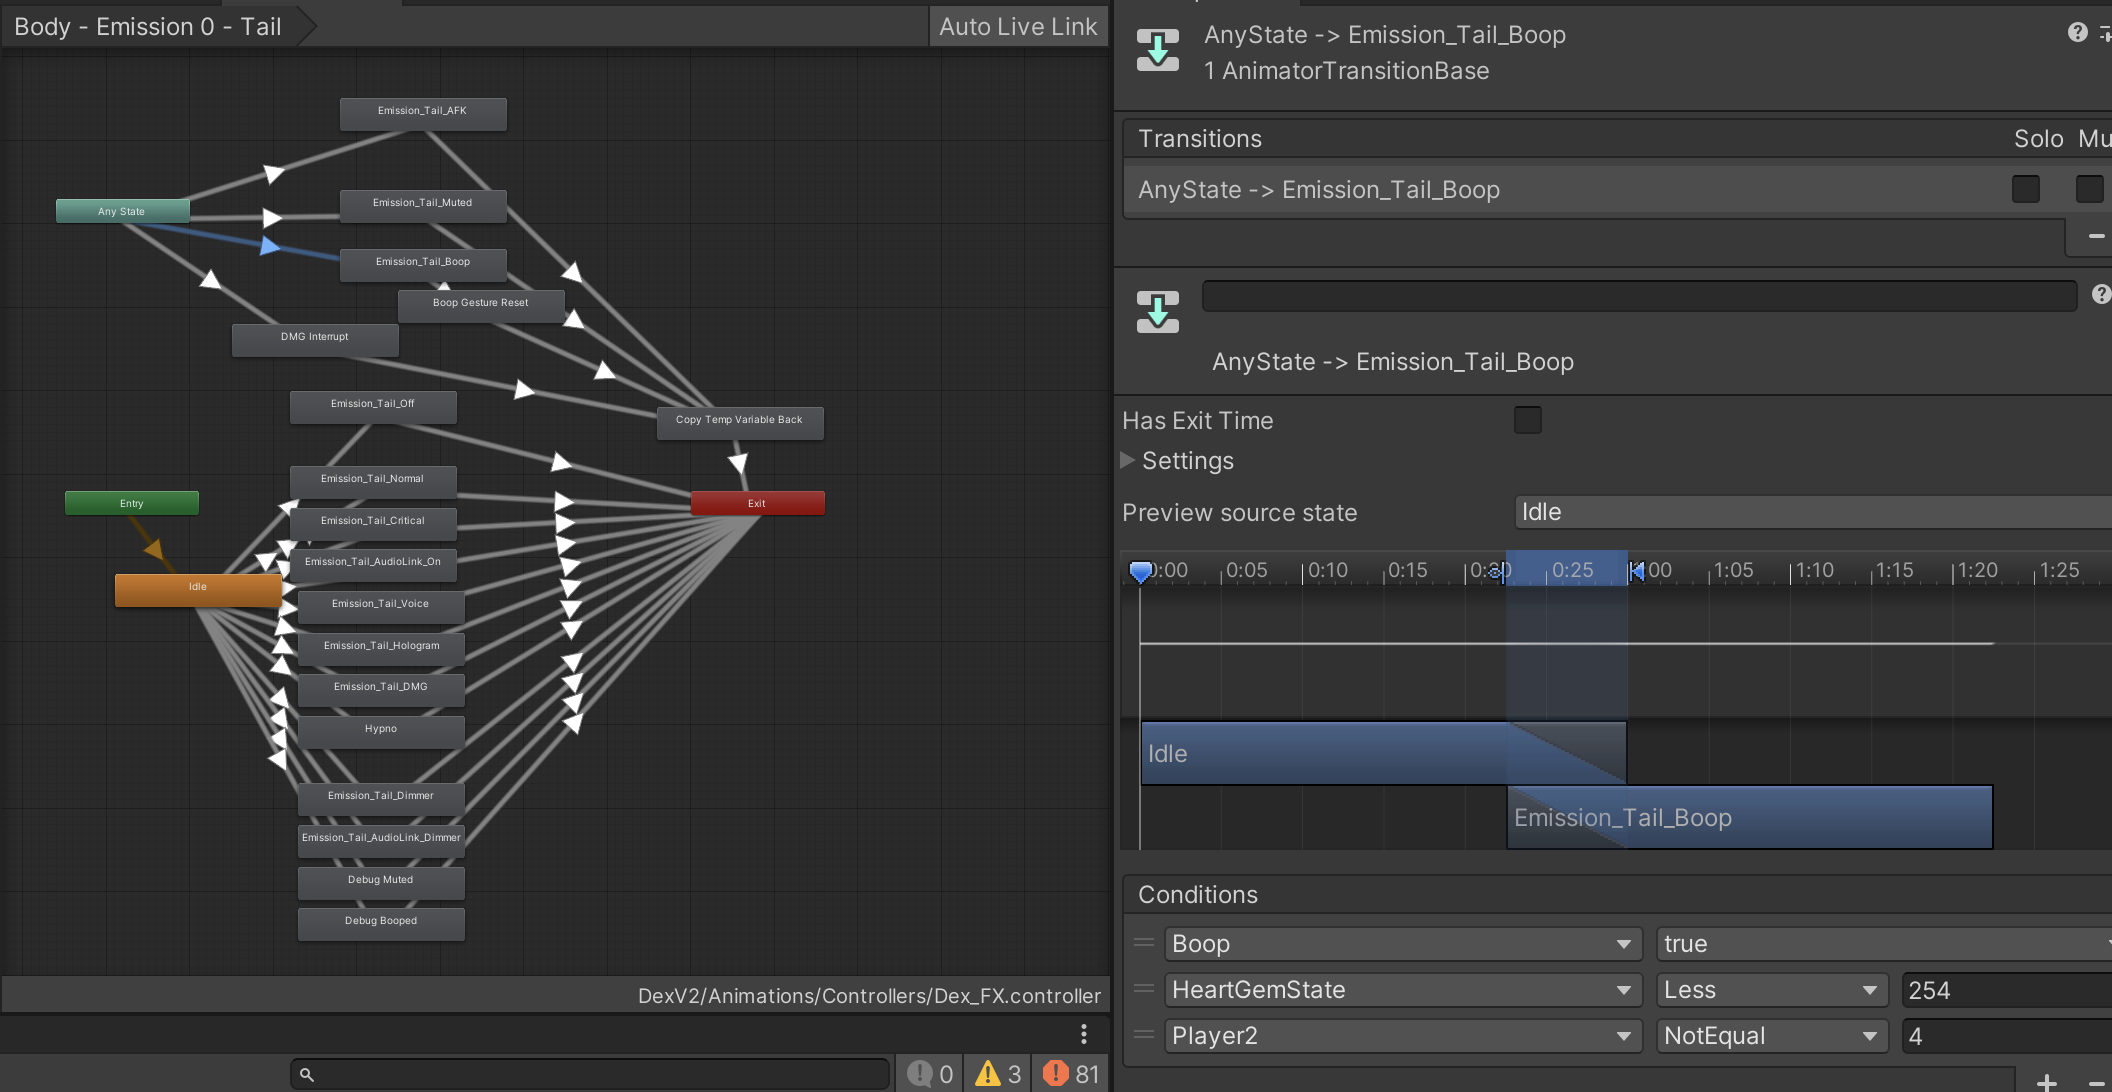
To stop the loop of Any State > Emission_Tail_Boop > Any State > Emission_Tail_Boop > ...., in this case we need HeartGemState to be greater or equal to 254. (For context, each of the states in the bottom half of this diagram sets it to 0, 1, 2, 3, etc.)
State Behaviours and VRC Avatar Parameter Driver
Each state on an Animator Controller can have one or more state behaviours attached; modifiers that change what happen when that state is processed.
VRChat provides several of these, allowing for things like turning off tracking during certain animations (you probably don't want your real legs being tracked when you're trying to sit in a virtual only chair) - and importantly for this, setting animator parameters.
To add this state behaviour, click on the Add Behaviour button, and then search for VRC - and select VRCAvatarParameterDriver.
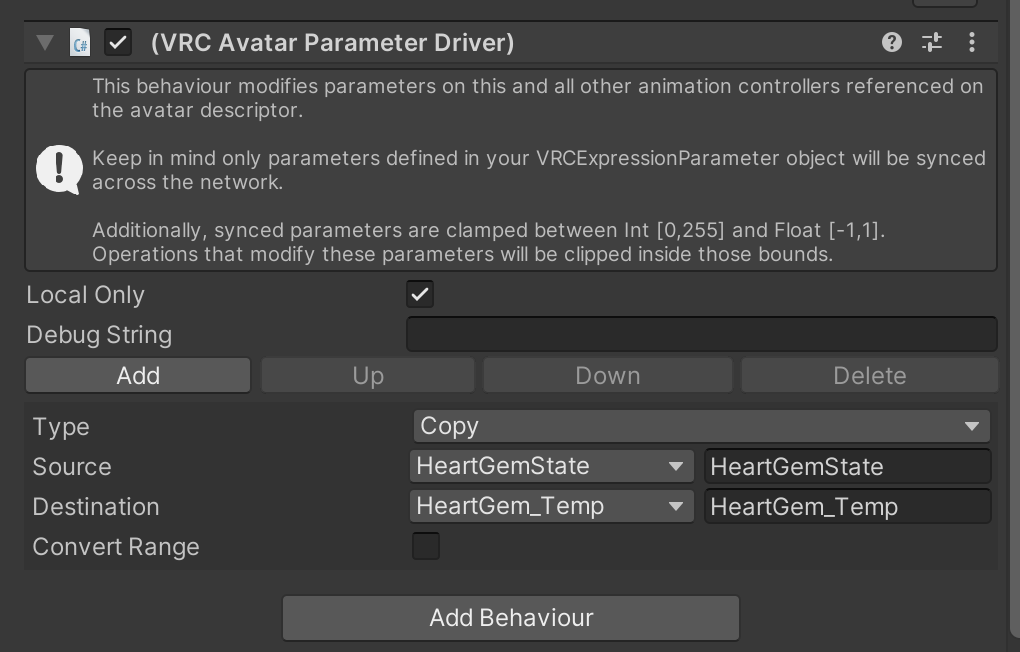
In the example above:
- The "Idle" state copies the current value of
HeartGemStateto an animator parameter calledHeartGem_Temp. The latter parameter doesn't exist outside of the Animator Controller - it isn't synced. - Once a boop is started, the "Expression_Tail_Boop" state sets
HeartGemStateto 255 - stopping the loop with Any State. - Once a boop is finished, the "Copy Temp Variable Back" state copies the current value of
HeartGem_Tempback toHeartGemState- the new value of which is then synced back across the network. - The loop then exits so it can start again back at Idle and resume whatever the previous state was.
Part 2 - Part 4 - Other Bits and Pieces Mostly Out Of Scope
A lot of stuff here is provided for more research purposes only.
OSC
Open Sound Control is a protocol originally designed for musical equipment to talk to each other (hence the name). VRChat has full support for it, allowing from reading from any parameter, and writing to any parameter that you've set up.
There are a lot of creative uses for this. Here are some examples:
- You can have a keypad on your phone or Stream Deck that automatically sets avatar presets.
- If you're a streamer, you can allow chat to control various aspects of your avatar.
- You can (probably) make the lights in your room glow as your avatar does.
- It forms the basis of VRChat's community eye and face tracking modules.
- You can write a script that randomizes some parameters on an avatar every few seconds.
A Brief Note on Parameter Optimization
As mentioned above, you can have between 32 and 256 Expression Parameters depending on their type - there are 256 bits of data available, bools use 1 bit, floats and ints use 8 bits.
For a lot of avatars, 32 Expression Parameters will be plenty - but if you're using avatar add-ons like VRCLens, GoGoLoco, or the face and eye tracking support, you might want to think about optimizing (or getting a tool that can optimize for you)
For example, with the shirt example from earlier, instead of one int to handle ShirtState, if you only needed four options, then you could instead have two bools - which would save 6 bits.
I generally favour going for the simplest option and using an int for anything with more than two discrete states; it becomes more of a problem to add something in future with multiple bools. You do not want to end up with something akin to CGP Grey's Rock Paper Scissors video(s). But if you're desperate, it's an option.
PhysBones
PhysBones are VRChat's implementation of dynamic bones, allowing for elements of your avatar to respond to movement.
One thing not mentioned in the previous article - there's an IsAnimated box if you want to use an actual animation with them rather than rely entirely on procedural animations. This does decrease performance, which is why it isn't enabled by default
PhysBones can also modify a parameter that can be used in an Animator Controller.
Two-Axis Puppets, Four Axis Puppets, and Blend Trees
Blend Trees allow for combining multiple animations based on the state of one or more Animator Parameters.
For example, you might have one animation that moves your tail from side to side, and one animation that moves your tail up and down - and equivalent Tail_Horizontal and Tail_Vertical parameters. A Blend Tree would allow for combining those together.
Two-Axis and Four-Axis Puppets allow for controlling multiple floats from inside VRChat at the same time, so could control these to point your tail at a diagonal angle. Two-Axis tends to be used for situations like this, Four-Axis might be used for an emotions slider (with Happy, Angry, Sad, Joyful parameters, as one example).
Write Defaults
Write Defaults (also known as WD) is one of those Unity settings that is frequently misunderstood. It is a big reason why sometimes adding a new option can randomly cause other things to break.
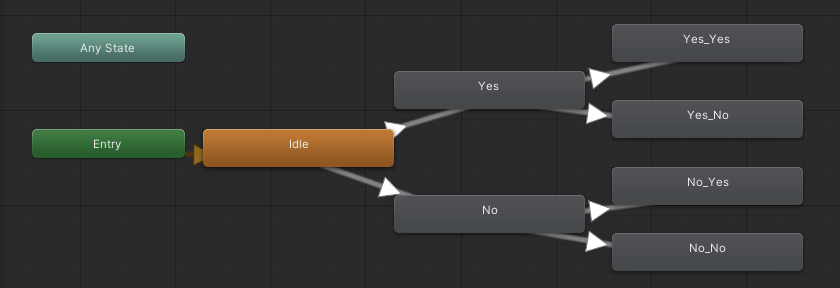
Our initial (incorrect) interpretation of Write Defaults was that it would write back the state of an animation to the default. For example, if we bring back this example from earlier....
Let's say that Yes animates the LeftArm bone, and Yes_No animates the RightLeg bone. Our expectation with WD enabled was that both LeftArm and RightLeg would be moved, but that isn't correct.
What WD actually does is reset the things controlled by that layer that aren't being actively animated - so in this scenario, as soon as it changed to Yes_No, the default position of LeftArm would be written to it.
This is another reason for keeping the amount of things changed by each layer relatively low. (Remember, multiple layers can be keyed to the same parameter!)
The main thing about Write Defaults for VRChat is that WD on and WD off generally shouldn't be mixed together, save some specific circumstances mentioned in VRChat's documentation.
VRCFury will attempt to auto fix this if it's enabled and detects it... though this has a tendency to cause its own problems.
Quest, Android, and iOS support
Full details on mobile support are out of scope for this article, but due to the stricter requirements, you will probably want a second, simpler set of Animator Controllers that only do what they can.
The important thing when doing this is to keep the same Expression Parameters file even if the mobile version doesn't have the equivalent Animator Parameters - otherwise the two versions may drift out of sync.
...or just use an Impostor.
VRCFury Revisited
This article begun as a potential way to avoid VRCFury's Toggle component, and i hope I've illustrated that it (or similar things) are more often the correct choice.
But as alluded to earlier, the two don't need to be in conflict.
VRCFury can pull in entire Animator Controllers, Expression Parameters, and menus. It'll do things like automatically making submenus if there would be more than 8 items in a single menu, it will optimize parameters to use the minimum amount of space, turn some Animator Controller layers into Blend Trees which apparently works slightly better with VRChat for performance reasons.
Part 2 - Part 5 - Was It Worth It
I hope through this you've seen why I just recommended VRCFury as a starting point in the previous article.
The truth is this - it's interesting to see how far you can push things and I would never want to discourage anyone from that perspective.
But at the same time... it's worth thinking about how much you need to do.
When I got my first avatar that felt like me, I went overboard. Let's bring back a screenshot above for a second:
This wasn't the only layer on this avatar like this; entire systems for random tail wags, how the tail glows, a multitude of materials, jokes intended as one offs. Each animation created manually. An OSC dashboard to invoke multiple features at the same time. Submenus upon submenus upon submenus. And it was mostly all cool, and we learned a lot!
...but we'd also sometimes have to apologize for the tail clipping through people at random. Some worlds really didn't like the tail emissions, hurting friends to look at until I turned them off. And that amount of submenus makes it hard to find what's important quickly.
When a friend offered to make modifications to a base they love for us, we started making a map of all those submenus. Plans to port things over slowly, until there was feature parity. And... we just didn't.
Partially, that's the executive dysfunction.
Some things had become redundant - with getting full body tracking in the intervening period, I could shake a purely PhysBone driven tail properly [2].
But mostly, it was just from figuring out that we didn't need all of that. It is nice to show off cool features to friends, but most of the time, the cool thing we want to show is just a shader effect and doesn't require anything too complex on the controller side. We like keeping things small and simple now; a couple of outfits that we use all the time; a club fit for when Furality rolls around, and maybe things to tease specific friends here and there. And VRCFury handles all of these cases just fine.
VRChat is a social platform. Unity is not the most social of experiences, unless you're streaming everything you're doing. And your friends are generally logging in to see you, not your randomization system. [3] There are circumstances where going above and beyond makes sense - for example, if you're a base creator, then more features might be helpful as something to market in your FurHub booth.
As with everything, all things in moderation.
footnotes
My suspicion is these still might be possible without manually editing an Animator Controller, but we're not experts in VRCFury either. ↩︎
Case in point on executive dysfunction - I still need to figure out a way to use full body tracking with the newer headset. ↩︎
It might be different in Resonite from the collaborative building aspect. ↩︎